LumberJocks Woodworking Forum banner
124K views 254 replies 116 participants last post by  cabinetmaster  
#1 ·
Cabinet Scrapers Exposed!

The buzz about scrapers…

Lately, talk of the cabinet scraper and the frustration that this little tool inflicts on a character has created some buzz in the LJ community. This simple, inexpensive, and very effective tool also frustrates me, but for a different reason. I see many people missing out on the joy of using this tool because they are fed too much information that clouds the simple truth.

On the other hand…

On one hand I appreciate the histories and detailed accounts of filing, honing, burnishing, and turning the burr. On the other hand, the cabinet or card scraper is made overly complicated.

When I share my method of sharpening a cabinet scraper with other woodworkers, I am most often discounted and pooh-poohed. It's near heresy because it is not mystical and complicated enough. It does not support the shroud of mystery around some lost art of the craftsman which elevates him to the level of mythical proportions.

Pulling down the shroud of mystery…

There is always more than one way to perform tasks in the shop, but here is how I sharpen my scrapers. This post may look long but it is more photos than text.

Here is a look at the collection of scrapers that I use almost everyday that I work in the shop. I use them quite often in my remodeling as well.

Cabinet Scraper Collection

I have no preference of any of them. They are different sizes but they are all basically the same thickness, about 1/32" thick.
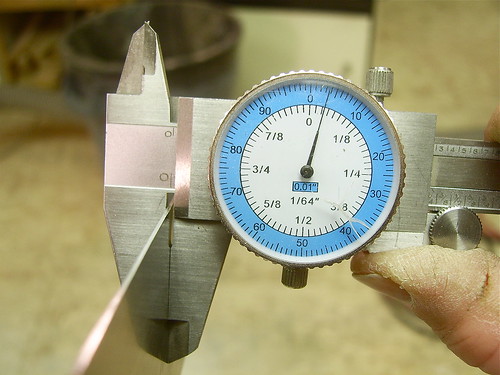
Cabinet Scraper Thickness

There is one card that is thinner which gets used the least. I have enough control of the thick scrapers to perform some of the finest work on veneer and inlays. Here I display the difference in the thickness of the scrapers.
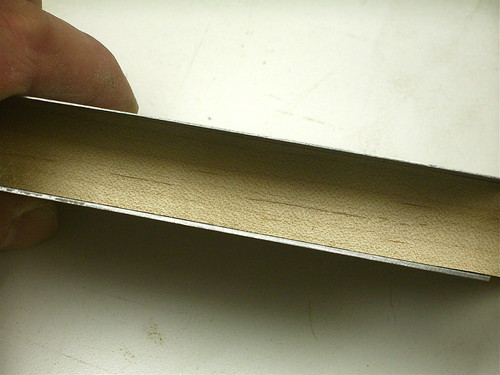
Various Thicknesses

Workflow and sharpening…

When I am working at the bench and need to use my scrapers, I leave my mill file clamped in the bench vise just like this.
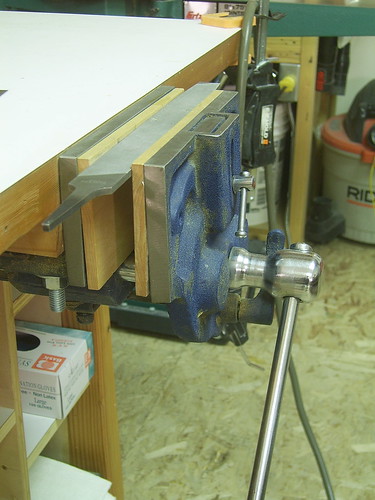
Sharpening File

I will scrape my project on one bench and then turn around to the other bench to stroke the card a few times to whip it back into shape. I do not use a jig, I simply hold it by hand at a 90 degree angle on the file. To sharpen I stroke it the full length of the file 3 to 4 times, that is all that is needed. Then I flip it and do the other side. This is exactly how I hold it.
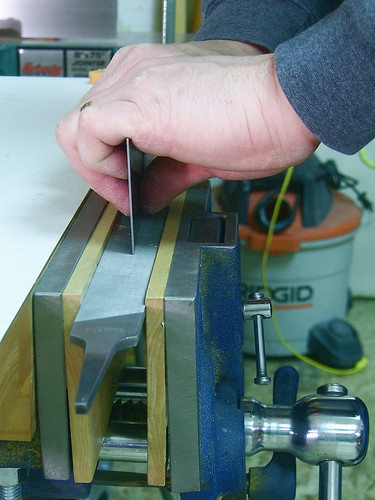
Sharpening The Card Scraper

Here is a tip…
One thing I find important is keeping the file clean from the file shavings. I keep compressed air handy to blow off the file. You can feel if the shavings roll under the scraper, this is a sign that it needs to be blown off.

What's your angle?

The easiest way to find the working angle is to hold the card at 45 degrees to the surface. Then stand it back up toward vertical a little more, no more than 1/4 to 1/3 the distance. I don't get hung up on the angle in degrees, it is really by feel. You will get the feel of it as you vary the angle and pressure until it starts to produce fine shavings.

Place your thumbs in the center towards the bottom of the scraper. You can use different areas of the cutting edge by moving the location of your thumbs, thereby applying pressure where you want. You may also pull the scraper applying pressure to the back with your fingers.

This is basically what it will look like.
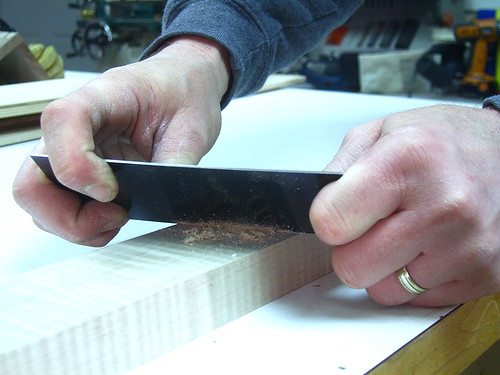
Scraper Angle

Here is another view showing some real cabinet scraper action on a piece of reclaimed doug fir flooring.
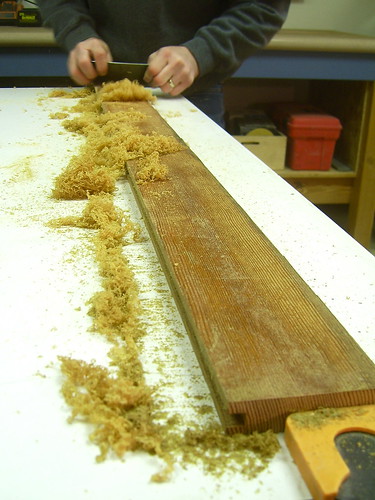
Flooring Sample

Here is the flooring with a good bit of scraping done. This piece of wood flooring had a finish on it and sheetrock mud from a remodel project. The cabinet scraper was sharp enough to cut through all of this and make some of the finest shavings.
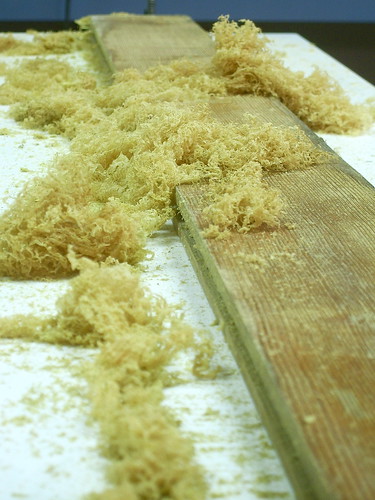
Doug Fir Flooring

Here is the result of my sharpening method on a piece of curly maple. This is a difficult piece of wood to plane by hand or machine, but look at the finish and the fine curly shavings.

Curly Maple Sample

The next photo shows the scraper results on a piece of Brazilian cherry with a difficult grain pattern. Notice that once again I get consistently fine "angel hair" shavings.
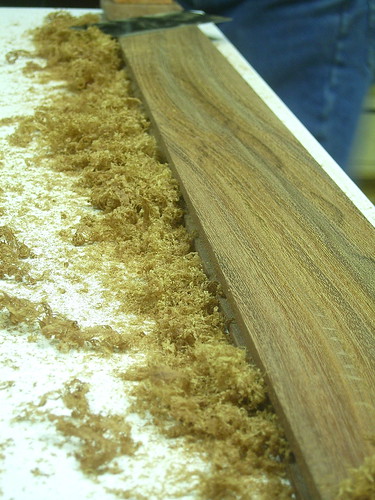
Brazilian Cherry Flooring Sample

My last photo shows a piece of baltic birch ply that has a maple veneer that I applied. I have total control to scrape the veneer without cutting through it and yet get some nice shavings.
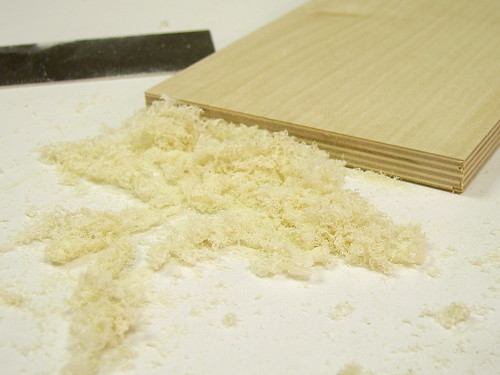
Maple Veneered Plywood

The proof is in the pudding…

Well, there you have it. I sharpen my cabinet scraper with a few strokes on the file and nothing more. I sharpened the scraper between each piece of wood but these are true results for each.

I have no preference as to which cabinet scraper that I use. The cheap Stanley scrapers work just as well as the more expensive Sandvik scrapers.

A balanced point of view…

I will let you know that the cabinet scraper is followed by a random orbital sander in my workflow. I never use the scraper with the intention of the wood surface going straight to finish.

This level of sharpening is very easy to master and then you may find yourself wanting to precede to the next level. I am very satisfied with the performance of my scraper at this level and do not desire to go any further. If you look at my portfolio you can be sure that the cabinet scraper was used in every project and the results speak for themselves so I can stand by my method.

May the shroud of mystery be pulled back and the great Oz be exposed…it is that simple.

Peace, Love, and Woodworking
 
#52 ·
Well… This is useful. I am SOOO guilty of adding mystique where there is none, and revering various personalities despite my disdain for idol worship. Too much of that in woodworking. (Everywhere else too)

Suffice it to say that I

Love. This. Blog.

Glad it got bumped.
 
#54 ·
Ok, I just tried this over the holiday weekend. Holy Cow! This totally works!

I was skeptical, since I have been watching a lot of videos (YouTube) by people that I have a lot of respect for and all the different techniques they use, and I thought to my self "This is too easy"..There's no way this will work" but it does.

I had already ordered a new file and a burnisher from Amazon so when it came in last Friday I knew exactly what I was going to be doing Saturday.

I was throwing all sort of shavings on Oak, Maple, Mahogany, and even some Pine.

Thank you Todd!!!
 
#55 ·
Card Scrapers the Video!

It's Finally Here!

I have completed my first feature woodworking video. This video shows how I sharpen my card scrapers.

It is a simple process and I kept the instruction simple with some close-up video action.

I hope this post goes smooth, it has taken me all day to figure out how to finish up the video and 3 attempts to get it online. So this is a pretty big moment.

I can work on polished video later but I have to start somewhere.

I hope that this video on sharpening cabinet scrapers or card scrapers (I use the term interchangeably) gives hope to those that have struggled with more complicated methods.

I hope to get feedback from everyone that tries this method.

Peace, Love, & Woodworking

http://blip.tv/play/AeO6KAA
 
#110 ·
Sharpening Card Scrapers - The Lost Scene...

Forgive My Insensitivity…

A public Thank You is in order before I go any further. I had some great support from two individuals that are a part of LumberJocks.

I relied heavily on Dave Pruett for "on call" support to figure out how to edit / process / and post my video.

I need to thank Marc Spagnuolo as well. I did not continually call him like Dave, but his advice and pointers were taken to heart and helped me out as well.

As with my woodworking, my achievement with video is due to the support of others. Thank You!

The Lost Scene…

I forgot to add one scene in my video for the first post. It is kind of important because I use the cabinet scraper on a piece of reclaimed flooring with finish on it. First, I scrape off the finish (Oh boy does it explode off the board in front of the scraper!) and then I am able to start peeling the wood off in curls.

I did a re-edit and post, but you do not have to watch the whole video to see the lost scraper scene. You can see it here, it is just over a minute long:

http://www.flickr.com/apps/video/stewart.swf?v=63881

If you haven't seen the full video yet, it is available here:

http://blip.tv/play/AeO6KJKXCQ

I hope that this opens the door to the use of the card scraper for those that have struggled with the sharpening of this amazing tool.

I appreciate feedback and encourage any others that use card scrapers to post a blog with their perspective on the use of this tool.

Share the Love~Share the Knowledge
 
#138 ·
Trusting Your Glue Joints

http://blip.tv/play/Af6ZQpKXCQ

Many woodworkers lack confidence in their glue joints. The way to overcome this is by getting to know your products and materials. This is accomplished by experimenting and testing - particularly through destructive testing.

I continually test my off-cuts from every project. This provides a form of quality control testing that is specific to each project.

In this video I show a couple of the methods that I use to test my glue joints. Testing your joints to the point of wood failure will give you quite a bit of information. Close examination of the results will allow you to understand if you may suffer product failure in your project or if your woodworking techniques are falling short.

I advise caution when testing wood to the point of failure, but these methods are quite safe and easily controlled.
Share the Love~Share the Knowledge
 
#168 ·
Using Toner to Add or Change Color

Sorry for the False Start Guys…

I had the privacy setting turned on when I posted to YouTube. (D'oh!)

It's Finally Here!

Whew! It takes a lot of work to shoot a video, edit, and get it posted to the internet.

I am still struggling with posting to the internet. My HD file sizes are too big to be accepted by BlipTv and YouTube, and once I get the size down to an acceptable limit, they lose quite a bit of quality. This is a bit frustrating and makes me sad to see all my hard work go for naught when it comes to the final viewing quality.

If anybody has any suggestions please let me know.

On to Wood Working

This video demonstrates the use of toner made with dye, for adding color to a woodworking project.

In this episode, I use toner to change the existing color of a set of French doors. These doors are for my clients so this is a live project.

This is not a comprehensive dissertation on the use of dyes and toner. I am limited to the use of what is necessary to complete this particular project, but the principles and the basics are very well applied and demonstrated.

I hope you enjoy the video and find it informative.


I used ML Campbell's MagnaMax to finish the door. It is a wonderfully durable pre-cat lacquer.

My Favorite Finish

Providing Nutrition for Woodworkers
 
#169 ·
Very informative. I never really understood toner usage, and I now have a much better idea.

I noticed when you first started spraying you'd stop and start in the middle of a panel instead of the long full-length coats. I usually get terrible finish build-up if I accidentally do that with, say, a spray can finish. I assume you can do that because of the ultra-fine droplet size?
 
#204 ·
Holding and Routing Small Profile Mouldings

An Opportunity to Share

While creating some detail mouldings for cabinet doors and drawers, I realized this would be a great opportunity to share how I handle these smaller pieces.

Detail mouldings finished

Simple But Safe

The methods that I use are very simple but create safe handling in a small production setting.

My work table is not a traditional style woodworking bench, it has a solid laminate top without bench dog holes. I like the clean solid surface for the type of work that I do.

This would appear to leave me with a lack of any methods for holding my work, especially small pieces. But I have some simple methods for holding my work that are quite effective.

The Problem

When routing a profile on the stock, if it is not held in place it will drift away from the router bit. It needs to be stopped on the ends and on the opposite side of the workpiece from the cut.

We need to keep the workpiece clear of obstacles. The router fence needs to stay off of the table edge and if you are using a router with a guide bearing, the bearing may need to have clearance from the table surface.

Here you can see how the piece migrates away from the router and the router fence will end up riding against the table.

Workpiece moves away from router

The Solution

The solution is simple. I use stop blocks that have 90° cutouts in them to capture the corners of the work piece. These are clamped to the table with enough space to easily place and remove the workpiece.

The stops in place

The rules are simple, the stop has to be lower than the stock you are holding and it has to allow clearance for a router fence to enter and exit the ends. It is also important to realize that the stock is wide enough to safely remain on the table and the small profile will be removed from the stock at the tablesaw.

Clearance for the router

Clearance on ends for router fence

The stops do not need to clamp tight against the workpiece, they only need to act as a stop on both ends (hence the name.) You can leave a gap of 1/8" for ease of changing out the pieces and this is important when you have several pieces to work as in a small production run.

Stops holding small piece

For this particular project I had stacks of short and long pieces to rout. I ran all of the short ones and then moved the stop to allow for holding the longer pieces.

You may wonder why I did not set up the router table. This could be done but I had to do a lot of climb cutting due to the difficult grain. Climb cutting is easier for me to do while holdinging a router on the workpiece rather than holding the workpiece on the router table. This worked best for this situation.

Other Uses

After routing the profile I needed to do a bit of sanding to clean up the profile. I used a stop placed at one end to hold the workpiece for sanding. This avoids the need to clamp the piece and possibly even move the clamp for access to work the full length of the profile.

I had several pieces to sand so this made sanding, changing sides, and swapping out workpieces a quick exercise.

Sanding the profile

I hope this gives you some ideas for working in your shop.

Share the Love~Share the Knowledge
 
#227 ·
Cutting Small Pieces on the Compound Miter Saw

A Challenging Situation

Cutting small pieces of trim or moulding accurately on the compound miter saw can be challenging and a bit dangerous. The compound miter saw (known as the chopsaw in the trades and hereafter) has a large opening in the table for the blade and, most often, the plastic insert in the table drops down slightly from the level of the surrounding table. This is characteristic on my Hitachi, DeWalt, and Makita chopsaws. (I am a contractor so I sport 3 chopsaws.)

SV102002

This provides poor support when cutting small pieces of trim or moulding and this situation creates a safety issue. Poorly supported pieces may be sucked into the blade and drag fingers into it or at least go flying around the shop, ricocheting like a bullet. A zero clearance table surface is the solution and is very simple to make.

SV101891

It is important to understand that this table is a consumable item and new ones will need to be made regularly and perhaps specific for each job. This is not like making an auxiliary table for the drill press that will last for years.

The table surface can be 1/2" or 3/4" plywood. Since you are cutting small pieces, the table does not need to be too big. It needs to be big enough that you will not cut through the far edge of it easily which would cut it clean apart, but small enough that you can still read the miter gauge on the saw. It looks like I have cut clean through mine but I have not.

If you are primarily making 45° cuts, almost every saw has a stop that allows it to pretty much snap into location if you are running a little blind from the zero clearance table.

The fence should be tall enough to provide support for the full height of your particular trim. This provides back support for a clean cut the full height of your trim or moulding piece.

I keep the auxiliary table in place by attaching with screws from the backside of the chopsaw fence through predrilled factory holes.

SV101900

You may notice that I have a laser on my chopsaw and it is very accurate. But I find that the saw blade's own path on the sacrificial table and fence provides the best indication of where to position the piece for my intended cut.

Making the Cut

When performing a cut, hold the piece firmly and, very importantly, adjust your feed rate to provide the most controlled action. Advancing the cut too quickly raises the chances that the small piece can be grabbed out of control. The best thing to do is let the blade be the guide by appling just enough pressure to let the blade advance at it's own rate.

Installing a premium blade for detailed cutting will provide the best results and aid in making cuts more safely. It is the same principle that a sharp knife or chisel is safer to use than a dull one.

SV101896

When cutting stock I prefer to mark for a cut, cut close to it, then creep up on the final cut. This provides me with the best results for a clean and accurate cut.

SV101904

A Cautionary Statement

Cutting small pieces tends to place your appendages closer to the blade consistently more than general cutting and this ramps up the risk factor. The zero clearance table helps control small pieces and reduce the risks associated with this type of work.

Use extreme caution and common sense. If it does not feel safe, then that alone will raise your personal risk.

Share the Love~Share the Knowledge
 
#228 ·
Great safety & accuracy tip! I used to cut small pieces "almost through" then finish the cut with a sharp knife or fine saw. Now I use a clamp on the out feed side & just make the cut, sooo much faster. Thanks for sharing, Like the backstop lining up with the true cut of the blade path.
 
#243 ·
Improved Support With Roller Stands

Like many woodworkers, you will find roller stands in my shop for extra material support. I do not like the single roller stands, I prefer the stands that provide support with 3 or 4 rollers. This type of roller stand provides a larger surface and better support.

The particular set of roller stands that you see here is the Craftsman brand from Sears. They cost about $70 each several years ago.

SV102067

But I am still not satisfied with the performance of roller stands on their own. One of the problems is that they will guide your work askew from the intended direction if it is not perfectly aligned to feed straight into the blade. Ball bearing type roller stands will help with this problem but I have a solution with an added benefit.

SV102069

My solution was to make a table top surface that could be placed over the roller stands. The surface is made from tempered masonite hardboard and hard maple was used to create a simple frame. The frame captures the roller stand and stays in place.

I could have made a small table surface to cover one set of roller stands, but I needed more table surface than one would provide. I created the table top 6 feet long and wide enough to cover the roller stands. Before I had permanent and solid infeed/outfeed tables for my tablesaw, I used this set up on both ends of the tablesaw. The benefit of this for a small shop that is sharing space with cars or in a basement, is that it is flexible and can be stored when not in use and easily set up when needed.

This system does require the purchase of more roller stands, but it provides a lot of table surface. As I stated before, I had to use this system before I set up permanent tables and I actually used it for several years.

Two roller stands are set up in line with each other and the height is adjusted according to the needs of the specific tool being used.

SV102070

Next I place the table top on the roller stands.

SV102073

For the outfeed support I prefer the leading edge of the table is lower than the surface of the tool's table. A straightedge tells the story.

SV102074

SV102080

I only used the full setup for the outfeed on this project, but I have another roller stand and table surface for a full setup on the infeed side if needed as well.

SV102096

SV102105

Full and proper support on the infeed and outfeed of a saw will increase safety and provide better results through better control.

SV102107

Not everybody has the luxury and space of a full dedicated shop space so this could be a solution that will work for you, or it may lead you to a solution better suited to your needs.

Share the Love~Share the Knowledge