LumberJocks Woodworking Forum banner
21 - 40 of 98 Posts
Zig Zag Cutting Board - How To:

For those of you who asked me for a tutorial on how to make the zig zag legless vegetable death table (cutting board), here is my best shot. I am far too impatient to take photos when I work, so I decided to illustrate the process using some good old Adobe PhotoShop. I hope you find this useful and informative.

I will outline the process in 10 steps below. I have assumed that when viewing these steps that basic woodworking skills are familiar to you. If you have questions, or run into snags, PM me and I'll do my best to help out.

If you want to see what these boards look like, take a look at my projects. There are a few in there.

Keep in mind that because these are endgrain boards, you should ideally chose the original boards with interesting endgrain. Makes sense right?

Image


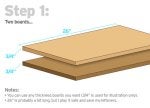
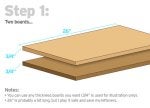
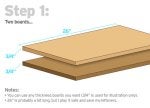
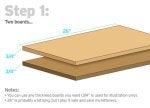
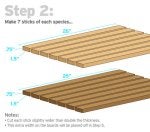
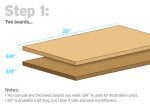
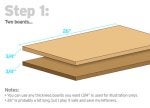
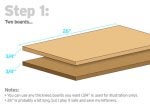
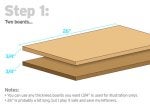
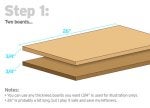
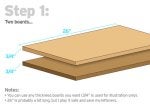
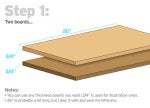
I typically measure all of my initial boards and add a few inches. I'd rather end up with scrap pieces, then a scrapped piece. I went big on the 26" length, but after you do a few of these you can create your own ideal measurements. I also try to start out with boards of thicknesses larger than 3/4", but it was easier math for the illustration to use 3/4" thickness.

Image


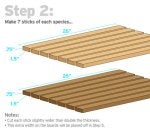
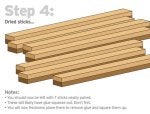
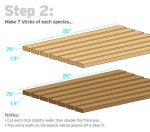
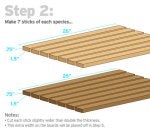
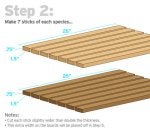
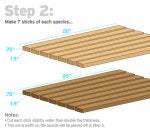
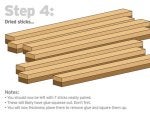
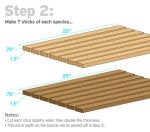
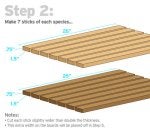
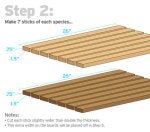
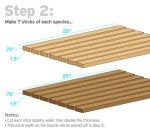
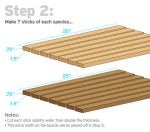
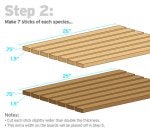
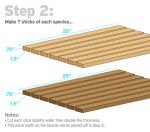
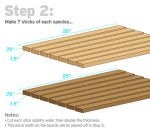
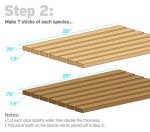
You can make boards of all sizes. I'm limited to a 12" thickness planer, so that's why I am illustrating 7 sticks of each species. Again, experiment with different sizes, so long as the individual sticks are twice as wide as they are thick.

Image


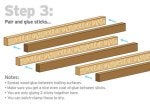
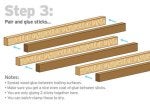
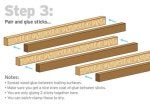
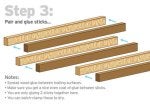
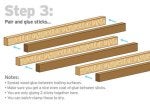
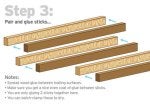
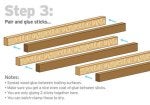
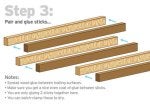
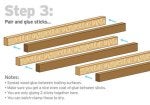
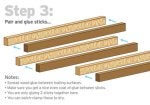
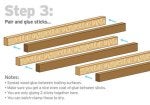
I can't stress enough the importance of only mating two sticks at a time. No three sticks should be mated with glue. Use your preferred clamping methods, but make sure these are nice and tight. You don't want any gaps for bacteria to hide in.

Image


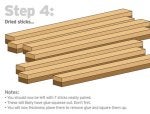
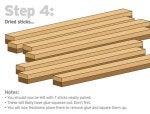
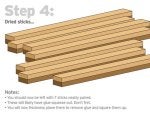
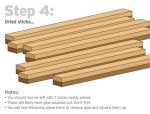
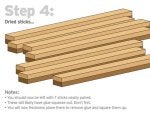
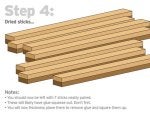
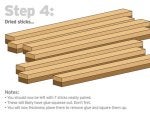
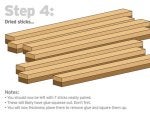
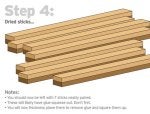
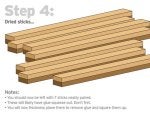
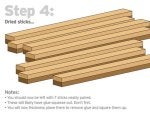
After these sticks dry, pull them out of the clamps. They are ready to be planed down a bit to make sure they are all even and dimensional. I tape them all (squeeze-out side up) together and run them through the planer.

Image


After these are planed, it's important to pull them apart and make sure they are dimensional (as wide as they are tall). If they differ, run them through the planer individually until they are square.

Image


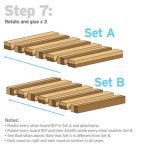
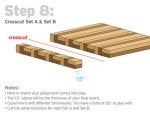
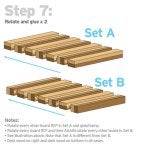
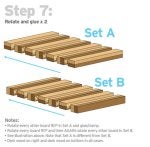
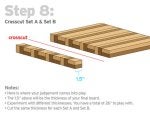
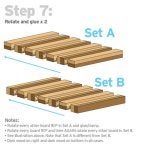
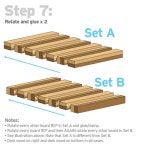
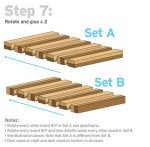
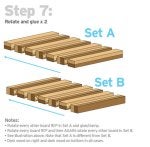
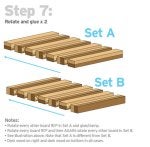
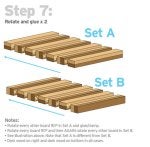
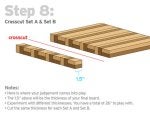
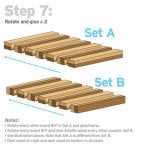
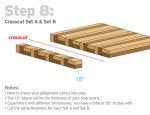
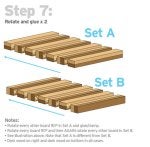
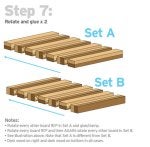
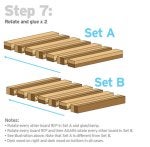
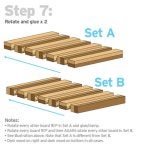
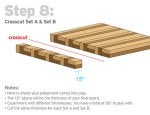
In order to get the zig zag pattern, you have to cut the original sticks in half so that you can make two sets of patterns. This is the tricky part that I was never able to show folks without illustrations. We'll call them Set A and Set B for this demo.

Image


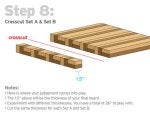
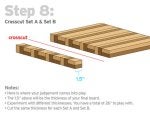
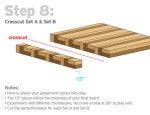
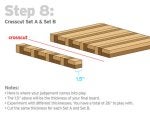
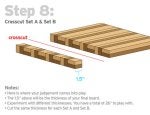
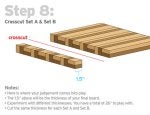
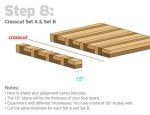
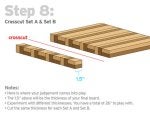
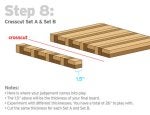
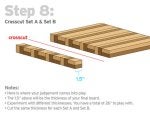
Now, the reason I went with 26" as the original length is so that this next step allows you to be creative. You can make a very long (two maybe) board that is thin, or make a very heavy-duty board. Thickness is up to you.

Image


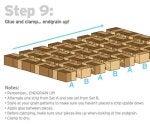
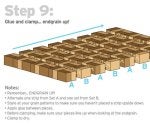
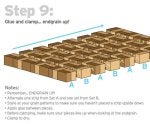
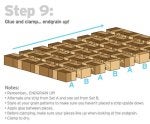
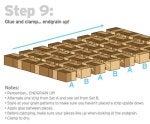
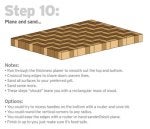
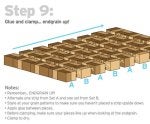
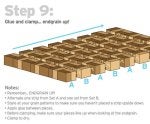
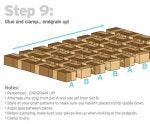
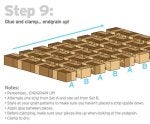
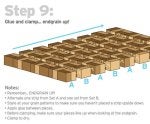
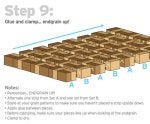
Now you are ready for your final glue-up. Take your time and really see this board for what it will become. Look at the end grains and make sure they are uniform. I have flipped boards upside down and noticed this too late. And remember "ENDGRAINS UP!" Maybe I'll make a TShirt with that phrase on it one day.

Image


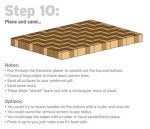
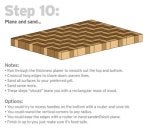
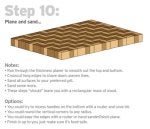
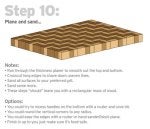
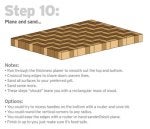
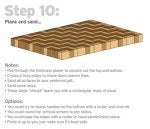
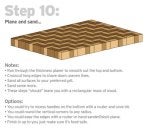
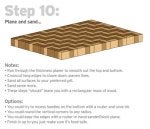
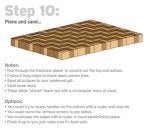
After the glue dries, you should be left with a not-square-yet board.

Image


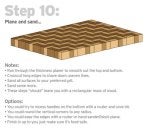
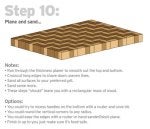
Trim edges using any method you prefer. I run mine across my crosscut sled to make sure they are as true as possible.

I hope this tutorial was helpful and that you are inspired to try one of these boards out.

UPDATE: I have created an additional blog entry with some patterns to try out using the techniques listed above. Check out Zig Zag Cutting Board Patterns - Inspirational
Nice posting!
Very clear understanding.
Thanks for sharing.
 

Attachments

Zig Zag Cutting Board - How To:

For those of you who asked me for a tutorial on how to make the zig zag legless vegetable death table (cutting board), here is my best shot. I am far too impatient to take photos when I work, so I decided to illustrate the process using some good old Adobe PhotoShop. I hope you find this useful and informative.

I will outline the process in 10 steps below. I have assumed that when viewing these steps that basic woodworking skills are familiar to you. If you have questions, or run into snags, PM me and I'll do my best to help out.

If you want to see what these boards look like, take a look at my projects. There are a few in there.

Keep in mind that because these are endgrain boards, you should ideally chose the original boards with interesting endgrain. Makes sense right?

Image


I typically measure all of my initial boards and add a few inches. I'd rather end up with scrap pieces, then a scrapped piece. I went big on the 26" length, but after you do a few of these you can create your own ideal measurements. I also try to start out with boards of thicknesses larger than 3/4", but it was easier math for the illustration to use 3/4" thickness.

Image


You can make boards of all sizes. I'm limited to a 12" thickness planer, so that's why I am illustrating 7 sticks of each species. Again, experiment with different sizes, so long as the individual sticks are twice as wide as they are thick.

Image


I can't stress enough the importance of only mating two sticks at a time. No three sticks should be mated with glue. Use your preferred clamping methods, but make sure these are nice and tight. You don't want any gaps for bacteria to hide in.

Image


After these sticks dry, pull them out of the clamps. They are ready to be planed down a bit to make sure they are all even and dimensional. I tape them all (squeeze-out side up) together and run them through the planer.

Image


After these are planed, it's important to pull them apart and make sure they are dimensional (as wide as they are tall). If they differ, run them through the planer individually until they are square.

Image


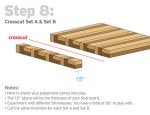
In order to get the zig zag pattern, you have to cut the original sticks in half so that you can make two sets of patterns. This is the tricky part that I was never able to show folks without illustrations. We'll call them Set A and Set B for this demo.

Image


Now, the reason I went with 26" as the original length is so that this next step allows you to be creative. You can make a very long (two maybe) board that is thin, or make a very heavy-duty board. Thickness is up to you.

Image


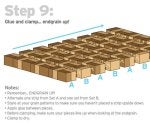
Now you are ready for your final glue-up. Take your time and really see this board for what it will become. Look at the end grains and make sure they are uniform. I have flipped boards upside down and noticed this too late. And remember "ENDGRAINS UP!" Maybe I'll make a TShirt with that phrase on it one day.

Image


After the glue dries, you should be left with a not-square-yet board.

Image


Trim edges using any method you prefer. I run mine across my crosscut sled to make sure they are as true as possible.

I hope this tutorial was helpful and that you are inspired to try one of these boards out.

UPDATE: I have created an additional blog entry with some patterns to try out using the techniques listed above. Check out Zig Zag Cutting Board Patterns - Inspirational
Wow. Very nice blog.
 

Attachments

Zig Zag Cutting Board - How To:

For those of you who asked me for a tutorial on how to make the zig zag legless vegetable death table (cutting board), here is my best shot. I am far too impatient to take photos when I work, so I decided to illustrate the process using some good old Adobe PhotoShop. I hope you find this useful and informative.

I will outline the process in 10 steps below. I have assumed that when viewing these steps that basic woodworking skills are familiar to you. If you have questions, or run into snags, PM me and I'll do my best to help out.

If you want to see what these boards look like, take a look at my projects. There are a few in there.

Keep in mind that because these are endgrain boards, you should ideally chose the original boards with interesting endgrain. Makes sense right?

Image


I typically measure all of my initial boards and add a few inches. I'd rather end up with scrap pieces, then a scrapped piece. I went big on the 26" length, but after you do a few of these you can create your own ideal measurements. I also try to start out with boards of thicknesses larger than 3/4", but it was easier math for the illustration to use 3/4" thickness.

Image


You can make boards of all sizes. I'm limited to a 12" thickness planer, so that's why I am illustrating 7 sticks of each species. Again, experiment with different sizes, so long as the individual sticks are twice as wide as they are thick.

Image


I can't stress enough the importance of only mating two sticks at a time. No three sticks should be mated with glue. Use your preferred clamping methods, but make sure these are nice and tight. You don't want any gaps for bacteria to hide in.

Image


After these sticks dry, pull them out of the clamps. They are ready to be planed down a bit to make sure they are all even and dimensional. I tape them all (squeeze-out side up) together and run them through the planer.

Image


After these are planed, it's important to pull them apart and make sure they are dimensional (as wide as they are tall). If they differ, run them through the planer individually until they are square.

Image


In order to get the zig zag pattern, you have to cut the original sticks in half so that you can make two sets of patterns. This is the tricky part that I was never able to show folks without illustrations. We'll call them Set A and Set B for this demo.

Image


Now, the reason I went with 26" as the original length is so that this next step allows you to be creative. You can make a very long (two maybe) board that is thin, or make a very heavy-duty board. Thickness is up to you.

Image


Now you are ready for your final glue-up. Take your time and really see this board for what it will become. Look at the end grains and make sure they are uniform. I have flipped boards upside down and noticed this too late. And remember "ENDGRAINS UP!" Maybe I'll make a TShirt with that phrase on it one day.

Image


After the glue dries, you should be left with a not-square-yet board.

Image


Trim edges using any method you prefer. I run mine across my crosscut sled to make sure they are as true as possible.

I hope this tutorial was helpful and that you are inspired to try one of these boards out.

UPDATE: I have created an additional blog entry with some patterns to try out using the techniques listed above. Check out Zig Zag Cutting Board Patterns - Inspirational
Great job…..Very well detailed and explained….....thank you
 

Attachments

Zig Zag Cutting Board - How To:

For those of you who asked me for a tutorial on how to make the zig zag legless vegetable death table (cutting board), here is my best shot. I am far too impatient to take photos when I work, so I decided to illustrate the process using some good old Adobe PhotoShop. I hope you find this useful and informative.

I will outline the process in 10 steps below. I have assumed that when viewing these steps that basic woodworking skills are familiar to you. If you have questions, or run into snags, PM me and I'll do my best to help out.

If you want to see what these boards look like, take a look at my projects. There are a few in there.

Keep in mind that because these are endgrain boards, you should ideally chose the original boards with interesting endgrain. Makes sense right?

Image


I typically measure all of my initial boards and add a few inches. I'd rather end up with scrap pieces, then a scrapped piece. I went big on the 26" length, but after you do a few of these you can create your own ideal measurements. I also try to start out with boards of thicknesses larger than 3/4", but it was easier math for the illustration to use 3/4" thickness.

Image


You can make boards of all sizes. I'm limited to a 12" thickness planer, so that's why I am illustrating 7 sticks of each species. Again, experiment with different sizes, so long as the individual sticks are twice as wide as they are thick.

Image


I can't stress enough the importance of only mating two sticks at a time. No three sticks should be mated with glue. Use your preferred clamping methods, but make sure these are nice and tight. You don't want any gaps for bacteria to hide in.

Image


After these sticks dry, pull them out of the clamps. They are ready to be planed down a bit to make sure they are all even and dimensional. I tape them all (squeeze-out side up) together and run them through the planer.

Image


After these are planed, it's important to pull them apart and make sure they are dimensional (as wide as they are tall). If they differ, run them through the planer individually until they are square.

Image


In order to get the zig zag pattern, you have to cut the original sticks in half so that you can make two sets of patterns. This is the tricky part that I was never able to show folks without illustrations. We'll call them Set A and Set B for this demo.

Image


Now, the reason I went with 26" as the original length is so that this next step allows you to be creative. You can make a very long (two maybe) board that is thin, or make a very heavy-duty board. Thickness is up to you.

Image


Now you are ready for your final glue-up. Take your time and really see this board for what it will become. Look at the end grains and make sure they are uniform. I have flipped boards upside down and noticed this too late. And remember "ENDGRAINS UP!" Maybe I'll make a TShirt with that phrase on it one day.

Image


After the glue dries, you should be left with a not-square-yet board.

Image


Trim edges using any method you prefer. I run mine across my crosscut sled to make sure they are as true as possible.

I hope this tutorial was helpful and that you are inspired to try one of these boards out.

UPDATE: I have created an additional blog entry with some patterns to try out using the techniques listed above. Check out Zig Zag Cutting Board Patterns - Inspirational
I sat and tried to draw out how I would do this after seeing your last board. This makes it a whole lot easier.

THANKS!!!!
 

Attachments

Discussion starter · #25 ·
Zig Zag Cutting Board - How To:

For those of you who asked me for a tutorial on how to make the zig zag legless vegetable death table (cutting board), here is my best shot. I am far too impatient to take photos when I work, so I decided to illustrate the process using some good old Adobe PhotoShop. I hope you find this useful and informative.

I will outline the process in 10 steps below. I have assumed that when viewing these steps that basic woodworking skills are familiar to you. If you have questions, or run into snags, PM me and I'll do my best to help out.

If you want to see what these boards look like, take a look at my projects. There are a few in there.

Keep in mind that because these are endgrain boards, you should ideally chose the original boards with interesting endgrain. Makes sense right?

Image


I typically measure all of my initial boards and add a few inches. I'd rather end up with scrap pieces, then a scrapped piece. I went big on the 26" length, but after you do a few of these you can create your own ideal measurements. I also try to start out with boards of thicknesses larger than 3/4", but it was easier math for the illustration to use 3/4" thickness.

Image


You can make boards of all sizes. I'm limited to a 12" thickness planer, so that's why I am illustrating 7 sticks of each species. Again, experiment with different sizes, so long as the individual sticks are twice as wide as they are thick.

Image


I can't stress enough the importance of only mating two sticks at a time. No three sticks should be mated with glue. Use your preferred clamping methods, but make sure these are nice and tight. You don't want any gaps for bacteria to hide in.

Image


After these sticks dry, pull them out of the clamps. They are ready to be planed down a bit to make sure they are all even and dimensional. I tape them all (squeeze-out side up) together and run them through the planer.

Image


After these are planed, it's important to pull them apart and make sure they are dimensional (as wide as they are tall). If they differ, run them through the planer individually until they are square.

Image


In order to get the zig zag pattern, you have to cut the original sticks in half so that you can make two sets of patterns. This is the tricky part that I was never able to show folks without illustrations. We'll call them Set A and Set B for this demo.

Image


Now, the reason I went with 26" as the original length is so that this next step allows you to be creative. You can make a very long (two maybe) board that is thin, or make a very heavy-duty board. Thickness is up to you.

Image


Now you are ready for your final glue-up. Take your time and really see this board for what it will become. Look at the end grains and make sure they are uniform. I have flipped boards upside down and noticed this too late. And remember "ENDGRAINS UP!" Maybe I'll make a TShirt with that phrase on it one day.

Image


After the glue dries, you should be left with a not-square-yet board.

Image


Trim edges using any method you prefer. I run mine across my crosscut sled to make sure they are as true as possible.

I hope this tutorial was helpful and that you are inspired to try one of these boards out.

UPDATE: I have created an additional blog entry with some patterns to try out using the techniques listed above. Check out Zig Zag Cutting Board Patterns - Inspirational
For those of you still following along, I have posted a new blog on some inspirational patterns to try out using the same techniques listed above.

http://lumberjocks.com/McLeanVA/blog/18453
 

Attachments

Zig Zag Cutting Board - How To:

For those of you who asked me for a tutorial on how to make the zig zag legless vegetable death table (cutting board), here is my best shot. I am far too impatient to take photos when I work, so I decided to illustrate the process using some good old Adobe PhotoShop. I hope you find this useful and informative.

I will outline the process in 10 steps below. I have assumed that when viewing these steps that basic woodworking skills are familiar to you. If you have questions, or run into snags, PM me and I'll do my best to help out.

If you want to see what these boards look like, take a look at my projects. There are a few in there.

Keep in mind that because these are endgrain boards, you should ideally chose the original boards with interesting endgrain. Makes sense right?

Image


I typically measure all of my initial boards and add a few inches. I'd rather end up with scrap pieces, then a scrapped piece. I went big on the 26" length, but after you do a few of these you can create your own ideal measurements. I also try to start out with boards of thicknesses larger than 3/4", but it was easier math for the illustration to use 3/4" thickness.

Image


You can make boards of all sizes. I'm limited to a 12" thickness planer, so that's why I am illustrating 7 sticks of each species. Again, experiment with different sizes, so long as the individual sticks are twice as wide as they are thick.

Image


I can't stress enough the importance of only mating two sticks at a time. No three sticks should be mated with glue. Use your preferred clamping methods, but make sure these are nice and tight. You don't want any gaps for bacteria to hide in.

Image


After these sticks dry, pull them out of the clamps. They are ready to be planed down a bit to make sure they are all even and dimensional. I tape them all (squeeze-out side up) together and run them through the planer.

Image


After these are planed, it's important to pull them apart and make sure they are dimensional (as wide as they are tall). If they differ, run them through the planer individually until they are square.

Image


In order to get the zig zag pattern, you have to cut the original sticks in half so that you can make two sets of patterns. This is the tricky part that I was never able to show folks without illustrations. We'll call them Set A and Set B for this demo.

Image


Now, the reason I went with 26" as the original length is so that this next step allows you to be creative. You can make a very long (two maybe) board that is thin, or make a very heavy-duty board. Thickness is up to you.

Image


Now you are ready for your final glue-up. Take your time and really see this board for what it will become. Look at the end grains and make sure they are uniform. I have flipped boards upside down and noticed this too late. And remember "ENDGRAINS UP!" Maybe I'll make a TShirt with that phrase on it one day.

Image


After the glue dries, you should be left with a not-square-yet board.

Image


Trim edges using any method you prefer. I run mine across my crosscut sled to make sure they are as true as possible.

I hope this tutorial was helpful and that you are inspired to try one of these boards out.

UPDATE: I have created an additional blog entry with some patterns to try out using the techniques listed above. Check out Zig Zag Cutting Board Patterns - Inspirational
I'm printing them now. The wife saw them, so guess what I'll be doing soon. Thanks for taking the time to put this together!
 

Attachments

Zig Zag Cutting Board - How To:

For those of you who asked me for a tutorial on how to make the zig zag legless vegetable death table (cutting board), here is my best shot. I am far too impatient to take photos when I work, so I decided to illustrate the process using some good old Adobe PhotoShop. I hope you find this useful and informative.

I will outline the process in 10 steps below. I have assumed that when viewing these steps that basic woodworking skills are familiar to you. If you have questions, or run into snags, PM me and I'll do my best to help out.

If you want to see what these boards look like, take a look at my projects. There are a few in there.

Keep in mind that because these are endgrain boards, you should ideally chose the original boards with interesting endgrain. Makes sense right?

Image


I typically measure all of my initial boards and add a few inches. I'd rather end up with scrap pieces, then a scrapped piece. I went big on the 26" length, but after you do a few of these you can create your own ideal measurements. I also try to start out with boards of thicknesses larger than 3/4", but it was easier math for the illustration to use 3/4" thickness.

Image


You can make boards of all sizes. I'm limited to a 12" thickness planer, so that's why I am illustrating 7 sticks of each species. Again, experiment with different sizes, so long as the individual sticks are twice as wide as they are thick.

Image


I can't stress enough the importance of only mating two sticks at a time. No three sticks should be mated with glue. Use your preferred clamping methods, but make sure these are nice and tight. You don't want any gaps for bacteria to hide in.

Image


After these sticks dry, pull them out of the clamps. They are ready to be planed down a bit to make sure they are all even and dimensional. I tape them all (squeeze-out side up) together and run them through the planer.

Image


After these are planed, it's important to pull them apart and make sure they are dimensional (as wide as they are tall). If they differ, run them through the planer individually until they are square.

Image


In order to get the zig zag pattern, you have to cut the original sticks in half so that you can make two sets of patterns. This is the tricky part that I was never able to show folks without illustrations. We'll call them Set A and Set B for this demo.

Image


Now, the reason I went with 26" as the original length is so that this next step allows you to be creative. You can make a very long (two maybe) board that is thin, or make a very heavy-duty board. Thickness is up to you.

Image


Now you are ready for your final glue-up. Take your time and really see this board for what it will become. Look at the end grains and make sure they are uniform. I have flipped boards upside down and noticed this too late. And remember "ENDGRAINS UP!" Maybe I'll make a TShirt with that phrase on it one day.

Image


After the glue dries, you should be left with a not-square-yet board.

Image


Trim edges using any method you prefer. I run mine across my crosscut sled to make sure they are as true as possible.

I hope this tutorial was helpful and that you are inspired to try one of these boards out.

UPDATE: I have created an additional blog entry with some patterns to try out using the techniques listed above. Check out Zig Zag Cutting Board Patterns - Inspirational
What a great post! This is great for everyone to read no doubt! Thx and look fwod to reafding more!
 

Attachments

Zig Zag Cutting Board - How To:

For those of you who asked me for a tutorial on how to make the zig zag legless vegetable death table (cutting board), here is my best shot. I am far too impatient to take photos when I work, so I decided to illustrate the process using some good old Adobe PhotoShop. I hope you find this useful and informative.

I will outline the process in 10 steps below. I have assumed that when viewing these steps that basic woodworking skills are familiar to you. If you have questions, or run into snags, PM me and I'll do my best to help out.

If you want to see what these boards look like, take a look at my projects. There are a few in there.

Keep in mind that because these are endgrain boards, you should ideally chose the original boards with interesting endgrain. Makes sense right?

Image


I typically measure all of my initial boards and add a few inches. I'd rather end up with scrap pieces, then a scrapped piece. I went big on the 26" length, but after you do a few of these you can create your own ideal measurements. I also try to start out with boards of thicknesses larger than 3/4", but it was easier math for the illustration to use 3/4" thickness.

Image


You can make boards of all sizes. I'm limited to a 12" thickness planer, so that's why I am illustrating 7 sticks of each species. Again, experiment with different sizes, so long as the individual sticks are twice as wide as they are thick.

Image


I can't stress enough the importance of only mating two sticks at a time. No three sticks should be mated with glue. Use your preferred clamping methods, but make sure these are nice and tight. You don't want any gaps for bacteria to hide in.

Image


After these sticks dry, pull them out of the clamps. They are ready to be planed down a bit to make sure they are all even and dimensional. I tape them all (squeeze-out side up) together and run them through the planer.

Image


After these are planed, it's important to pull them apart and make sure they are dimensional (as wide as they are tall). If they differ, run them through the planer individually until they are square.

Image


In order to get the zig zag pattern, you have to cut the original sticks in half so that you can make two sets of patterns. This is the tricky part that I was never able to show folks without illustrations. We'll call them Set A and Set B for this demo.

Image


Now, the reason I went with 26" as the original length is so that this next step allows you to be creative. You can make a very long (two maybe) board that is thin, or make a very heavy-duty board. Thickness is up to you.

Image


Now you are ready for your final glue-up. Take your time and really see this board for what it will become. Look at the end grains and make sure they are uniform. I have flipped boards upside down and noticed this too late. And remember "ENDGRAINS UP!" Maybe I'll make a TShirt with that phrase on it one day.

Image


After the glue dries, you should be left with a not-square-yet board.

Image


Trim edges using any method you prefer. I run mine across my crosscut sled to make sure they are as true as possible.

I hope this tutorial was helpful and that you are inspired to try one of these boards out.

UPDATE: I have created an additional blog entry with some patterns to try out using the techniques listed above. Check out Zig Zag Cutting Board Patterns - Inspirational
Thanks for the HowTo.

Question; I thought planning end grain was a nono. Just wondering how many of you guys are actually doing this and what are your thoughts on the subject?
 

Attachments

Discussion starter · #29 ·
Zig Zag Cutting Board - How To:

For those of you who asked me for a tutorial on how to make the zig zag legless vegetable death table (cutting board), here is my best shot. I am far too impatient to take photos when I work, so I decided to illustrate the process using some good old Adobe PhotoShop. I hope you find this useful and informative.

I will outline the process in 10 steps below. I have assumed that when viewing these steps that basic woodworking skills are familiar to you. If you have questions, or run into snags, PM me and I'll do my best to help out.

If you want to see what these boards look like, take a look at my projects. There are a few in there.

Keep in mind that because these are endgrain boards, you should ideally chose the original boards with interesting endgrain. Makes sense right?

Image


I typically measure all of my initial boards and add a few inches. I'd rather end up with scrap pieces, then a scrapped piece. I went big on the 26" length, but after you do a few of these you can create your own ideal measurements. I also try to start out with boards of thicknesses larger than 3/4", but it was easier math for the illustration to use 3/4" thickness.

Image


You can make boards of all sizes. I'm limited to a 12" thickness planer, so that's why I am illustrating 7 sticks of each species. Again, experiment with different sizes, so long as the individual sticks are twice as wide as they are thick.

Image


I can't stress enough the importance of only mating two sticks at a time. No three sticks should be mated with glue. Use your preferred clamping methods, but make sure these are nice and tight. You don't want any gaps for bacteria to hide in.

Image


After these sticks dry, pull them out of the clamps. They are ready to be planed down a bit to make sure they are all even and dimensional. I tape them all (squeeze-out side up) together and run them through the planer.

Image


After these are planed, it's important to pull them apart and make sure they are dimensional (as wide as they are tall). If they differ, run them through the planer individually until they are square.

Image


In order to get the zig zag pattern, you have to cut the original sticks in half so that you can make two sets of patterns. This is the tricky part that I was never able to show folks without illustrations. We'll call them Set A and Set B for this demo.

Image


Now, the reason I went with 26" as the original length is so that this next step allows you to be creative. You can make a very long (two maybe) board that is thin, or make a very heavy-duty board. Thickness is up to you.

Image


Now you are ready for your final glue-up. Take your time and really see this board for what it will become. Look at the end grains and make sure they are uniform. I have flipped boards upside down and noticed this too late. And remember "ENDGRAINS UP!" Maybe I'll make a TShirt with that phrase on it one day.

Image


After the glue dries, you should be left with a not-square-yet board.

Image


Trim edges using any method you prefer. I run mine across my crosscut sled to make sure they are as true as possible.

I hope this tutorial was helpful and that you are inspired to try one of these boards out.

UPDATE: I have created an additional blog entry with some patterns to try out using the techniques listed above. Check out Zig Zag Cutting Board Patterns - Inspirational
RexMcKinnon - Great topic for discussion. I have never had any problems planing end grain boards. It certainly puts a strain on both your planer as well as your blades, but if you do decide to give it a shot, take super-light passes. Never try and hog off too much at a time. I do quite a bit of sanding once I get my boards out of the planer, so I really use the planer just to get me in the ballpark of parallel planes.

Now of course, I'm not a professional by any means. I'm a pure hobbyist. So listen to the pros if they recommend against it.

You could probably try a different technique (like sanding), but I'm not sure how you would stay accurate on your thickness.

Not sure this helps, but I figured I'd add in my two cents.
 

Attachments

Zig Zag Cutting Board - How To:

For those of you who asked me for a tutorial on how to make the zig zag legless vegetable death table (cutting board), here is my best shot. I am far too impatient to take photos when I work, so I decided to illustrate the process using some good old Adobe PhotoShop. I hope you find this useful and informative.

I will outline the process in 10 steps below. I have assumed that when viewing these steps that basic woodworking skills are familiar to you. If you have questions, or run into snags, PM me and I'll do my best to help out.

If you want to see what these boards look like, take a look at my projects. There are a few in there.

Keep in mind that because these are endgrain boards, you should ideally chose the original boards with interesting endgrain. Makes sense right?

Image


I typically measure all of my initial boards and add a few inches. I'd rather end up with scrap pieces, then a scrapped piece. I went big on the 26" length, but after you do a few of these you can create your own ideal measurements. I also try to start out with boards of thicknesses larger than 3/4", but it was easier math for the illustration to use 3/4" thickness.

Image


You can make boards of all sizes. I'm limited to a 12" thickness planer, so that's why I am illustrating 7 sticks of each species. Again, experiment with different sizes, so long as the individual sticks are twice as wide as they are thick.

Image


I can't stress enough the importance of only mating two sticks at a time. No three sticks should be mated with glue. Use your preferred clamping methods, but make sure these are nice and tight. You don't want any gaps for bacteria to hide in.

Image


After these sticks dry, pull them out of the clamps. They are ready to be planed down a bit to make sure they are all even and dimensional. I tape them all (squeeze-out side up) together and run them through the planer.

Image


After these are planed, it's important to pull them apart and make sure they are dimensional (as wide as they are tall). If they differ, run them through the planer individually until they are square.

Image


In order to get the zig zag pattern, you have to cut the original sticks in half so that you can make two sets of patterns. This is the tricky part that I was never able to show folks without illustrations. We'll call them Set A and Set B for this demo.

Image


Now, the reason I went with 26" as the original length is so that this next step allows you to be creative. You can make a very long (two maybe) board that is thin, or make a very heavy-duty board. Thickness is up to you.

Image


Now you are ready for your final glue-up. Take your time and really see this board for what it will become. Look at the end grains and make sure they are uniform. I have flipped boards upside down and noticed this too late. And remember "ENDGRAINS UP!" Maybe I'll make a TShirt with that phrase on it one day.

Image


After the glue dries, you should be left with a not-square-yet board.

Image


Trim edges using any method you prefer. I run mine across my crosscut sled to make sure they are as true as possible.

I hope this tutorial was helpful and that you are inspired to try one of these boards out.

UPDATE: I have created an additional blog entry with some patterns to try out using the techniques listed above. Check out Zig Zag Cutting Board Patterns - Inspirational
Thank you so much. I actually like the Adobe better then pics (in this case). I think you were able to show (at least I was able to see it better) the steps and progression better in the way you did it. I love the zig zag and the weave pattern boards and was always reluctant to do it as it would take too much time and with the added time I would have to place a much larger price tag on them. That's why I have always stayed with the long grain boards. UNTIL NOW. This is a very simple process and is well within the time restraints that I place on myself when making boards. I will try to get a couple of these turned out for my last shows in Dec. Thanks again and feel free to doodle up anything else that strikes your fancy bone…...
 

Attachments

Zig Zag Cutting Board - How To:

For those of you who asked me for a tutorial on how to make the zig zag legless vegetable death table (cutting board), here is my best shot. I am far too impatient to take photos when I work, so I decided to illustrate the process using some good old Adobe PhotoShop. I hope you find this useful and informative.

I will outline the process in 10 steps below. I have assumed that when viewing these steps that basic woodworking skills are familiar to you. If you have questions, or run into snags, PM me and I'll do my best to help out.

If you want to see what these boards look like, take a look at my projects. There are a few in there.

Keep in mind that because these are endgrain boards, you should ideally chose the original boards with interesting endgrain. Makes sense right?

Image


I typically measure all of my initial boards and add a few inches. I'd rather end up with scrap pieces, then a scrapped piece. I went big on the 26" length, but after you do a few of these you can create your own ideal measurements. I also try to start out with boards of thicknesses larger than 3/4", but it was easier math for the illustration to use 3/4" thickness.

Image


You can make boards of all sizes. I'm limited to a 12" thickness planer, so that's why I am illustrating 7 sticks of each species. Again, experiment with different sizes, so long as the individual sticks are twice as wide as they are thick.

Image


I can't stress enough the importance of only mating two sticks at a time. No three sticks should be mated with glue. Use your preferred clamping methods, but make sure these are nice and tight. You don't want any gaps for bacteria to hide in.

Image


After these sticks dry, pull them out of the clamps. They are ready to be planed down a bit to make sure they are all even and dimensional. I tape them all (squeeze-out side up) together and run them through the planer.

Image


After these are planed, it's important to pull them apart and make sure they are dimensional (as wide as they are tall). If they differ, run them through the planer individually until they are square.

Image


In order to get the zig zag pattern, you have to cut the original sticks in half so that you can make two sets of patterns. This is the tricky part that I was never able to show folks without illustrations. We'll call them Set A and Set B for this demo.

Image


Now, the reason I went with 26" as the original length is so that this next step allows you to be creative. You can make a very long (two maybe) board that is thin, or make a very heavy-duty board. Thickness is up to you.

Image


Now you are ready for your final glue-up. Take your time and really see this board for what it will become. Look at the end grains and make sure they are uniform. I have flipped boards upside down and noticed this too late. And remember "ENDGRAINS UP!" Maybe I'll make a TShirt with that phrase on it one day.

Image


After the glue dries, you should be left with a not-square-yet board.

Image


Trim edges using any method you prefer. I run mine across my crosscut sled to make sure they are as true as possible.

I hope this tutorial was helpful and that you are inspired to try one of these boards out.

UPDATE: I have created an additional blog entry with some patterns to try out using the techniques listed above. Check out Zig Zag Cutting Board Patterns - Inspirational
My 2 cents worth… stay clear of the thickness planer with Endgrain… I know that a few folks use it with really light passes but I know that many have had a board explode in the machine… and that is downright dangerous…
I have a Drumsander… and I would now be without it… then again I do a lot of boards and I can justify the expense.. as always have fun but play safe…
 

Attachments

Zig Zag Cutting Board - How To:

For those of you who asked me for a tutorial on how to make the zig zag legless vegetable death table (cutting board), here is my best shot. I am far too impatient to take photos when I work, so I decided to illustrate the process using some good old Adobe PhotoShop. I hope you find this useful and informative.

I will outline the process in 10 steps below. I have assumed that when viewing these steps that basic woodworking skills are familiar to you. If you have questions, or run into snags, PM me and I'll do my best to help out.

If you want to see what these boards look like, take a look at my projects. There are a few in there.

Keep in mind that because these are endgrain boards, you should ideally chose the original boards with interesting endgrain. Makes sense right?

Image


I typically measure all of my initial boards and add a few inches. I'd rather end up with scrap pieces, then a scrapped piece. I went big on the 26" length, but after you do a few of these you can create your own ideal measurements. I also try to start out with boards of thicknesses larger than 3/4", but it was easier math for the illustration to use 3/4" thickness.

Image


You can make boards of all sizes. I'm limited to a 12" thickness planer, so that's why I am illustrating 7 sticks of each species. Again, experiment with different sizes, so long as the individual sticks are twice as wide as they are thick.

Image


I can't stress enough the importance of only mating two sticks at a time. No three sticks should be mated with glue. Use your preferred clamping methods, but make sure these are nice and tight. You don't want any gaps for bacteria to hide in.

Image


After these sticks dry, pull them out of the clamps. They are ready to be planed down a bit to make sure they are all even and dimensional. I tape them all (squeeze-out side up) together and run them through the planer.

Image


After these are planed, it's important to pull them apart and make sure they are dimensional (as wide as they are tall). If they differ, run them through the planer individually until they are square.

Image


In order to get the zig zag pattern, you have to cut the original sticks in half so that you can make two sets of patterns. This is the tricky part that I was never able to show folks without illustrations. We'll call them Set A and Set B for this demo.

Image


Now, the reason I went with 26" as the original length is so that this next step allows you to be creative. You can make a very long (two maybe) board that is thin, or make a very heavy-duty board. Thickness is up to you.

Image


Now you are ready for your final glue-up. Take your time and really see this board for what it will become. Look at the end grains and make sure they are uniform. I have flipped boards upside down and noticed this too late. And remember "ENDGRAINS UP!" Maybe I'll make a TShirt with that phrase on it one day.

Image


After the glue dries, you should be left with a not-square-yet board.

Image


Trim edges using any method you prefer. I run mine across my crosscut sled to make sure they are as true as possible.

I hope this tutorial was helpful and that you are inspired to try one of these boards out.

UPDATE: I have created an additional blog entry with some patterns to try out using the techniques listed above. Check out Zig Zag Cutting Board Patterns - Inspirational
My new Wood mag just came today and it has an article about end grain cutting boards. High lighted in the instructions it say, DO NOT USE A PLANER ON END GRAIN CUTTING BOARDS. I agree with Larry. IT AIN"T WORTH THE POSSIBLE UNWANTED RESULTS…..........
 

Attachments

Discussion starter · #33 ·
Zig Zag Cutting Board - How To:

For those of you who asked me for a tutorial on how to make the zig zag legless vegetable death table (cutting board), here is my best shot. I am far too impatient to take photos when I work, so I decided to illustrate the process using some good old Adobe PhotoShop. I hope you find this useful and informative.

I will outline the process in 10 steps below. I have assumed that when viewing these steps that basic woodworking skills are familiar to you. If you have questions, or run into snags, PM me and I'll do my best to help out.

If you want to see what these boards look like, take a look at my projects. There are a few in there.

Keep in mind that because these are endgrain boards, you should ideally chose the original boards with interesting endgrain. Makes sense right?

Image


I typically measure all of my initial boards and add a few inches. I'd rather end up with scrap pieces, then a scrapped piece. I went big on the 26" length, but after you do a few of these you can create your own ideal measurements. I also try to start out with boards of thicknesses larger than 3/4", but it was easier math for the illustration to use 3/4" thickness.

Image


You can make boards of all sizes. I'm limited to a 12" thickness planer, so that's why I am illustrating 7 sticks of each species. Again, experiment with different sizes, so long as the individual sticks are twice as wide as they are thick.

Image


I can't stress enough the importance of only mating two sticks at a time. No three sticks should be mated with glue. Use your preferred clamping methods, but make sure these are nice and tight. You don't want any gaps for bacteria to hide in.

Image


After these sticks dry, pull them out of the clamps. They are ready to be planed down a bit to make sure they are all even and dimensional. I tape them all (squeeze-out side up) together and run them through the planer.

Image


After these are planed, it's important to pull them apart and make sure they are dimensional (as wide as they are tall). If they differ, run them through the planer individually until they are square.

Image


In order to get the zig zag pattern, you have to cut the original sticks in half so that you can make two sets of patterns. This is the tricky part that I was never able to show folks without illustrations. We'll call them Set A and Set B for this demo.

Image


Now, the reason I went with 26" as the original length is so that this next step allows you to be creative. You can make a very long (two maybe) board that is thin, or make a very heavy-duty board. Thickness is up to you.

Image


Now you are ready for your final glue-up. Take your time and really see this board for what it will become. Look at the end grains and make sure they are uniform. I have flipped boards upside down and noticed this too late. And remember "ENDGRAINS UP!" Maybe I'll make a TShirt with that phrase on it one day.

Image


After the glue dries, you should be left with a not-square-yet board.

Image


Trim edges using any method you prefer. I run mine across my crosscut sled to make sure they are as true as possible.

I hope this tutorial was helpful and that you are inspired to try one of these boards out.

UPDATE: I have created an additional blog entry with some patterns to try out using the techniques listed above. Check out Zig Zag Cutting Board Patterns - Inspirational
So I learned something from these replies. Get a drumsander. Going to have to beg the wife to let me have some fun money. Thanks y'all.
 

Attachments

Zig Zag Cutting Board - How To:

For those of you who asked me for a tutorial on how to make the zig zag legless vegetable death table (cutting board), here is my best shot. I am far too impatient to take photos when I work, so I decided to illustrate the process using some good old Adobe PhotoShop. I hope you find this useful and informative.

I will outline the process in 10 steps below. I have assumed that when viewing these steps that basic woodworking skills are familiar to you. If you have questions, or run into snags, PM me and I'll do my best to help out.

If you want to see what these boards look like, take a look at my projects. There are a few in there.

Keep in mind that because these are endgrain boards, you should ideally chose the original boards with interesting endgrain. Makes sense right?

Image


I typically measure all of my initial boards and add a few inches. I'd rather end up with scrap pieces, then a scrapped piece. I went big on the 26" length, but after you do a few of these you can create your own ideal measurements. I also try to start out with boards of thicknesses larger than 3/4", but it was easier math for the illustration to use 3/4" thickness.

Image


You can make boards of all sizes. I'm limited to a 12" thickness planer, so that's why I am illustrating 7 sticks of each species. Again, experiment with different sizes, so long as the individual sticks are twice as wide as they are thick.

Image


I can't stress enough the importance of only mating two sticks at a time. No three sticks should be mated with glue. Use your preferred clamping methods, but make sure these are nice and tight. You don't want any gaps for bacteria to hide in.

Image


After these sticks dry, pull them out of the clamps. They are ready to be planed down a bit to make sure they are all even and dimensional. I tape them all (squeeze-out side up) together and run them through the planer.

Image


After these are planed, it's important to pull them apart and make sure they are dimensional (as wide as they are tall). If they differ, run them through the planer individually until they are square.

Image


In order to get the zig zag pattern, you have to cut the original sticks in half so that you can make two sets of patterns. This is the tricky part that I was never able to show folks without illustrations. We'll call them Set A and Set B for this demo.

Image


Now, the reason I went with 26" as the original length is so that this next step allows you to be creative. You can make a very long (two maybe) board that is thin, or make a very heavy-duty board. Thickness is up to you.

Image


Now you are ready for your final glue-up. Take your time and really see this board for what it will become. Look at the end grains and make sure they are uniform. I have flipped boards upside down and noticed this too late. And remember "ENDGRAINS UP!" Maybe I'll make a TShirt with that phrase on it one day.

Image


After the glue dries, you should be left with a not-square-yet board.

Image


Trim edges using any method you prefer. I run mine across my crosscut sled to make sure they are as true as possible.

I hope this tutorial was helpful and that you are inspired to try one of these boards out.

UPDATE: I have created an additional blog entry with some patterns to try out using the techniques listed above. Check out Zig Zag Cutting Board Patterns - Inspirational
cheeper to make a drum sander
i few of us have made them for less than 300.00
just a idea.
 

Attachments

Zig Zag Cutting Board - How To:

For those of you who asked me for a tutorial on how to make the zig zag legless vegetable death table (cutting board), here is my best shot. I am far too impatient to take photos when I work, so I decided to illustrate the process using some good old Adobe PhotoShop. I hope you find this useful and informative.

I will outline the process in 10 steps below. I have assumed that when viewing these steps that basic woodworking skills are familiar to you. If you have questions, or run into snags, PM me and I'll do my best to help out.

If you want to see what these boards look like, take a look at my projects. There are a few in there.

Keep in mind that because these are endgrain boards, you should ideally chose the original boards with interesting endgrain. Makes sense right?

Image


I typically measure all of my initial boards and add a few inches. I'd rather end up with scrap pieces, then a scrapped piece. I went big on the 26" length, but after you do a few of these you can create your own ideal measurements. I also try to start out with boards of thicknesses larger than 3/4", but it was easier math for the illustration to use 3/4" thickness.

Image


You can make boards of all sizes. I'm limited to a 12" thickness planer, so that's why I am illustrating 7 sticks of each species. Again, experiment with different sizes, so long as the individual sticks are twice as wide as they are thick.

Image


I can't stress enough the importance of only mating two sticks at a time. No three sticks should be mated with glue. Use your preferred clamping methods, but make sure these are nice and tight. You don't want any gaps for bacteria to hide in.

Image


After these sticks dry, pull them out of the clamps. They are ready to be planed down a bit to make sure they are all even and dimensional. I tape them all (squeeze-out side up) together and run them through the planer.

Image


After these are planed, it's important to pull them apart and make sure they are dimensional (as wide as they are tall). If they differ, run them through the planer individually until they are square.

Image


In order to get the zig zag pattern, you have to cut the original sticks in half so that you can make two sets of patterns. This is the tricky part that I was never able to show folks without illustrations. We'll call them Set A and Set B for this demo.

Image


Now, the reason I went with 26" as the original length is so that this next step allows you to be creative. You can make a very long (two maybe) board that is thin, or make a very heavy-duty board. Thickness is up to you.

Image


Now you are ready for your final glue-up. Take your time and really see this board for what it will become. Look at the end grains and make sure they are uniform. I have flipped boards upside down and noticed this too late. And remember "ENDGRAINS UP!" Maybe I'll make a TShirt with that phrase on it one day.

Image


After the glue dries, you should be left with a not-square-yet board.

Image


Trim edges using any method you prefer. I run mine across my crosscut sled to make sure they are as true as possible.

I hope this tutorial was helpful and that you are inspired to try one of these boards out.

UPDATE: I have created an additional blog entry with some patterns to try out using the techniques listed above. Check out Zig Zag Cutting Board Patterns - Inspirational
Absolutely great blog! The diagrams with adobe are so clear and easy to understand…thanks for taking the time to do this McLean. I saw your original post and had already decided to try to make one, now I am sure I can do this.

I also invested in a drum sander a couple of years ago…Performax 16-32 and I would not ever be without it again. If you get one you wont regret it, and tell the wife you will be happy to make some more boards for her!
 

Attachments

Discussion starter · #36 ·
Zig Zag Cutting Board - How To:

For those of you who asked me for a tutorial on how to make the zig zag legless vegetable death table (cutting board), here is my best shot. I am far too impatient to take photos when I work, so I decided to illustrate the process using some good old Adobe PhotoShop. I hope you find this useful and informative.

I will outline the process in 10 steps below. I have assumed that when viewing these steps that basic woodworking skills are familiar to you. If you have questions, or run into snags, PM me and I'll do my best to help out.

If you want to see what these boards look like, take a look at my projects. There are a few in there.

Keep in mind that because these are endgrain boards, you should ideally chose the original boards with interesting endgrain. Makes sense right?

Image


I typically measure all of my initial boards and add a few inches. I'd rather end up with scrap pieces, then a scrapped piece. I went big on the 26" length, but after you do a few of these you can create your own ideal measurements. I also try to start out with boards of thicknesses larger than 3/4", but it was easier math for the illustration to use 3/4" thickness.

Image


You can make boards of all sizes. I'm limited to a 12" thickness planer, so that's why I am illustrating 7 sticks of each species. Again, experiment with different sizes, so long as the individual sticks are twice as wide as they are thick.

Image


I can't stress enough the importance of only mating two sticks at a time. No three sticks should be mated with glue. Use your preferred clamping methods, but make sure these are nice and tight. You don't want any gaps for bacteria to hide in.

Image


After these sticks dry, pull them out of the clamps. They are ready to be planed down a bit to make sure they are all even and dimensional. I tape them all (squeeze-out side up) together and run them through the planer.

Image


After these are planed, it's important to pull them apart and make sure they are dimensional (as wide as they are tall). If they differ, run them through the planer individually until they are square.

Image


In order to get the zig zag pattern, you have to cut the original sticks in half so that you can make two sets of patterns. This is the tricky part that I was never able to show folks without illustrations. We'll call them Set A and Set B for this demo.

Image


Now, the reason I went with 26" as the original length is so that this next step allows you to be creative. You can make a very long (two maybe) board that is thin, or make a very heavy-duty board. Thickness is up to you.

Image


Now you are ready for your final glue-up. Take your time and really see this board for what it will become. Look at the end grains and make sure they are uniform. I have flipped boards upside down and noticed this too late. And remember "ENDGRAINS UP!" Maybe I'll make a TShirt with that phrase on it one day.

Image


After the glue dries, you should be left with a not-square-yet board.

Image


Trim edges using any method you prefer. I run mine across my crosscut sled to make sure they are as true as possible.

I hope this tutorial was helpful and that you are inspired to try one of these boards out.

UPDATE: I have created an additional blog entry with some patterns to try out using the techniques listed above. Check out Zig Zag Cutting Board Patterns - Inspirational
Thank you for the thumbs up Mathew. I've been researching drum sanders for the past week, once I received overwhelming feedback on putting end grain boards through my planer. I've just been extremely lucky I guess. Because I'm a pure hobbyist (i.e. make no profit from wood projects) justifying the price of a drum sander is going to be really difficult. I've been racking my brain trying to figure out how I can take care of this last thickness and cleanup step. Craigslist has come up dry on folks trying to get rid of their old drum sanders.

Anyways, thanks again and good luck on your boards.
 

Attachments

Zig Zag Cutting Board - How To:

For those of you who asked me for a tutorial on how to make the zig zag legless vegetable death table (cutting board), here is my best shot. I am far too impatient to take photos when I work, so I decided to illustrate the process using some good old Adobe PhotoShop. I hope you find this useful and informative.

I will outline the process in 10 steps below. I have assumed that when viewing these steps that basic woodworking skills are familiar to you. If you have questions, or run into snags, PM me and I'll do my best to help out.

If you want to see what these boards look like, take a look at my projects. There are a few in there.

Keep in mind that because these are endgrain boards, you should ideally chose the original boards with interesting endgrain. Makes sense right?

Image


I typically measure all of my initial boards and add a few inches. I'd rather end up with scrap pieces, then a scrapped piece. I went big on the 26" length, but after you do a few of these you can create your own ideal measurements. I also try to start out with boards of thicknesses larger than 3/4", but it was easier math for the illustration to use 3/4" thickness.

Image


You can make boards of all sizes. I'm limited to a 12" thickness planer, so that's why I am illustrating 7 sticks of each species. Again, experiment with different sizes, so long as the individual sticks are twice as wide as they are thick.

Image


I can't stress enough the importance of only mating two sticks at a time. No three sticks should be mated with glue. Use your preferred clamping methods, but make sure these are nice and tight. You don't want any gaps for bacteria to hide in.

Image


After these sticks dry, pull them out of the clamps. They are ready to be planed down a bit to make sure they are all even and dimensional. I tape them all (squeeze-out side up) together and run them through the planer.

Image


After these are planed, it's important to pull them apart and make sure they are dimensional (as wide as they are tall). If they differ, run them through the planer individually until they are square.

Image


In order to get the zig zag pattern, you have to cut the original sticks in half so that you can make two sets of patterns. This is the tricky part that I was never able to show folks without illustrations. We'll call them Set A and Set B for this demo.

Image


Now, the reason I went with 26" as the original length is so that this next step allows you to be creative. You can make a very long (two maybe) board that is thin, or make a very heavy-duty board. Thickness is up to you.

Image


Now you are ready for your final glue-up. Take your time and really see this board for what it will become. Look at the end grains and make sure they are uniform. I have flipped boards upside down and noticed this too late. And remember "ENDGRAINS UP!" Maybe I'll make a TShirt with that phrase on it one day.

Image


After the glue dries, you should be left with a not-square-yet board.

Image


Trim edges using any method you prefer. I run mine across my crosscut sled to make sure they are as true as possible.

I hope this tutorial was helpful and that you are inspired to try one of these boards out.

UPDATE: I have created an additional blog entry with some patterns to try out using the techniques listed above. Check out Zig Zag Cutting Board Patterns - Inspirational
McLean, I found mine on craigslist. It took me a little while to find one (Performax 16-32, $360). At the time I found mine there were 4 listed. It may take you a while. Don't be afraid to drive a reasonable distance to get one. You should be able to find one in your area. Just don't give up. Make a few boards to sell to help cover the cost. This is the time of year to sell them. Make some simple long grain boards and sell to friends or at a craft show. Just a thought.

Jim
 

Attachments

Zig Zag Cutting Board - How To:

For those of you who asked me for a tutorial on how to make the zig zag legless vegetable death table (cutting board), here is my best shot. I am far too impatient to take photos when I work, so I decided to illustrate the process using some good old Adobe PhotoShop. I hope you find this useful and informative.

I will outline the process in 10 steps below. I have assumed that when viewing these steps that basic woodworking skills are familiar to you. If you have questions, or run into snags, PM me and I'll do my best to help out.

If you want to see what these boards look like, take a look at my projects. There are a few in there.

Keep in mind that because these are endgrain boards, you should ideally chose the original boards with interesting endgrain. Makes sense right?

Image


I typically measure all of my initial boards and add a few inches. I'd rather end up with scrap pieces, then a scrapped piece. I went big on the 26" length, but after you do a few of these you can create your own ideal measurements. I also try to start out with boards of thicknesses larger than 3/4", but it was easier math for the illustration to use 3/4" thickness.

Image


You can make boards of all sizes. I'm limited to a 12" thickness planer, so that's why I am illustrating 7 sticks of each species. Again, experiment with different sizes, so long as the individual sticks are twice as wide as they are thick.

Image


I can't stress enough the importance of only mating two sticks at a time. No three sticks should be mated with glue. Use your preferred clamping methods, but make sure these are nice and tight. You don't want any gaps for bacteria to hide in.

Image


After these sticks dry, pull them out of the clamps. They are ready to be planed down a bit to make sure they are all even and dimensional. I tape them all (squeeze-out side up) together and run them through the planer.

Image


After these are planed, it's important to pull them apart and make sure they are dimensional (as wide as they are tall). If they differ, run them through the planer individually until they are square.

Image


In order to get the zig zag pattern, you have to cut the original sticks in half so that you can make two sets of patterns. This is the tricky part that I was never able to show folks without illustrations. We'll call them Set A and Set B for this demo.

Image


Now, the reason I went with 26" as the original length is so that this next step allows you to be creative. You can make a very long (two maybe) board that is thin, or make a very heavy-duty board. Thickness is up to you.

Image


Now you are ready for your final glue-up. Take your time and really see this board for what it will become. Look at the end grains and make sure they are uniform. I have flipped boards upside down and noticed this too late. And remember "ENDGRAINS UP!" Maybe I'll make a TShirt with that phrase on it one day.

Image


After the glue dries, you should be left with a not-square-yet board.

Image


Trim edges using any method you prefer. I run mine across my crosscut sled to make sure they are as true as possible.

I hope this tutorial was helpful and that you are inspired to try one of these boards out.

UPDATE: I have created an additional blog entry with some patterns to try out using the techniques listed above. Check out Zig Zag Cutting Board Patterns - Inspirational
I checked out your project page and just want to commend you on some beautiful and creative work! It shows that you are really into your craft. Thanks for the inspiration.
 

Attachments

Zig Zag Cutting Board - How To:

For those of you who asked me for a tutorial on how to make the zig zag legless vegetable death table (cutting board), here is my best shot. I am far too impatient to take photos when I work, so I decided to illustrate the process using some good old Adobe PhotoShop. I hope you find this useful and informative.

I will outline the process in 10 steps below. I have assumed that when viewing these steps that basic woodworking skills are familiar to you. If you have questions, or run into snags, PM me and I'll do my best to help out.

If you want to see what these boards look like, take a look at my projects. There are a few in there.

Keep in mind that because these are endgrain boards, you should ideally chose the original boards with interesting endgrain. Makes sense right?

Image


I typically measure all of my initial boards and add a few inches. I'd rather end up with scrap pieces, then a scrapped piece. I went big on the 26" length, but after you do a few of these you can create your own ideal measurements. I also try to start out with boards of thicknesses larger than 3/4", but it was easier math for the illustration to use 3/4" thickness.

Image


You can make boards of all sizes. I'm limited to a 12" thickness planer, so that's why I am illustrating 7 sticks of each species. Again, experiment with different sizes, so long as the individual sticks are twice as wide as they are thick.

Image


I can't stress enough the importance of only mating two sticks at a time. No three sticks should be mated with glue. Use your preferred clamping methods, but make sure these are nice and tight. You don't want any gaps for bacteria to hide in.

Image


After these sticks dry, pull them out of the clamps. They are ready to be planed down a bit to make sure they are all even and dimensional. I tape them all (squeeze-out side up) together and run them through the planer.

Image


After these are planed, it's important to pull them apart and make sure they are dimensional (as wide as they are tall). If they differ, run them through the planer individually until they are square.

Image


In order to get the zig zag pattern, you have to cut the original sticks in half so that you can make two sets of patterns. This is the tricky part that I was never able to show folks without illustrations. We'll call them Set A and Set B for this demo.

Image


Now, the reason I went with 26" as the original length is so that this next step allows you to be creative. You can make a very long (two maybe) board that is thin, or make a very heavy-duty board. Thickness is up to you.

Image


Now you are ready for your final glue-up. Take your time and really see this board for what it will become. Look at the end grains and make sure they are uniform. I have flipped boards upside down and noticed this too late. And remember "ENDGRAINS UP!" Maybe I'll make a TShirt with that phrase on it one day.

Image


After the glue dries, you should be left with a not-square-yet board.

Image


Trim edges using any method you prefer. I run mine across my crosscut sled to make sure they are as true as possible.

I hope this tutorial was helpful and that you are inspired to try one of these boards out.

UPDATE: I have created an additional blog entry with some patterns to try out using the techniques listed above. Check out Zig Zag Cutting Board Patterns - Inspirational
Thanks I'm going to give it a whirl soon!
 

Attachments

Zig Zag Cutting Board - How To:

For those of you who asked me for a tutorial on how to make the zig zag legless vegetable death table (cutting board), here is my best shot. I am far too impatient to take photos when I work, so I decided to illustrate the process using some good old Adobe PhotoShop. I hope you find this useful and informative.

I will outline the process in 10 steps below. I have assumed that when viewing these steps that basic woodworking skills are familiar to you. If you have questions, or run into snags, PM me and I'll do my best to help out.

If you want to see what these boards look like, take a look at my projects. There are a few in there.

Keep in mind that because these are endgrain boards, you should ideally chose the original boards with interesting endgrain. Makes sense right?

Image


I typically measure all of my initial boards and add a few inches. I'd rather end up with scrap pieces, then a scrapped piece. I went big on the 26" length, but after you do a few of these you can create your own ideal measurements. I also try to start out with boards of thicknesses larger than 3/4", but it was easier math for the illustration to use 3/4" thickness.

Image


You can make boards of all sizes. I'm limited to a 12" thickness planer, so that's why I am illustrating 7 sticks of each species. Again, experiment with different sizes, so long as the individual sticks are twice as wide as they are thick.

Image


I can't stress enough the importance of only mating two sticks at a time. No three sticks should be mated with glue. Use your preferred clamping methods, but make sure these are nice and tight. You don't want any gaps for bacteria to hide in.

Image


After these sticks dry, pull them out of the clamps. They are ready to be planed down a bit to make sure they are all even and dimensional. I tape them all (squeeze-out side up) together and run them through the planer.

Image


After these are planed, it's important to pull them apart and make sure they are dimensional (as wide as they are tall). If they differ, run them through the planer individually until they are square.

Image


In order to get the zig zag pattern, you have to cut the original sticks in half so that you can make two sets of patterns. This is the tricky part that I was never able to show folks without illustrations. We'll call them Set A and Set B for this demo.

Image


Now, the reason I went with 26" as the original length is so that this next step allows you to be creative. You can make a very long (two maybe) board that is thin, or make a very heavy-duty board. Thickness is up to you.

Image


Now you are ready for your final glue-up. Take your time and really see this board for what it will become. Look at the end grains and make sure they are uniform. I have flipped boards upside down and noticed this too late. And remember "ENDGRAINS UP!" Maybe I'll make a TShirt with that phrase on it one day.

Image


After the glue dries, you should be left with a not-square-yet board.

Image


Trim edges using any method you prefer. I run mine across my crosscut sled to make sure they are as true as possible.

I hope this tutorial was helpful and that you are inspired to try one of these boards out.

UPDATE: I have created an additional blog entry with some patterns to try out using the techniques listed above. Check out Zig Zag Cutting Board Patterns - Inspirational
Amazing instructions. Thanks so much for taking the time to do this.
 

Attachments

21 - 40 of 98 Posts