LumberJocks Woodworking Forum banner
41 - 60 of 98 Posts
Zig Zag Cutting Board - How To:

For those of you who asked me for a tutorial on how to make the zig zag legless vegetable death table (cutting board), here is my best shot. I am far too impatient to take photos when I work, so I decided to illustrate the process using some good old Adobe PhotoShop. I hope you find this useful and informative.

I will outline the process in 10 steps below. I have assumed that when viewing these steps that basic woodworking skills are familiar to you. If you have questions, or run into snags, PM me and I'll do my best to help out.

If you want to see what these boards look like, take a look at my projects. There are a few in there.

Keep in mind that because these are endgrain boards, you should ideally chose the original boards with interesting endgrain. Makes sense right?

Image


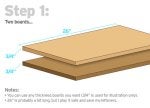
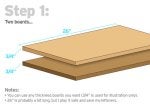
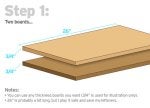
I typically measure all of my initial boards and add a few inches. I'd rather end up with scrap pieces, then a scrapped piece. I went big on the 26" length, but after you do a few of these you can create your own ideal measurements. I also try to start out with boards of thicknesses larger than 3/4", but it was easier math for the illustration to use 3/4" thickness.

Image


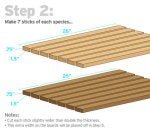
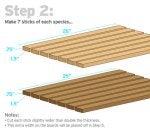
You can make boards of all sizes. I'm limited to a 12" thickness planer, so that's why I am illustrating 7 sticks of each species. Again, experiment with different sizes, so long as the individual sticks are twice as wide as they are thick.

Image


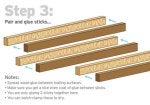
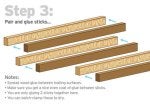
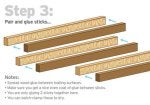
I can't stress enough the importance of only mating two sticks at a time. No three sticks should be mated with glue. Use your preferred clamping methods, but make sure these are nice and tight. You don't want any gaps for bacteria to hide in.

Image


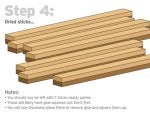
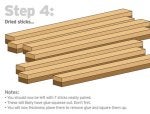
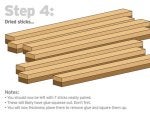
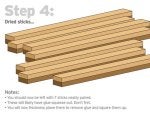
After these sticks dry, pull them out of the clamps. They are ready to be planed down a bit to make sure they are all even and dimensional. I tape them all (squeeze-out side up) together and run them through the planer.

Image


After these are planed, it's important to pull them apart and make sure they are dimensional (as wide as they are tall). If they differ, run them through the planer individually until they are square.

Image


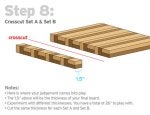
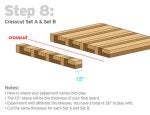
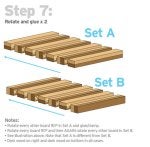
In order to get the zig zag pattern, you have to cut the original sticks in half so that you can make two sets of patterns. This is the tricky part that I was never able to show folks without illustrations. We'll call them Set A and Set B for this demo.

Image


Now, the reason I went with 26" as the original length is so that this next step allows you to be creative. You can make a very long (two maybe) board that is thin, or make a very heavy-duty board. Thickness is up to you.

Image


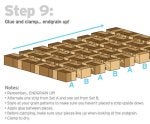
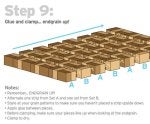
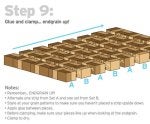
Now you are ready for your final glue-up. Take your time and really see this board for what it will become. Look at the end grains and make sure they are uniform. I have flipped boards upside down and noticed this too late. And remember "ENDGRAINS UP!" Maybe I'll make a TShirt with that phrase on it one day.

Image


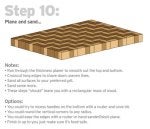
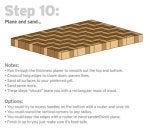
After the glue dries, you should be left with a not-square-yet board.

Image


Trim edges using any method you prefer. I run mine across my crosscut sled to make sure they are as true as possible.

I hope this tutorial was helpful and that you are inspired to try one of these boards out.

UPDATE: I have created an additional blog entry with some patterns to try out using the techniques listed above. Check out Zig Zag Cutting Board Patterns - Inspirational
Another option instead of using a thickness planer or a drum sander is a router planing jig. There are quite a few different designs for them on LJ. They are much safer than running the end grain board through a planer and much cheaper than a drum sander. The only drawback is that they are slow, but that is one reason why they are safe.
 

Attachments

Zig Zag Cutting Board - How To:

For those of you who asked me for a tutorial on how to make the zig zag legless vegetable death table (cutting board), here is my best shot. I am far too impatient to take photos when I work, so I decided to illustrate the process using some good old Adobe PhotoShop. I hope you find this useful and informative.

I will outline the process in 10 steps below. I have assumed that when viewing these steps that basic woodworking skills are familiar to you. If you have questions, or run into snags, PM me and I'll do my best to help out.

If you want to see what these boards look like, take a look at my projects. There are a few in there.

Keep in mind that because these are endgrain boards, you should ideally chose the original boards with interesting endgrain. Makes sense right?

Image


I typically measure all of my initial boards and add a few inches. I'd rather end up with scrap pieces, then a scrapped piece. I went big on the 26" length, but after you do a few of these you can create your own ideal measurements. I also try to start out with boards of thicknesses larger than 3/4", but it was easier math for the illustration to use 3/4" thickness.

Image


You can make boards of all sizes. I'm limited to a 12" thickness planer, so that's why I am illustrating 7 sticks of each species. Again, experiment with different sizes, so long as the individual sticks are twice as wide as they are thick.

Image


I can't stress enough the importance of only mating two sticks at a time. No three sticks should be mated with glue. Use your preferred clamping methods, but make sure these are nice and tight. You don't want any gaps for bacteria to hide in.

Image


After these sticks dry, pull them out of the clamps. They are ready to be planed down a bit to make sure they are all even and dimensional. I tape them all (squeeze-out side up) together and run them through the planer.

Image


After these are planed, it's important to pull them apart and make sure they are dimensional (as wide as they are tall). If they differ, run them through the planer individually until they are square.

Image


In order to get the zig zag pattern, you have to cut the original sticks in half so that you can make two sets of patterns. This is the tricky part that I was never able to show folks without illustrations. We'll call them Set A and Set B for this demo.

Image


Now, the reason I went with 26" as the original length is so that this next step allows you to be creative. You can make a very long (two maybe) board that is thin, or make a very heavy-duty board. Thickness is up to you.

Image


Now you are ready for your final glue-up. Take your time and really see this board for what it will become. Look at the end grains and make sure they are uniform. I have flipped boards upside down and noticed this too late. And remember "ENDGRAINS UP!" Maybe I'll make a TShirt with that phrase on it one day.

Image


After the glue dries, you should be left with a not-square-yet board.

Image


Trim edges using any method you prefer. I run mine across my crosscut sled to make sure they are as true as possible.

I hope this tutorial was helpful and that you are inspired to try one of these boards out.

UPDATE: I have created an additional blog entry with some patterns to try out using the techniques listed above. Check out Zig Zag Cutting Board Patterns - Inspirational
i looked high and low for this tutorial…thanks so much. best tutorial and description of a project i've even seen. you rock.
 

Attachments

Discussion starter · #43 ·
Zig Zag Cutting Board - How To:

For those of you who asked me for a tutorial on how to make the zig zag legless vegetable death table (cutting board), here is my best shot. I am far too impatient to take photos when I work, so I decided to illustrate the process using some good old Adobe PhotoShop. I hope you find this useful and informative.

I will outline the process in 10 steps below. I have assumed that when viewing these steps that basic woodworking skills are familiar to you. If you have questions, or run into snags, PM me and I'll do my best to help out.

If you want to see what these boards look like, take a look at my projects. There are a few in there.

Keep in mind that because these are endgrain boards, you should ideally chose the original boards with interesting endgrain. Makes sense right?

Image


I typically measure all of my initial boards and add a few inches. I'd rather end up with scrap pieces, then a scrapped piece. I went big on the 26" length, but after you do a few of these you can create your own ideal measurements. I also try to start out with boards of thicknesses larger than 3/4", but it was easier math for the illustration to use 3/4" thickness.

Image


You can make boards of all sizes. I'm limited to a 12" thickness planer, so that's why I am illustrating 7 sticks of each species. Again, experiment with different sizes, so long as the individual sticks are twice as wide as they are thick.

Image


I can't stress enough the importance of only mating two sticks at a time. No three sticks should be mated with glue. Use your preferred clamping methods, but make sure these are nice and tight. You don't want any gaps for bacteria to hide in.

Image


After these sticks dry, pull them out of the clamps. They are ready to be planed down a bit to make sure they are all even and dimensional. I tape them all (squeeze-out side up) together and run them through the planer.

Image


After these are planed, it's important to pull them apart and make sure they are dimensional (as wide as they are tall). If they differ, run them through the planer individually until they are square.

Image


In order to get the zig zag pattern, you have to cut the original sticks in half so that you can make two sets of patterns. This is the tricky part that I was never able to show folks without illustrations. We'll call them Set A and Set B for this demo.

Image


Now, the reason I went with 26" as the original length is so that this next step allows you to be creative. You can make a very long (two maybe) board that is thin, or make a very heavy-duty board. Thickness is up to you.

Image


Now you are ready for your final glue-up. Take your time and really see this board for what it will become. Look at the end grains and make sure they are uniform. I have flipped boards upside down and noticed this too late. And remember "ENDGRAINS UP!" Maybe I'll make a TShirt with that phrase on it one day.

Image


After the glue dries, you should be left with a not-square-yet board.

Image


Trim edges using any method you prefer. I run mine across my crosscut sled to make sure they are as true as possible.

I hope this tutorial was helpful and that you are inspired to try one of these boards out.

UPDATE: I have created an additional blog entry with some patterns to try out using the techniques listed above. Check out Zig Zag Cutting Board Patterns - Inspirational
@spike - Thank you for the compliment. I truly appreciate it.
 

Attachments

Zig Zag Cutting Board - How To:

For those of you who asked me for a tutorial on how to make the zig zag legless vegetable death table (cutting board), here is my best shot. I am far too impatient to take photos when I work, so I decided to illustrate the process using some good old Adobe PhotoShop. I hope you find this useful and informative.

I will outline the process in 10 steps below. I have assumed that when viewing these steps that basic woodworking skills are familiar to you. If you have questions, or run into snags, PM me and I'll do my best to help out.

If you want to see what these boards look like, take a look at my projects. There are a few in there.

Keep in mind that because these are endgrain boards, you should ideally chose the original boards with interesting endgrain. Makes sense right?

Image


I typically measure all of my initial boards and add a few inches. I'd rather end up with scrap pieces, then a scrapped piece. I went big on the 26" length, but after you do a few of these you can create your own ideal measurements. I also try to start out with boards of thicknesses larger than 3/4", but it was easier math for the illustration to use 3/4" thickness.

Image


You can make boards of all sizes. I'm limited to a 12" thickness planer, so that's why I am illustrating 7 sticks of each species. Again, experiment with different sizes, so long as the individual sticks are twice as wide as they are thick.

Image


I can't stress enough the importance of only mating two sticks at a time. No three sticks should be mated with glue. Use your preferred clamping methods, but make sure these are nice and tight. You don't want any gaps for bacteria to hide in.

Image


After these sticks dry, pull them out of the clamps. They are ready to be planed down a bit to make sure they are all even and dimensional. I tape them all (squeeze-out side up) together and run them through the planer.

Image


After these are planed, it's important to pull them apart and make sure they are dimensional (as wide as they are tall). If they differ, run them through the planer individually until they are square.

Image


In order to get the zig zag pattern, you have to cut the original sticks in half so that you can make two sets of patterns. This is the tricky part that I was never able to show folks without illustrations. We'll call them Set A and Set B for this demo.

Image


Now, the reason I went with 26" as the original length is so that this next step allows you to be creative. You can make a very long (two maybe) board that is thin, or make a very heavy-duty board. Thickness is up to you.

Image


Now you are ready for your final glue-up. Take your time and really see this board for what it will become. Look at the end grains and make sure they are uniform. I have flipped boards upside down and noticed this too late. And remember "ENDGRAINS UP!" Maybe I'll make a TShirt with that phrase on it one day.

Image


After the glue dries, you should be left with a not-square-yet board.

Image


Trim edges using any method you prefer. I run mine across my crosscut sled to make sure they are as true as possible.

I hope this tutorial was helpful and that you are inspired to try one of these boards out.

UPDATE: I have created an additional blog entry with some patterns to try out using the techniques listed above. Check out Zig Zag Cutting Board Patterns - Inspirational
Im going along with Spike on this one. I just finished flattening my first zigzagger and it came out spot on from these easy to follow instructions. And as far as the router planer sled being slow .. pshhhh … i flattened my board in about 30 minutes with pretty good results.

Thanks McLean!
 

Attachments

Discussion starter · #45 ·
Zig Zag Cutting Board - How To:

For those of you who asked me for a tutorial on how to make the zig zag legless vegetable death table (cutting board), here is my best shot. I am far too impatient to take photos when I work, so I decided to illustrate the process using some good old Adobe PhotoShop. I hope you find this useful and informative.

I will outline the process in 10 steps below. I have assumed that when viewing these steps that basic woodworking skills are familiar to you. If you have questions, or run into snags, PM me and I'll do my best to help out.

If you want to see what these boards look like, take a look at my projects. There are a few in there.

Keep in mind that because these are endgrain boards, you should ideally chose the original boards with interesting endgrain. Makes sense right?

Image


I typically measure all of my initial boards and add a few inches. I'd rather end up with scrap pieces, then a scrapped piece. I went big on the 26" length, but after you do a few of these you can create your own ideal measurements. I also try to start out with boards of thicknesses larger than 3/4", but it was easier math for the illustration to use 3/4" thickness.

Image


You can make boards of all sizes. I'm limited to a 12" thickness planer, so that's why I am illustrating 7 sticks of each species. Again, experiment with different sizes, so long as the individual sticks are twice as wide as they are thick.

Image


I can't stress enough the importance of only mating two sticks at a time. No three sticks should be mated with glue. Use your preferred clamping methods, but make sure these are nice and tight. You don't want any gaps for bacteria to hide in.

Image


After these sticks dry, pull them out of the clamps. They are ready to be planed down a bit to make sure they are all even and dimensional. I tape them all (squeeze-out side up) together and run them through the planer.

Image


After these are planed, it's important to pull them apart and make sure they are dimensional (as wide as they are tall). If they differ, run them through the planer individually until they are square.

Image


In order to get the zig zag pattern, you have to cut the original sticks in half so that you can make two sets of patterns. This is the tricky part that I was never able to show folks without illustrations. We'll call them Set A and Set B for this demo.

Image


Now, the reason I went with 26" as the original length is so that this next step allows you to be creative. You can make a very long (two maybe) board that is thin, or make a very heavy-duty board. Thickness is up to you.

Image


Now you are ready for your final glue-up. Take your time and really see this board for what it will become. Look at the end grains and make sure they are uniform. I have flipped boards upside down and noticed this too late. And remember "ENDGRAINS UP!" Maybe I'll make a TShirt with that phrase on it one day.

Image


After the glue dries, you should be left with a not-square-yet board.

Image


Trim edges using any method you prefer. I run mine across my crosscut sled to make sure they are as true as possible.

I hope this tutorial was helpful and that you are inspired to try one of these boards out.

UPDATE: I have created an additional blog entry with some patterns to try out using the techniques listed above. Check out Zig Zag Cutting Board Patterns - Inspirational
@chrisstef - I am so happy it worked out for you. That's awesome. I'm really glad it was helpful. Make sure to check out the second part of the blog with some of the other combinations using the same methods. I've seen a few versions on LJs and they are really cool.

Since I bought my lathe, I haven't stopped turning. I need to get back into making cutting boards.
 

Attachments

Zig Zag Cutting Board - How To:

For those of you who asked me for a tutorial on how to make the zig zag legless vegetable death table (cutting board), here is my best shot. I am far too impatient to take photos when I work, so I decided to illustrate the process using some good old Adobe PhotoShop. I hope you find this useful and informative.

I will outline the process in 10 steps below. I have assumed that when viewing these steps that basic woodworking skills are familiar to you. If you have questions, or run into snags, PM me and I'll do my best to help out.

If you want to see what these boards look like, take a look at my projects. There are a few in there.

Keep in mind that because these are endgrain boards, you should ideally chose the original boards with interesting endgrain. Makes sense right?

Image


I typically measure all of my initial boards and add a few inches. I'd rather end up with scrap pieces, then a scrapped piece. I went big on the 26" length, but after you do a few of these you can create your own ideal measurements. I also try to start out with boards of thicknesses larger than 3/4", but it was easier math for the illustration to use 3/4" thickness.

Image


You can make boards of all sizes. I'm limited to a 12" thickness planer, so that's why I am illustrating 7 sticks of each species. Again, experiment with different sizes, so long as the individual sticks are twice as wide as they are thick.

Image


I can't stress enough the importance of only mating two sticks at a time. No three sticks should be mated with glue. Use your preferred clamping methods, but make sure these are nice and tight. You don't want any gaps for bacteria to hide in.

Image


After these sticks dry, pull them out of the clamps. They are ready to be planed down a bit to make sure they are all even and dimensional. I tape them all (squeeze-out side up) together and run them through the planer.

Image


After these are planed, it's important to pull them apart and make sure they are dimensional (as wide as they are tall). If they differ, run them through the planer individually until they are square.

Image


In order to get the zig zag pattern, you have to cut the original sticks in half so that you can make two sets of patterns. This is the tricky part that I was never able to show folks without illustrations. We'll call them Set A and Set B for this demo.

Image


Now, the reason I went with 26" as the original length is so that this next step allows you to be creative. You can make a very long (two maybe) board that is thin, or make a very heavy-duty board. Thickness is up to you.

Image


Now you are ready for your final glue-up. Take your time and really see this board for what it will become. Look at the end grains and make sure they are uniform. I have flipped boards upside down and noticed this too late. And remember "ENDGRAINS UP!" Maybe I'll make a TShirt with that phrase on it one day.

Image


After the glue dries, you should be left with a not-square-yet board.

Image


Trim edges using any method you prefer. I run mine across my crosscut sled to make sure they are as true as possible.

I hope this tutorial was helpful and that you are inspired to try one of these boards out.

UPDATE: I have created an additional blog entry with some patterns to try out using the techniques listed above. Check out Zig Zag Cutting Board Patterns - Inspirational
worked like a charm … except when my planer decided to snipe out the ends … but that my problem. I just took it back to the jointer for a nice flat face. It was my first CB and i think the wifes givin it the green light to be left out on the counter!
 

Attachments

Discussion starter · #47 ·
Zig Zag Cutting Board - How To:

For those of you who asked me for a tutorial on how to make the zig zag legless vegetable death table (cutting board), here is my best shot. I am far too impatient to take photos when I work, so I decided to illustrate the process using some good old Adobe PhotoShop. I hope you find this useful and informative.

I will outline the process in 10 steps below. I have assumed that when viewing these steps that basic woodworking skills are familiar to you. If you have questions, or run into snags, PM me and I'll do my best to help out.

If you want to see what these boards look like, take a look at my projects. There are a few in there.

Keep in mind that because these are endgrain boards, you should ideally chose the original boards with interesting endgrain. Makes sense right?

Image


I typically measure all of my initial boards and add a few inches. I'd rather end up with scrap pieces, then a scrapped piece. I went big on the 26" length, but after you do a few of these you can create your own ideal measurements. I also try to start out with boards of thicknesses larger than 3/4", but it was easier math for the illustration to use 3/4" thickness.

Image


You can make boards of all sizes. I'm limited to a 12" thickness planer, so that's why I am illustrating 7 sticks of each species. Again, experiment with different sizes, so long as the individual sticks are twice as wide as they are thick.

Image


I can't stress enough the importance of only mating two sticks at a time. No three sticks should be mated with glue. Use your preferred clamping methods, but make sure these are nice and tight. You don't want any gaps for bacteria to hide in.

Image


After these sticks dry, pull them out of the clamps. They are ready to be planed down a bit to make sure they are all even and dimensional. I tape them all (squeeze-out side up) together and run them through the planer.

Image


After these are planed, it's important to pull them apart and make sure they are dimensional (as wide as they are tall). If they differ, run them through the planer individually until they are square.

Image


In order to get the zig zag pattern, you have to cut the original sticks in half so that you can make two sets of patterns. This is the tricky part that I was never able to show folks without illustrations. We'll call them Set A and Set B for this demo.

Image


Now, the reason I went with 26" as the original length is so that this next step allows you to be creative. You can make a very long (two maybe) board that is thin, or make a very heavy-duty board. Thickness is up to you.

Image


Now you are ready for your final glue-up. Take your time and really see this board for what it will become. Look at the end grains and make sure they are uniform. I have flipped boards upside down and noticed this too late. And remember "ENDGRAINS UP!" Maybe I'll make a TShirt with that phrase on it one day.

Image


After the glue dries, you should be left with a not-square-yet board.

Image


Trim edges using any method you prefer. I run mine across my crosscut sled to make sure they are as true as possible.

I hope this tutorial was helpful and that you are inspired to try one of these boards out.

UPDATE: I have created an additional blog entry with some patterns to try out using the techniques listed above. Check out Zig Zag Cutting Board Patterns - Inspirational
@chrisstef - Since posting the tutorial I've changed my point of view on running end grain through your planer. Just be careful. Only had one minor incident where the knives grabbed the board and it wasn't that big of a deal. I ended up buying a drum sander and this makes life so much easier. Best of luck. Glad it turned out well.
 

Attachments

Zig Zag Cutting Board - How To:

For those of you who asked me for a tutorial on how to make the zig zag legless vegetable death table (cutting board), here is my best shot. I am far too impatient to take photos when I work, so I decided to illustrate the process using some good old Adobe PhotoShop. I hope you find this useful and informative.

I will outline the process in 10 steps below. I have assumed that when viewing these steps that basic woodworking skills are familiar to you. If you have questions, or run into snags, PM me and I'll do my best to help out.

If you want to see what these boards look like, take a look at my projects. There are a few in there.

Keep in mind that because these are endgrain boards, you should ideally chose the original boards with interesting endgrain. Makes sense right?

Image


I typically measure all of my initial boards and add a few inches. I'd rather end up with scrap pieces, then a scrapped piece. I went big on the 26" length, but after you do a few of these you can create your own ideal measurements. I also try to start out with boards of thicknesses larger than 3/4", but it was easier math for the illustration to use 3/4" thickness.

Image


You can make boards of all sizes. I'm limited to a 12" thickness planer, so that's why I am illustrating 7 sticks of each species. Again, experiment with different sizes, so long as the individual sticks are twice as wide as they are thick.

Image


I can't stress enough the importance of only mating two sticks at a time. No three sticks should be mated with glue. Use your preferred clamping methods, but make sure these are nice and tight. You don't want any gaps for bacteria to hide in.

Image


After these sticks dry, pull them out of the clamps. They are ready to be planed down a bit to make sure they are all even and dimensional. I tape them all (squeeze-out side up) together and run them through the planer.

Image


After these are planed, it's important to pull them apart and make sure they are dimensional (as wide as they are tall). If they differ, run them through the planer individually until they are square.

Image


In order to get the zig zag pattern, you have to cut the original sticks in half so that you can make two sets of patterns. This is the tricky part that I was never able to show folks without illustrations. We'll call them Set A and Set B for this demo.

Image


Now, the reason I went with 26" as the original length is so that this next step allows you to be creative. You can make a very long (two maybe) board that is thin, or make a very heavy-duty board. Thickness is up to you.

Image


Now you are ready for your final glue-up. Take your time and really see this board for what it will become. Look at the end grains and make sure they are uniform. I have flipped boards upside down and noticed this too late. And remember "ENDGRAINS UP!" Maybe I'll make a TShirt with that phrase on it one day.

Image


After the glue dries, you should be left with a not-square-yet board.

Image


Trim edges using any method you prefer. I run mine across my crosscut sled to make sure they are as true as possible.

I hope this tutorial was helpful and that you are inspired to try one of these boards out.

UPDATE: I have created an additional blog entry with some patterns to try out using the techniques listed above. Check out Zig Zag Cutting Board Patterns - Inspirational
Thanks for the tutorial. One question/thought - do you plane the board after it is endgrain-up?

Oh - never mind - just read all the comments :)

I am glad i just got a drum sander!
 

Attachments

Zig Zag Cutting Board - How To:

For those of you who asked me for a tutorial on how to make the zig zag legless vegetable death table (cutting board), here is my best shot. I am far too impatient to take photos when I work, so I decided to illustrate the process using some good old Adobe PhotoShop. I hope you find this useful and informative.

I will outline the process in 10 steps below. I have assumed that when viewing these steps that basic woodworking skills are familiar to you. If you have questions, or run into snags, PM me and I'll do my best to help out.

If you want to see what these boards look like, take a look at my projects. There are a few in there.

Keep in mind that because these are endgrain boards, you should ideally chose the original boards with interesting endgrain. Makes sense right?

Image


I typically measure all of my initial boards and add a few inches. I'd rather end up with scrap pieces, then a scrapped piece. I went big on the 26" length, but after you do a few of these you can create your own ideal measurements. I also try to start out with boards of thicknesses larger than 3/4", but it was easier math for the illustration to use 3/4" thickness.

Image


You can make boards of all sizes. I'm limited to a 12" thickness planer, so that's why I am illustrating 7 sticks of each species. Again, experiment with different sizes, so long as the individual sticks are twice as wide as they are thick.

Image


I can't stress enough the importance of only mating two sticks at a time. No three sticks should be mated with glue. Use your preferred clamping methods, but make sure these are nice and tight. You don't want any gaps for bacteria to hide in.

Image


After these sticks dry, pull them out of the clamps. They are ready to be planed down a bit to make sure they are all even and dimensional. I tape them all (squeeze-out side up) together and run them through the planer.

Image


After these are planed, it's important to pull them apart and make sure they are dimensional (as wide as they are tall). If they differ, run them through the planer individually until they are square.

Image


In order to get the zig zag pattern, you have to cut the original sticks in half so that you can make two sets of patterns. This is the tricky part that I was never able to show folks without illustrations. We'll call them Set A and Set B for this demo.

Image


Now, the reason I went with 26" as the original length is so that this next step allows you to be creative. You can make a very long (two maybe) board that is thin, or make a very heavy-duty board. Thickness is up to you.

Image


Now you are ready for your final glue-up. Take your time and really see this board for what it will become. Look at the end grains and make sure they are uniform. I have flipped boards upside down and noticed this too late. And remember "ENDGRAINS UP!" Maybe I'll make a TShirt with that phrase on it one day.

Image


After the glue dries, you should be left with a not-square-yet board.

Image


Trim edges using any method you prefer. I run mine across my crosscut sled to make sure they are as true as possible.

I hope this tutorial was helpful and that you are inspired to try one of these boards out.

UPDATE: I have created an additional blog entry with some patterns to try out using the techniques listed above. Check out Zig Zag Cutting Board Patterns - Inspirational
Thanks ! Great tutorial.
 

Attachments

Zig Zag Cutting Board - How To:

For those of you who asked me for a tutorial on how to make the zig zag legless vegetable death table (cutting board), here is my best shot. I am far too impatient to take photos when I work, so I decided to illustrate the process using some good old Adobe PhotoShop. I hope you find this useful and informative.

I will outline the process in 10 steps below. I have assumed that when viewing these steps that basic woodworking skills are familiar to you. If you have questions, or run into snags, PM me and I'll do my best to help out.

If you want to see what these boards look like, take a look at my projects. There are a few in there.

Keep in mind that because these are endgrain boards, you should ideally chose the original boards with interesting endgrain. Makes sense right?

Image


I typically measure all of my initial boards and add a few inches. I'd rather end up with scrap pieces, then a scrapped piece. I went big on the 26" length, but after you do a few of these you can create your own ideal measurements. I also try to start out with boards of thicknesses larger than 3/4", but it was easier math for the illustration to use 3/4" thickness.

Image


You can make boards of all sizes. I'm limited to a 12" thickness planer, so that's why I am illustrating 7 sticks of each species. Again, experiment with different sizes, so long as the individual sticks are twice as wide as they are thick.

Image


I can't stress enough the importance of only mating two sticks at a time. No three sticks should be mated with glue. Use your preferred clamping methods, but make sure these are nice and tight. You don't want any gaps for bacteria to hide in.

Image


After these sticks dry, pull them out of the clamps. They are ready to be planed down a bit to make sure they are all even and dimensional. I tape them all (squeeze-out side up) together and run them through the planer.

Image


After these are planed, it's important to pull them apart and make sure they are dimensional (as wide as they are tall). If they differ, run them through the planer individually until they are square.

Image


In order to get the zig zag pattern, you have to cut the original sticks in half so that you can make two sets of patterns. This is the tricky part that I was never able to show folks without illustrations. We'll call them Set A and Set B for this demo.

Image


Now, the reason I went with 26" as the original length is so that this next step allows you to be creative. You can make a very long (two maybe) board that is thin, or make a very heavy-duty board. Thickness is up to you.

Image


Now you are ready for your final glue-up. Take your time and really see this board for what it will become. Look at the end grains and make sure they are uniform. I have flipped boards upside down and noticed this too late. And remember "ENDGRAINS UP!" Maybe I'll make a TShirt with that phrase on it one day.

Image


After the glue dries, you should be left with a not-square-yet board.

Image


Trim edges using any method you prefer. I run mine across my crosscut sled to make sure they are as true as possible.

I hope this tutorial was helpful and that you are inspired to try one of these boards out.

UPDATE: I have created an additional blog entry with some patterns to try out using the techniques listed above. Check out Zig Zag Cutting Board Patterns - Inspirational
Thanks, following your instructions!
 

Attachments

Zig Zag Cutting Board - How To:

For those of you who asked me for a tutorial on how to make the zig zag legless vegetable death table (cutting board), here is my best shot. I am far too impatient to take photos when I work, so I decided to illustrate the process using some good old Adobe PhotoShop. I hope you find this useful and informative.

I will outline the process in 10 steps below. I have assumed that when viewing these steps that basic woodworking skills are familiar to you. If you have questions, or run into snags, PM me and I'll do my best to help out.

If you want to see what these boards look like, take a look at my projects. There are a few in there.

Keep in mind that because these are endgrain boards, you should ideally chose the original boards with interesting endgrain. Makes sense right?

Image


I typically measure all of my initial boards and add a few inches. I'd rather end up with scrap pieces, then a scrapped piece. I went big on the 26" length, but after you do a few of these you can create your own ideal measurements. I also try to start out with boards of thicknesses larger than 3/4", but it was easier math for the illustration to use 3/4" thickness.

Image


You can make boards of all sizes. I'm limited to a 12" thickness planer, so that's why I am illustrating 7 sticks of each species. Again, experiment with different sizes, so long as the individual sticks are twice as wide as they are thick.

Image


I can't stress enough the importance of only mating two sticks at a time. No three sticks should be mated with glue. Use your preferred clamping methods, but make sure these are nice and tight. You don't want any gaps for bacteria to hide in.

Image


After these sticks dry, pull them out of the clamps. They are ready to be planed down a bit to make sure they are all even and dimensional. I tape them all (squeeze-out side up) together and run them through the planer.

Image


After these are planed, it's important to pull them apart and make sure they are dimensional (as wide as they are tall). If they differ, run them through the planer individually until they are square.

Image


In order to get the zig zag pattern, you have to cut the original sticks in half so that you can make two sets of patterns. This is the tricky part that I was never able to show folks without illustrations. We'll call them Set A and Set B for this demo.

Image


Now, the reason I went with 26" as the original length is so that this next step allows you to be creative. You can make a very long (two maybe) board that is thin, or make a very heavy-duty board. Thickness is up to you.

Image


Now you are ready for your final glue-up. Take your time and really see this board for what it will become. Look at the end grains and make sure they are uniform. I have flipped boards upside down and noticed this too late. And remember "ENDGRAINS UP!" Maybe I'll make a TShirt with that phrase on it one day.

Image


After the glue dries, you should be left with a not-square-yet board.

Image


Trim edges using any method you prefer. I run mine across my crosscut sled to make sure they are as true as possible.

I hope this tutorial was helpful and that you are inspired to try one of these boards out.

UPDATE: I have created an additional blog entry with some patterns to try out using the techniques listed above. Check out Zig Zag Cutting Board Patterns - Inspirational
well done and very clear instructions..
 

Attachments

Zig Zag Cutting Board - How To:

For those of you who asked me for a tutorial on how to make the zig zag legless vegetable death table (cutting board), here is my best shot. I am far too impatient to take photos when I work, so I decided to illustrate the process using some good old Adobe PhotoShop. I hope you find this useful and informative.

I will outline the process in 10 steps below. I have assumed that when viewing these steps that basic woodworking skills are familiar to you. If you have questions, or run into snags, PM me and I'll do my best to help out.

If you want to see what these boards look like, take a look at my projects. There are a few in there.

Keep in mind that because these are endgrain boards, you should ideally chose the original boards with interesting endgrain. Makes sense right?

Image


I typically measure all of my initial boards and add a few inches. I'd rather end up with scrap pieces, then a scrapped piece. I went big on the 26" length, but after you do a few of these you can create your own ideal measurements. I also try to start out with boards of thicknesses larger than 3/4", but it was easier math for the illustration to use 3/4" thickness.

Image


You can make boards of all sizes. I'm limited to a 12" thickness planer, so that's why I am illustrating 7 sticks of each species. Again, experiment with different sizes, so long as the individual sticks are twice as wide as they are thick.

Image


I can't stress enough the importance of only mating two sticks at a time. No three sticks should be mated with glue. Use your preferred clamping methods, but make sure these are nice and tight. You don't want any gaps for bacteria to hide in.

Image


After these sticks dry, pull them out of the clamps. They are ready to be planed down a bit to make sure they are all even and dimensional. I tape them all (squeeze-out side up) together and run them through the planer.

Image


After these are planed, it's important to pull them apart and make sure they are dimensional (as wide as they are tall). If they differ, run them through the planer individually until they are square.

Image


In order to get the zig zag pattern, you have to cut the original sticks in half so that you can make two sets of patterns. This is the tricky part that I was never able to show folks without illustrations. We'll call them Set A and Set B for this demo.

Image


Now, the reason I went with 26" as the original length is so that this next step allows you to be creative. You can make a very long (two maybe) board that is thin, or make a very heavy-duty board. Thickness is up to you.

Image


Now you are ready for your final glue-up. Take your time and really see this board for what it will become. Look at the end grains and make sure they are uniform. I have flipped boards upside down and noticed this too late. And remember "ENDGRAINS UP!" Maybe I'll make a TShirt with that phrase on it one day.

Image


After the glue dries, you should be left with a not-square-yet board.

Image


Trim edges using any method you prefer. I run mine across my crosscut sled to make sure they are as true as possible.

I hope this tutorial was helpful and that you are inspired to try one of these boards out.

UPDATE: I have created an additional blog entry with some patterns to try out using the techniques listed above. Check out Zig Zag Cutting Board Patterns - Inspirational
Many thanks, this will make a great wedding for my niece. With these instructions I have the confidence I can make this.
 

Attachments

Zig Zag Cutting Board - How To:

For those of you who asked me for a tutorial on how to make the zig zag legless vegetable death table (cutting board), here is my best shot. I am far too impatient to take photos when I work, so I decided to illustrate the process using some good old Adobe PhotoShop. I hope you find this useful and informative.

I will outline the process in 10 steps below. I have assumed that when viewing these steps that basic woodworking skills are familiar to you. If you have questions, or run into snags, PM me and I'll do my best to help out.

If you want to see what these boards look like, take a look at my projects. There are a few in there.

Keep in mind that because these are endgrain boards, you should ideally chose the original boards with interesting endgrain. Makes sense right?

Image


I typically measure all of my initial boards and add a few inches. I'd rather end up with scrap pieces, then a scrapped piece. I went big on the 26" length, but after you do a few of these you can create your own ideal measurements. I also try to start out with boards of thicknesses larger than 3/4", but it was easier math for the illustration to use 3/4" thickness.

Image


You can make boards of all sizes. I'm limited to a 12" thickness planer, so that's why I am illustrating 7 sticks of each species. Again, experiment with different sizes, so long as the individual sticks are twice as wide as they are thick.

Image


I can't stress enough the importance of only mating two sticks at a time. No three sticks should be mated with glue. Use your preferred clamping methods, but make sure these are nice and tight. You don't want any gaps for bacteria to hide in.

Image


After these sticks dry, pull them out of the clamps. They are ready to be planed down a bit to make sure they are all even and dimensional. I tape them all (squeeze-out side up) together and run them through the planer.

Image


After these are planed, it's important to pull them apart and make sure they are dimensional (as wide as they are tall). If they differ, run them through the planer individually until they are square.

Image


In order to get the zig zag pattern, you have to cut the original sticks in half so that you can make two sets of patterns. This is the tricky part that I was never able to show folks without illustrations. We'll call them Set A and Set B for this demo.

Image


Now, the reason I went with 26" as the original length is so that this next step allows you to be creative. You can make a very long (two maybe) board that is thin, or make a very heavy-duty board. Thickness is up to you.

Image


Now you are ready for your final glue-up. Take your time and really see this board for what it will become. Look at the end grains and make sure they are uniform. I have flipped boards upside down and noticed this too late. And remember "ENDGRAINS UP!" Maybe I'll make a TShirt with that phrase on it one day.

Image


After the glue dries, you should be left with a not-square-yet board.

Image


Trim edges using any method you prefer. I run mine across my crosscut sled to make sure they are as true as possible.

I hope this tutorial was helpful and that you are inspired to try one of these boards out.

UPDATE: I have created an additional blog entry with some patterns to try out using the techniques listed above. Check out Zig Zag Cutting Board Patterns - Inspirational
Thanks for the tutorial, Maclean, VA (my home state!!). I am just about to attempt my first end grain cutting board after a botched attempt at making a cherry queen bed for my son - I bit off a lot to chew for my fourth ever wood working project and, while I know that the learning curve is steep and it is ok to botch things, I lost a bit of confidence. So it is nice to find a good, clear tutorial on how to make a good looking cutting board (I decided to just go for some projects that could be skill developers for a bit). Thanks. And thanks for your perfect attitude about woodworking and this community - we are all trying to learn and muddle our way through and it is nice to have a place wephere you can ask some people who have been there before you!
 

Attachments

Zig Zag Cutting Board - How To:

For those of you who asked me for a tutorial on how to make the zig zag legless vegetable death table (cutting board), here is my best shot. I am far too impatient to take photos when I work, so I decided to illustrate the process using some good old Adobe PhotoShop. I hope you find this useful and informative.

I will outline the process in 10 steps below. I have assumed that when viewing these steps that basic woodworking skills are familiar to you. If you have questions, or run into snags, PM me and I'll do my best to help out.

If you want to see what these boards look like, take a look at my projects. There are a few in there.

Keep in mind that because these are endgrain boards, you should ideally chose the original boards with interesting endgrain. Makes sense right?

Image


I typically measure all of my initial boards and add a few inches. I'd rather end up with scrap pieces, then a scrapped piece. I went big on the 26" length, but after you do a few of these you can create your own ideal measurements. I also try to start out with boards of thicknesses larger than 3/4", but it was easier math for the illustration to use 3/4" thickness.

Image


You can make boards of all sizes. I'm limited to a 12" thickness planer, so that's why I am illustrating 7 sticks of each species. Again, experiment with different sizes, so long as the individual sticks are twice as wide as they are thick.

Image


I can't stress enough the importance of only mating two sticks at a time. No three sticks should be mated with glue. Use your preferred clamping methods, but make sure these are nice and tight. You don't want any gaps for bacteria to hide in.

Image


After these sticks dry, pull them out of the clamps. They are ready to be planed down a bit to make sure they are all even and dimensional. I tape them all (squeeze-out side up) together and run them through the planer.

Image


After these are planed, it's important to pull them apart and make sure they are dimensional (as wide as they are tall). If they differ, run them through the planer individually until they are square.

Image


In order to get the zig zag pattern, you have to cut the original sticks in half so that you can make two sets of patterns. This is the tricky part that I was never able to show folks without illustrations. We'll call them Set A and Set B for this demo.

Image


Now, the reason I went with 26" as the original length is so that this next step allows you to be creative. You can make a very long (two maybe) board that is thin, or make a very heavy-duty board. Thickness is up to you.

Image


Now you are ready for your final glue-up. Take your time and really see this board for what it will become. Look at the end grains and make sure they are uniform. I have flipped boards upside down and noticed this too late. And remember "ENDGRAINS UP!" Maybe I'll make a TShirt with that phrase on it one day.

Image


After the glue dries, you should be left with a not-square-yet board.

Image


Trim edges using any method you prefer. I run mine across my crosscut sled to make sure they are as true as possible.

I hope this tutorial was helpful and that you are inspired to try one of these boards out.

UPDATE: I have created an additional blog entry with some patterns to try out using the techniques listed above. Check out Zig Zag Cutting Board Patterns - Inspirational
Image


Thanks for the tutorial very clear and easy to follow, I made this one from Jarrah,Maple and Blackbutt
 

Attachments

Discussion starter · #55 ·
Zig Zag Cutting Board - How To:

For those of you who asked me for a tutorial on how to make the zig zag legless vegetable death table (cutting board), here is my best shot. I am far too impatient to take photos when I work, so I decided to illustrate the process using some good old Adobe PhotoShop. I hope you find this useful and informative.

I will outline the process in 10 steps below. I have assumed that when viewing these steps that basic woodworking skills are familiar to you. If you have questions, or run into snags, PM me and I'll do my best to help out.

If you want to see what these boards look like, take a look at my projects. There are a few in there.

Keep in mind that because these are endgrain boards, you should ideally chose the original boards with interesting endgrain. Makes sense right?

Image


I typically measure all of my initial boards and add a few inches. I'd rather end up with scrap pieces, then a scrapped piece. I went big on the 26" length, but after you do a few of these you can create your own ideal measurements. I also try to start out with boards of thicknesses larger than 3/4", but it was easier math for the illustration to use 3/4" thickness.

Image


You can make boards of all sizes. I'm limited to a 12" thickness planer, so that's why I am illustrating 7 sticks of each species. Again, experiment with different sizes, so long as the individual sticks are twice as wide as they are thick.

Image


I can't stress enough the importance of only mating two sticks at a time. No three sticks should be mated with glue. Use your preferred clamping methods, but make sure these are nice and tight. You don't want any gaps for bacteria to hide in.

Image


After these sticks dry, pull them out of the clamps. They are ready to be planed down a bit to make sure they are all even and dimensional. I tape them all (squeeze-out side up) together and run them through the planer.

Image


After these are planed, it's important to pull them apart and make sure they are dimensional (as wide as they are tall). If they differ, run them through the planer individually until they are square.

Image


In order to get the zig zag pattern, you have to cut the original sticks in half so that you can make two sets of patterns. This is the tricky part that I was never able to show folks without illustrations. We'll call them Set A and Set B for this demo.

Image


Now, the reason I went with 26" as the original length is so that this next step allows you to be creative. You can make a very long (two maybe) board that is thin, or make a very heavy-duty board. Thickness is up to you.

Image


Now you are ready for your final glue-up. Take your time and really see this board for what it will become. Look at the end grains and make sure they are uniform. I have flipped boards upside down and noticed this too late. And remember "ENDGRAINS UP!" Maybe I'll make a TShirt with that phrase on it one day.

Image


After the glue dries, you should be left with a not-square-yet board.

Image


Trim edges using any method you prefer. I run mine across my crosscut sled to make sure they are as true as possible.

I hope this tutorial was helpful and that you are inspired to try one of these boards out.

UPDATE: I have created an additional blog entry with some patterns to try out using the techniques listed above. Check out Zig Zag Cutting Board Patterns - Inspirational
@Auss, That's awesome. Thanks for posting. I wonder how many people have asked you "how in the world did you do that?"
 

Attachments

Zig Zag Cutting Board - How To:

For those of you who asked me for a tutorial on how to make the zig zag legless vegetable death table (cutting board), here is my best shot. I am far too impatient to take photos when I work, so I decided to illustrate the process using some good old Adobe PhotoShop. I hope you find this useful and informative.

I will outline the process in 10 steps below. I have assumed that when viewing these steps that basic woodworking skills are familiar to you. If you have questions, or run into snags, PM me and I'll do my best to help out.

If you want to see what these boards look like, take a look at my projects. There are a few in there.

Keep in mind that because these are endgrain boards, you should ideally chose the original boards with interesting endgrain. Makes sense right?

Image


I typically measure all of my initial boards and add a few inches. I'd rather end up with scrap pieces, then a scrapped piece. I went big on the 26" length, but after you do a few of these you can create your own ideal measurements. I also try to start out with boards of thicknesses larger than 3/4", but it was easier math for the illustration to use 3/4" thickness.

Image


You can make boards of all sizes. I'm limited to a 12" thickness planer, so that's why I am illustrating 7 sticks of each species. Again, experiment with different sizes, so long as the individual sticks are twice as wide as they are thick.

Image


I can't stress enough the importance of only mating two sticks at a time. No three sticks should be mated with glue. Use your preferred clamping methods, but make sure these are nice and tight. You don't want any gaps for bacteria to hide in.

Image


After these sticks dry, pull them out of the clamps. They are ready to be planed down a bit to make sure they are all even and dimensional. I tape them all (squeeze-out side up) together and run them through the planer.

Image


After these are planed, it's important to pull them apart and make sure they are dimensional (as wide as they are tall). If they differ, run them through the planer individually until they are square.

Image


In order to get the zig zag pattern, you have to cut the original sticks in half so that you can make two sets of patterns. This is the tricky part that I was never able to show folks without illustrations. We'll call them Set A and Set B for this demo.

Image


Now, the reason I went with 26" as the original length is so that this next step allows you to be creative. You can make a very long (two maybe) board that is thin, or make a very heavy-duty board. Thickness is up to you.

Image


Now you are ready for your final glue-up. Take your time and really see this board for what it will become. Look at the end grains and make sure they are uniform. I have flipped boards upside down and noticed this too late. And remember "ENDGRAINS UP!" Maybe I'll make a TShirt with that phrase on it one day.

Image


After the glue dries, you should be left with a not-square-yet board.

Image


Trim edges using any method you prefer. I run mine across my crosscut sled to make sure they are as true as possible.

I hope this tutorial was helpful and that you are inspired to try one of these boards out.

UPDATE: I have created an additional blog entry with some patterns to try out using the techniques listed above. Check out Zig Zag Cutting Board Patterns - Inspirational
Excellent write up. Very Helpful!!
 

Attachments

Zig Zag Cutting Board - How To:

For those of you who asked me for a tutorial on how to make the zig zag legless vegetable death table (cutting board), here is my best shot. I am far too impatient to take photos when I work, so I decided to illustrate the process using some good old Adobe PhotoShop. I hope you find this useful and informative.

I will outline the process in 10 steps below. I have assumed that when viewing these steps that basic woodworking skills are familiar to you. If you have questions, or run into snags, PM me and I'll do my best to help out.

If you want to see what these boards look like, take a look at my projects. There are a few in there.

Keep in mind that because these are endgrain boards, you should ideally chose the original boards with interesting endgrain. Makes sense right?

Image


I typically measure all of my initial boards and add a few inches. I'd rather end up with scrap pieces, then a scrapped piece. I went big on the 26" length, but after you do a few of these you can create your own ideal measurements. I also try to start out with boards of thicknesses larger than 3/4", but it was easier math for the illustration to use 3/4" thickness.

Image


You can make boards of all sizes. I'm limited to a 12" thickness planer, so that's why I am illustrating 7 sticks of each species. Again, experiment with different sizes, so long as the individual sticks are twice as wide as they are thick.

Image


I can't stress enough the importance of only mating two sticks at a time. No three sticks should be mated with glue. Use your preferred clamping methods, but make sure these are nice and tight. You don't want any gaps for bacteria to hide in.

Image


After these sticks dry, pull them out of the clamps. They are ready to be planed down a bit to make sure they are all even and dimensional. I tape them all (squeeze-out side up) together and run them through the planer.

Image


After these are planed, it's important to pull them apart and make sure they are dimensional (as wide as they are tall). If they differ, run them through the planer individually until they are square.

Image


In order to get the zig zag pattern, you have to cut the original sticks in half so that you can make two sets of patterns. This is the tricky part that I was never able to show folks without illustrations. We'll call them Set A and Set B for this demo.

Image


Now, the reason I went with 26" as the original length is so that this next step allows you to be creative. You can make a very long (two maybe) board that is thin, or make a very heavy-duty board. Thickness is up to you.

Image


Now you are ready for your final glue-up. Take your time and really see this board for what it will become. Look at the end grains and make sure they are uniform. I have flipped boards upside down and noticed this too late. And remember "ENDGRAINS UP!" Maybe I'll make a TShirt with that phrase on it one day.

Image


After the glue dries, you should be left with a not-square-yet board.

Image


Trim edges using any method you prefer. I run mine across my crosscut sled to make sure they are as true as possible.

I hope this tutorial was helpful and that you are inspired to try one of these boards out.

UPDATE: I have created an additional blog entry with some patterns to try out using the techniques listed above. Check out Zig Zag Cutting Board Patterns - Inspirational
McLean, I used your tutorial on my 2nd attempt at endgrain cutting boards, ( my 1st was TWW video) and it turned out better than expected.
I cut my strips extra long so I ended up with 2 boards, large and small. The small board was nice to experiment with "new to me" techniques.
I ran both end-grain boards thru my back-up planer (Ridgid TP1300) using all the safety precautions I have read about (because I don't own no stinking drum sander). I used cauls for the glue-ups so my boards were pretty flat to start with. I scraped the glue off while it was still soft. I used carpet tape (Duck brand and man it sticks) to adhere 2 jointed strips of wood to the sides, to further flatten the surface and prevent tear-out going thru the planer. The strips were 1/16" thicker than cutting board.
First 3 times thru planer no contact was made with blades. After initial contact, I used 1/8 turns of handwheel to deepen cut. Took probably 10 times thru planer to level each side of board but I had no issues.
I cut finger recesses in the ends of the board with a dado blade (got the idea from another LJ) and that worked great. No burning and very little sanding. All in all, I am very happy with this project.
Thanks McLean for the excellent tutorial !
Image


Image


Image
 

Attachments

Zig Zag Cutting Board - How To:

For those of you who asked me for a tutorial on how to make the zig zag legless vegetable death table (cutting board), here is my best shot. I am far too impatient to take photos when I work, so I decided to illustrate the process using some good old Adobe PhotoShop. I hope you find this useful and informative.

I will outline the process in 10 steps below. I have assumed that when viewing these steps that basic woodworking skills are familiar to you. If you have questions, or run into snags, PM me and I'll do my best to help out.

If you want to see what these boards look like, take a look at my projects. There are a few in there.

Keep in mind that because these are endgrain boards, you should ideally chose the original boards with interesting endgrain. Makes sense right?

Image


I typically measure all of my initial boards and add a few inches. I'd rather end up with scrap pieces, then a scrapped piece. I went big on the 26" length, but after you do a few of these you can create your own ideal measurements. I also try to start out with boards of thicknesses larger than 3/4", but it was easier math for the illustration to use 3/4" thickness.

Image


You can make boards of all sizes. I'm limited to a 12" thickness planer, so that's why I am illustrating 7 sticks of each species. Again, experiment with different sizes, so long as the individual sticks are twice as wide as they are thick.

Image


I can't stress enough the importance of only mating two sticks at a time. No three sticks should be mated with glue. Use your preferred clamping methods, but make sure these are nice and tight. You don't want any gaps for bacteria to hide in.

Image


After these sticks dry, pull them out of the clamps. They are ready to be planed down a bit to make sure they are all even and dimensional. I tape them all (squeeze-out side up) together and run them through the planer.

Image


After these are planed, it's important to pull them apart and make sure they are dimensional (as wide as they are tall). If they differ, run them through the planer individually until they are square.

Image


In order to get the zig zag pattern, you have to cut the original sticks in half so that you can make two sets of patterns. This is the tricky part that I was never able to show folks without illustrations. We'll call them Set A and Set B for this demo.

Image


Now, the reason I went with 26" as the original length is so that this next step allows you to be creative. You can make a very long (two maybe) board that is thin, or make a very heavy-duty board. Thickness is up to you.

Image


Now you are ready for your final glue-up. Take your time and really see this board for what it will become. Look at the end grains and make sure they are uniform. I have flipped boards upside down and noticed this too late. And remember "ENDGRAINS UP!" Maybe I'll make a TShirt with that phrase on it one day.

Image


After the glue dries, you should be left with a not-square-yet board.

Image


Trim edges using any method you prefer. I run mine across my crosscut sled to make sure they are as true as possible.

I hope this tutorial was helpful and that you are inspired to try one of these boards out.

UPDATE: I have created an additional blog entry with some patterns to try out using the techniques listed above. Check out Zig Zag Cutting Board Patterns - Inspirational
Hi there. As you have outlined the wood thickness and lengths in the above example of a zigzag board could you please indicate the sizes to the other zigzag boards that you shown in the section Inspirational. It would be so much help.
Brian
 

Attachments

Zig Zag Cutting Board - How To:

For those of you who asked me for a tutorial on how to make the zig zag legless vegetable death table (cutting board), here is my best shot. I am far too impatient to take photos when I work, so I decided to illustrate the process using some good old Adobe PhotoShop. I hope you find this useful and informative.

I will outline the process in 10 steps below. I have assumed that when viewing these steps that basic woodworking skills are familiar to you. If you have questions, or run into snags, PM me and I'll do my best to help out.

If you want to see what these boards look like, take a look at my projects. There are a few in there.

Keep in mind that because these are endgrain boards, you should ideally chose the original boards with interesting endgrain. Makes sense right?

Image


I typically measure all of my initial boards and add a few inches. I'd rather end up with scrap pieces, then a scrapped piece. I went big on the 26" length, but after you do a few of these you can create your own ideal measurements. I also try to start out with boards of thicknesses larger than 3/4", but it was easier math for the illustration to use 3/4" thickness.

Image


You can make boards of all sizes. I'm limited to a 12" thickness planer, so that's why I am illustrating 7 sticks of each species. Again, experiment with different sizes, so long as the individual sticks are twice as wide as they are thick.

Image


I can't stress enough the importance of only mating two sticks at a time. No three sticks should be mated with glue. Use your preferred clamping methods, but make sure these are nice and tight. You don't want any gaps for bacteria to hide in.

Image


After these sticks dry, pull them out of the clamps. They are ready to be planed down a bit to make sure they are all even and dimensional. I tape them all (squeeze-out side up) together and run them through the planer.

Image


After these are planed, it's important to pull them apart and make sure they are dimensional (as wide as they are tall). If they differ, run them through the planer individually until they are square.

Image


In order to get the zig zag pattern, you have to cut the original sticks in half so that you can make two sets of patterns. This is the tricky part that I was never able to show folks without illustrations. We'll call them Set A and Set B for this demo.

Image


Now, the reason I went with 26" as the original length is so that this next step allows you to be creative. You can make a very long (two maybe) board that is thin, or make a very heavy-duty board. Thickness is up to you.

Image


Now you are ready for your final glue-up. Take your time and really see this board for what it will become. Look at the end grains and make sure they are uniform. I have flipped boards upside down and noticed this too late. And remember "ENDGRAINS UP!" Maybe I'll make a TShirt with that phrase on it one day.

Image


After the glue dries, you should be left with a not-square-yet board.

Image


Trim edges using any method you prefer. I run mine across my crosscut sled to make sure they are as true as possible.

I hope this tutorial was helpful and that you are inspired to try one of these boards out.

UPDATE: I have created an additional blog entry with some patterns to try out using the techniques listed above. Check out Zig Zag Cutting Board Patterns - Inspirational
So I learned something from these replies. Get a drumsander. Going to have to beg the wife to let me have some fun money. Thanks y all.

- McLeanVA
Get a helical cutterhead for your planer, its cheaper than a drum sander, and the shearing action of the cutters is safer than what you have with standard cutterheads.
 

Attachments

Zig Zag Cutting Board - How To:

For those of you who asked me for a tutorial on how to make the zig zag legless vegetable death table (cutting board), here is my best shot. I am far too impatient to take photos when I work, so I decided to illustrate the process using some good old Adobe PhotoShop. I hope you find this useful and informative.

I will outline the process in 10 steps below. I have assumed that when viewing these steps that basic woodworking skills are familiar to you. If you have questions, or run into snags, PM me and I'll do my best to help out.

If you want to see what these boards look like, take a look at my projects. There are a few in there.

Keep in mind that because these are endgrain boards, you should ideally chose the original boards with interesting endgrain. Makes sense right?

Image


I typically measure all of my initial boards and add a few inches. I'd rather end up with scrap pieces, then a scrapped piece. I went big on the 26" length, but after you do a few of these you can create your own ideal measurements. I also try to start out with boards of thicknesses larger than 3/4", but it was easier math for the illustration to use 3/4" thickness.

Image


You can make boards of all sizes. I'm limited to a 12" thickness planer, so that's why I am illustrating 7 sticks of each species. Again, experiment with different sizes, so long as the individual sticks are twice as wide as they are thick.

Image


I can't stress enough the importance of only mating two sticks at a time. No three sticks should be mated with glue. Use your preferred clamping methods, but make sure these are nice and tight. You don't want any gaps for bacteria to hide in.

Image


After these sticks dry, pull them out of the clamps. They are ready to be planed down a bit to make sure they are all even and dimensional. I tape them all (squeeze-out side up) together and run them through the planer.

Image


After these are planed, it's important to pull them apart and make sure they are dimensional (as wide as they are tall). If they differ, run them through the planer individually until they are square.

Image


In order to get the zig zag pattern, you have to cut the original sticks in half so that you can make two sets of patterns. This is the tricky part that I was never able to show folks without illustrations. We'll call them Set A and Set B for this demo.

Image


Now, the reason I went with 26" as the original length is so that this next step allows you to be creative. You can make a very long (two maybe) board that is thin, or make a very heavy-duty board. Thickness is up to you.

Image


Now you are ready for your final glue-up. Take your time and really see this board for what it will become. Look at the end grains and make sure they are uniform. I have flipped boards upside down and noticed this too late. And remember "ENDGRAINS UP!" Maybe I'll make a TShirt with that phrase on it one day.

Image


After the glue dries, you should be left with a not-square-yet board.

Image


Trim edges using any method you prefer. I run mine across my crosscut sled to make sure they are as true as possible.

I hope this tutorial was helpful and that you are inspired to try one of these boards out.

UPDATE: I have created an additional blog entry with some patterns to try out using the techniques listed above. Check out Zig Zag Cutting Board Patterns - Inspirational
All the pictures are blocked out. I have searched and searched and have been unable to figure out how to be able to view them. I am using Windows 10. Any suggestions?

RE: http://i1098.photobucket.com/albums/g369/McLeanVa/demoStep-7.jpg

All that appears is a box that states "Please update your account to enable third party hosting"

Is there another way to view the pics.

Thanks. Wildflower
 

Attachments

41 - 60 of 98 Posts