LumberJocks Woodworking Forum banner
13K views 21 replies 7 participants last post by  bandit571  
#1 ·
Start up

Well ths may be a long blog, or just a teaser…
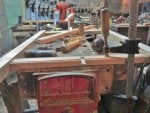
Brought home a stack of "Good" lumber from a recent Road Trip. Helpped clean out a friend's scrap pile..
Image


Thinking this stack is mostly Cherry,
Image


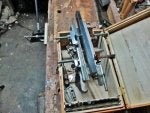
Well, there was a 6/4 slab in there, somewhere. Did a bit of resaw work on the bandsaw..
Image


Blade wanted to wander around a bit,,we have ways..
Image


In fact, I used three planes.
Image


Each set a little differently. Jumbo Jack was set very coarse, the 0-7 not so much, then a clean up with the No.8…
Image


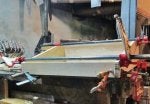
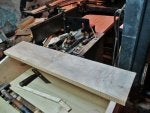
Legs were set aside, as I resawed some aprons and stretchers. Needed the planes to remove the saw marks and joint the edges..
Image


Great, now we have figure.
Image


Well, this morning, I decided the front and bak aprons were too long. Cut them to 26" in length. Laid out for some tenons…
Image


As I do tenons first. Bandsaw again..
Image


Blade was having issues, was trying to burn it's way along..
Image


Time for some "Details"
Image


Set up the Stanley 45 with a #23 bead cutter…
Image


As I have these to do…
Image


Stretchers got beads all four corners, aprons get a single one on the outer, bottom edge.
Image


I also cleaned the "show" face of the aprons….I set the Stanley 45 aside until I need it ..later.

Well, getting a bit long-winded, and time for Lunch…..stay tuned, next episode is coming up….
 

Attachments

#2 ·
Leg work..

Ok, lunch is over….spent the afternoon doing mortises to match the tenons..
Image


The "Usual Suspects" were found hiding in plain sight..
Image


At least they won't roll off onto the floor.

Clamped a leg blank to the bench, marked out where the mortise was needed. Chisels to chop it out…
Image


Dry fit. I trimmed a little off the end of the tenon, too. Rotate the blank 90 degrees, chop out the next mortise, and do another dry fit…
Image


Again, trim a little off the end of the tenon. Now I know where the outside corner is on this leg…grab the 45 and make a jig on the bench. ran the 45 along one face, turn the leg 90 degrees and do the 45 again..should look like this…
Image


Dry fit the three parts..
Image


Top of the leg is done, need a mortise for a stretcher, next…
Image


About 5" up from the bottom of the leg. These go from the front leg to the rear leg. There will be a stretcher to connect them, later. Dry fit..
Image


Again with the trim of the end. I had cut them at 3/4" long….should have been 5/8", oh well. Details..
Image


If you are standing beside the desk and look down, this is what you will see.
Got the other front leg all mortised up. Decided to see how much of a bear this will be to glue and clamp up..
Image


"Bear" does not even begin to describe it…..Maybe tomorrow, after I mortise the back legs, I can do a glue up of the end pieces, then assemble the rest together

All this is for, is a base unit for Rachel's Standing Desk. Underhill made his out of Pine….maybe this "Good" wood will be better? Cussing has started, will need a few "Fingers"..
Image


And rest up for tonight. Tomorrow might be an "interesting" day…stay tuned…
 

Attachments

#3 ·
Back leg work, a glue up or two..

Ok, Dungeon Shop is kind of a stuffy place to work, no air movement, unless you count me walking around. Got a few "helpers" set up..
Image


Had an empty bottle I could refill with water..
Image


Set up a fan to get things cooler…..around where I will be working..
Image


Mainly sitting on this. I had a couple extra long pipe clamps in the shop…too long. Tried to cut them down from 6' to 4'....pipe cutter broke. Hey, we have those hacksaws just hanging around. Got two 6' pipes cut to 4', and a 5' one as well. Just no need in the shop for real long clamps.

Brought two boards down to the shop, needed a panel glued up. Crosscut @28" or so long, jointed the edges with the #5-1/2 Jumbo Jack. Used the new length clamps to do the glue up..
Image


And set it aside. Back leg was set up on the now cleared bench..
Image


Mortise chopped out..
Image


And a dry fit.
Image


Leg needed two more mortises chopped. Then I re-set a little jig on the bench…
Image


Just to hold the leg still while the beading plane did it's work..
Image


One face done, rotate to bring the other face into the jig, and use the plane until this shows up..
Image


Not sure IF there is a single cutter that can do that corner. Time for a dry fit of all four parts at once…
Image


Amazing it can sit like that, without falling over….staged a few clamps.
Image


Have them roughly the right opening, hate fiddling around. Spread some Elmer's on the tenons, and the fight was on…..finally tried a third hand to hold things still..
Image


Checked it a few times (10+!) for square…..then set it aside with the other glue up. Set up the last leg, had the mortise all marked out, tools at the ready…..hmmm, I NEED to make the stretcher that goes between the two ends…Might make glueing the entire base a tad easier? Trudge back upstairs to pick a matching board out of the scrap stash, trudge back down to the shop. Set the bandsaw to rip a blank out of the 1×8 to match the other stretchers. The the Langdon Mitre box to cut to length…..needed planed smooth and beaded on all four corners, but….back was getting stiff and sore, shoulders were getting sore, too…..time to call it a night, there is always tomorrow

Stay tuned….
 

Attachments

#4 ·
Back leg work, a glue up or two..

Ok, Dungeon Shop is kind of a stuffy place to work, no air movement, unless you count me walking around. Got a few "helpers" set up..
Image


Had an empty bottle I could refill with water..
Image


Set up a fan to get things cooler…..around where I will be working..
Image


Mainly sitting on this. I had a couple extra long pipe clamps in the shop…too long. Tried to cut them down from 6' to 4'....pipe cutter broke. Hey, we have those hacksaws just hanging around. Got two 6' pipes cut to 4', and a 5' one as well. Just no need in the shop for real long clamps.

Brought two boards down to the shop, needed a panel glued up. Crosscut @28" or so long, jointed the edges with the #5-1/2 Jumbo Jack. Used the new length clamps to do the glue up..
Image


And set it aside. Back leg was set up on the now cleared bench..
Image


Mortise chopped out..
Image


And a dry fit.
Image


Leg needed two more mortises chopped. Then I re-set a little jig on the bench…
Image


Just to hold the leg still while the beading plane did it's work..
Image


One face done, rotate to bring the other face into the jig, and use the plane until this shows up..
Image


Not sure IF there is a single cutter that can do that corner. Time for a dry fit of all four parts at once…
Image


Amazing it can sit like that, without falling over….staged a few clamps.
Image


Have them roughly the right opening, hate fiddling around. Spread some Elmer's on the tenons, and the fight was on…..finally tried a third hand to hold things still..
Image


Checked it a few times (10+!) for square…..then set it aside with the other glue up. Set up the last leg, had the mortise all marked out, tools at the ready…..hmmm, I NEED to make the stretcher that goes between the two ends…Might make glueing the entire base a tad easier? Trudge back upstairs to pick a matching board out of the scrap stash, trudge back down to the shop. Set the bandsaw to rip a blank out of the 1×8 to match the other stretchers. The the Langdon Mitre box to cut to length…..needed planed smooth and beaded on all four corners, but….back was getting stiff and sore, shoulders were getting sore, too…..time to call it a night, there is always tomorrow

Stay tuned….
It that a Jameson stool I see?

BTW I have some possible live preserving advice: Stop putting tools on the wifes gear!! you could get killed for that!!
Or at least put a cover on it first.
Its a bit like somebody putting a cup of coffee or similar on the cast iron saw top.
 

Attachments

#8 ·
More leg work, glue ups, dry fits...

trying to get something done….had too many irons in the fire, bound to forget something….
Image


Cross stretcher has been planed smooth, and a bead cut on all four corners.
Image


Bought a set of carving knives, just to clean the beads up.
Image


I removed the glued up side from the clamps, decided to "pin" the joints. Drilled a few holes..
Image


A little glue into the hole, and drive a dowel through..
Image


Coping saw to trim the excess dowel, block plane to smooth things out. Set this aside, for now.
Last leg needed three mortises chopped out. I doubled check where they were going with a quick dry fit..
Marked things out, finished the other two mortises, and yet another dry fit..
Image


Got excited about the fit, forgot I needed to corner bead the outside corner of the leg…..and just glued things up..
Image


Will be using this "Third Hand" again, methinks…

Set this down, and dry fit things again, to see how much of a PITA this will be..
Image


Yep, will need a few more clamps. I also needed a measurement of sorts….
Image


To locate how big a dovetail I will need to make. Then cut the tail….
Image


So when the glue is cured I can cut the sockets, bead the leg, and locate enough hands to glue and clamp this mess together. I also checked the "false" top…
Image


To make sure it will be long enough after trimming for square. Will need the Scrub Jack Plane to flattened the panel…...when I get rested up enough.

Maybe after Lunch, I might wander back down to the shop, and see what other "Misadventures" I can get into..
Stay tuned…
 

Attachments

#9 ·
Assembly time

Ok, got side #2 out of the clamps….needed a few things down…
Image


Bead work was done on the outside corner of the last leg…the one I forgot to do. Was a bit trickier to do it now..first was sitting on the bench,,,,second one?
Image


Amazing what a shop stool can do…Next was more pins..
Image


Drill a hole, drive a pin with a spot of glue. coping saw to trim, planes to smooth things out..
Image


Since I had the cross stretcher cut to size, I used it to lay out a socket or two…Hand saw to cut..

Image


Chisels to remove the waste..
Image


dry fitted..
Image


Then slid home..
Image


Repeat for the other side…..then some dummy decided to add glue..
Image


had to use all 5 of my pipe clamps, the others weren't long enough…

While the glue cure a while….top needed scrubbed flat..
Image


Just an old Corsair C-5 by Great Neck…..
Image


Makes a decent scrub plane..then follow it with the small jointer/Try plane..
Image


Until things were as flat as I could get them Glue finally cured out…have things to do..
Image


Once the clamps were put away, made four of these corner blocks. Just glue and two screws..
Image


But, there was one other hole to make..
Image


Allows for the top to move as it wants to…
Decided this face of the top looked better, set it down on the bench..
Image


Screws are a tad too long. The nut won't move, but it allows the screw to tilt as the top moves…
I think that will about do for awhile..
Image


later I can start on the upper half of this desk build…
Image


Viewed from the side. I need to go get a load of Cherry thickness plane to the same sizes….need to lighten things up a bit. that will happen Friday, so maybe next weekend, I can start on the rest of this build?

Stay tuned, we are almost halfway done…
 

Attachments

#10 ·
Assembly time

Ok, got side #2 out of the clamps….needed a few things down…
Image


Bead work was done on the outside corner of the last leg…the one I forgot to do. Was a bit trickier to do it now..first was sitting on the bench,,,,second one?
Image


Amazing what a shop stool can do…Next was more pins..
Image


Drill a hole, drive a pin with a spot of glue. coping saw to trim, planes to smooth things out..
Image


Since I had the cross stretcher cut to size, I used it to lay out a socket or two…Hand saw to cut..

Image


Chisels to remove the waste..
Image


dry fitted..
Image


Then slid home..
Image


Repeat for the other side…..then some dummy decided to add glue..
Image


had to use all 5 of my pipe clamps, the others weren't long enough…

While the glue cure a while….top needed scrubbed flat..
Image


Just an old Corsair C-5 by Great Neck…..
Image


Makes a decent scrub plane..then follow it with the small jointer/Try plane..
Image


Until things were as flat as I could get them Glue finally cured out…have things to do..
Image


Once the clamps were put away, made four of these corner blocks. Just glue and two screws..
Image


But, there was one other hole to make..
Image


Allows for the top to move as it wants to…
Decided this face of the top looked better, set it down on the bench..
Image


Screws are a tad too long. The nut won't move, but it allows the screw to tilt as the top moves…
I think that will about do for awhile..
Image


later I can start on the upper half of this desk build…
Image


Viewed from the side. I need to go get a load of Cherry thickness plane to the same sizes….need to lighten things up a bit. that will happen Friday, so maybe next weekend, I can start on the rest of this build?

Stay tuned, we are almost halfway done…
Wow - it would take me a couple of months to complete the amount of work you have finished in a week or so, and I use power tools. I like all of the pictures showing what you did. Always like to see how others approach a build.
 

Attachments

#12 ·
Road trip,and a glue up

Reached the point I needed a Planer…..no way am I hand planing 5/4 down to 3/4".....Have a friend that has my old Delta 12" planer….soooo, load up the van…
Image


And head out on the road….hang a left at the old Family Cemetery site..
Image


Corner of the old 1822 Homestead. They later built one of the first Methodist Churches in the area..
Image


This was the site of Olive Chapel. They long since moved into town.

About 2 miles from here, pull into the fellow driveway. Open the back of the van, and proceed to make a mess..
Image


If you look behind the trash cans, you will see an old bench I built a long time ago….now doing work as a lathe stand..
Got all but two boards planed down to 3/4" thick. Another was just under 1/2" for a box project. The last one would not fit through the planer…13-1/4" wide….oops. I was a bit distracted out there, by a small slab..
Image


Of 8/4 White Oak…..anyway, load the stash back into the van…
Image


And try to beat a thunderstorm to the house….made it with 15 minutes to spare…

Sorted a few boards, hauled the desk parts to the Dungeon Shop….both sides were clamped together, and the edges planed to match. Set that aside, jointed a few more edges, once I found out which three boards go where, made another mess..
Image


Until I could finally do a glue up…
Image


This time, I needed cauls on both sides..
Image


While that sat for a bit, laid out the rest of the parts..
Image


Both sides, a back and a top shelf….the piece across the front..
Image


I need to cut to length, and start on some dovetails. Once the corner is done, I can plane the top edge to match the sides' angle. Front and back get through dovetails….top shelf will be screwed in place and have walnut plugs over the screws. It is where the lid will get hinged to. Don't want it moving around…

The planer and the bench ( and a router table) were mine at one time. Used to be a Pole barn Shop, long ago. When both my friend and I moved away from that place, I did not have the room for those tools, gave them to him to use as needed. Like today, I can come back, and use a few tools as needed.

So, next up? Dovetails by hand….stay tuned…
 

Attachments

#13 ·
Road trip,and a glue up

Reached the point I needed a Planer…..no way am I hand planing 5/4 down to 3/4".....Have a friend that has my old Delta 12" planer….soooo, load up the van…
Image


And head out on the road….hang a left at the old Family Cemetery site..
Image


Corner of the old 1822 Homestead. They later built one of the first Methodist Churches in the area..
Image


This was the site of Olive Chapel. They long since moved into town.

About 2 miles from here, pull into the fellow driveway. Open the back of the van, and proceed to make a mess..
Image


If you look behind the trash cans, you will see an old bench I built a long time ago….now doing work as a lathe stand..
Got all but two boards planed down to 3/4" thick. Another was just under 1/2" for a box project. The last one would not fit through the planer…13-1/4" wide….oops. I was a bit distracted out there, by a small slab..
Image


Of 8/4 White Oak…..anyway, load the stash back into the van…
Image


And try to beat a thunderstorm to the house….made it with 15 minutes to spare…

Sorted a few boards, hauled the desk parts to the Dungeon Shop….both sides were clamped together, and the edges planed to match. Set that aside, jointed a few more edges, once I found out which three boards go where, made another mess..
Image


Until I could finally do a glue up…
Image


This time, I needed cauls on both sides..
Image


While that sat for a bit, laid out the rest of the parts..
Image


Both sides, a back and a top shelf….the piece across the front..
Image


I need to cut to length, and start on some dovetails. Once the corner is done, I can plane the top edge to match the sides' angle. Front and back get through dovetails….top shelf will be screwed in place and have walnut plugs over the screws. It is where the lid will get hinged to. Don't want it moving around…

The planer and the bench ( and a router table) were mine at one time. Used to be a Pole barn Shop, long ago. When both my friend and I moved away from that place, I did not have the room for those tools, gave them to him to use as needed. Like today, I can come back, and use a few tools as needed.

So, next up? Dovetails by hand….stay tuned…
Looks like a fairly well thought out plan, a trip straight throug the dead center of town to a friend and then all plain sailing before the storm drool over a small slab and then return to harbour up do some joints and pull everything together for a fine finish.
 

Attachments

#16 ·
Dovetails, just dovetails

Have four corners to do. Gave a hint in the last blog…
Image


This is Corner #1…..maple doesn't like saws any more than Cherry does, it appears.
I usually do pins first on these through dovetails..
Image


Handsaw to cut, just an old Disston No. 4…..
Image


Then some chisel work..
Image


I chop in from one face of the board, leaving a tab for support, then flip the board over…
Image


Chop out the waste..
Image


Once they look good, I use these pins, and a sharp pencil, to trace out where the pins will go on the "tail board"

Then the bandsaw to cut on the waste sides of the lines..
Image


Simply because I can't handsaw angles like this…..saw tends to wander around, and is hard to start.
Chop out the waste, same routine as the pines..
Image


Then a dry fit..
Image


Then repeat these steps for corner #2..
Image


And the rest of the corners…
Image


While I had all four sides together, decided to use the square in a few spots..
Image


Not bad there..
Image


Looks good to me. Will need to fine tune all of the joints, for a better fit, later.

Set this mess aside, and set out a box..
Image


Because the last time I used this plane..
Image


It had a #23 Bead cutter on board. Removed that, and dug out the #12 straight cutter ( no blood, THIS time around..) and reset everything to mill a 1/4" wide groove..
Image


The the desk's bottom can sit in. Set a 1/4" in from the bottom edge of the boards. Poplar panel for a bottom.

Maybe later to day, knee willing, I can hobble back down these steps..
Image


To the shop, and mill some grooviness into the desk? twisted the knee yesterday, using a cane today…Monday will get it seen too..

Stay tuned, a glue up may happen before too much longer….then a fitting of the lid. Maybe a finish after that?

Desk? Think one of these..
Image


That sits atop a long legged stand. Hardest part is getting that angle for the lid just right.
May get some measurements later…..this new desk is a tad bigger..

Again, thanks for reading along, stay tuned.
 

Attachments

#17 ·
Dovetails, just dovetails

Have four corners to do. Gave a hint in the last blog…
Image


This is Corner #1…..maple doesn't like saws any more than Cherry does, it appears.
I usually do pins first on these through dovetails..
Image


Handsaw to cut, just an old Disston No. 4…..
Image


Then some chisel work..
Image


I chop in from one face of the board, leaving a tab for support, then flip the board over…
Image


Chop out the waste..
Image


Once they look good, I use these pins, and a sharp pencil, to trace out where the pins will go on the "tail board"

Then the bandsaw to cut on the waste sides of the lines..
Image


Simply because I can't handsaw angles like this…..saw tends to wander around, and is hard to start.
Chop out the waste, same routine as the pines..
Image


Then a dry fit..
Image


Then repeat these steps for corner #2..
Image


And the rest of the corners…
Image


While I had all four sides together, decided to use the square in a few spots..
Image


Not bad there..
Image


Looks good to me. Will need to fine tune all of the joints, for a better fit, later.

Set this mess aside, and set out a box..
Image


Because the last time I used this plane..
Image


It had a #23 Bead cutter on board. Removed that, and dug out the #12 straight cutter ( no blood, THIS time around..) and reset everything to mill a 1/4" wide groove..
Image


The the desk's bottom can sit in. Set a 1/4" in from the bottom edge of the boards. Poplar panel for a bottom.

Maybe later to day, knee willing, I can hobble back down these steps..
Image


To the shop, and mill some grooviness into the desk? twisted the knee yesterday, using a cane today…Monday will get it seen too..

Stay tuned, a glue up may happen before too much longer….then a fitting of the lid. Maybe a finish after that?

Desk? Think one of these..
Image


That sits atop a long legged stand. Hardest part is getting that angle for the lid just right.
May get some measurements later…..this new desk is a tad bigger..

Again, thanks for reading along, stay tuned.
Bandit you may want to consider getting a pully system installed in the stairway so the cases of Jamesons dont have to be carried down by hand thus saving your knees.

Hope the doc gives you the all clear otherwise

Keep up the good work!
 

Attachments

#19 ·
glue ups, and some lid work

Took a while, was fighting things like it was a Monday….Grooves were made…..but needed adjusted..
Image


Tried the 1/4" cutter….skates on the plane wouldn't close up enough…..will fix at a later date. I put a slightly wider cutter in. Was a bit rough to recut some of the grooves. Got all four done. Needed to plane the poplar panels down a bit….they were sawn Riff….meaning one edge was thicker than the other…
Image


At least Poplar is easy to plane. Had the fan going in the shop….legs stayed cool….shavings blew everywhere..
Image


May have been too thin of a shaving? Got the panels dry fitted..
Image


Took a few tries. Turned out the two panels were not quite wide enough…will need a filler between them, later.

Had 5 pipe clamps at the ready….two needed visegrip keepers so they'd stay clamped..new bottle of glue, was able to get most of my fingers…
Image


There goes the neighborhood. Had to add the fifth pipe clamp along the back edge, and two "F" style ones front to back….let this mess sit awhile ( while I peel dried glue off my fingers)

Got to thinking ( Dangerous?) about how the lid will meet the top shelf…..went to Roy Underhill's site to find out how to find the meeting angle. Meanwhile, clamps are coming off….didn't like how the top shelf match the lid…
Image


Dug through the stash, and found a better match. Needed trimmed down a bit. The way the two pieces were meeting at the angle..
Image


Just wasn't getting it….I used Underhill's ideas. A scrap of plywood was held on the inside of the case, and the edge was traced. I got out some scrap the same thickness as the lid, drew two more lines showing where the two pieces crossed at. Bevel gauge to mark the angle. I found a stick of pine scrap, and made a guide block for the angles..
Image


Laid these on the edge of the side, to make sure they would work. First off, I needed to trim things square on the ends, and to length. No tablesaw? I do have a vintage saw..
Image


Might even be as old as I am? I dug out a scrap of pine that had a good straight, smooth edge. I marked a cut line, and then where the edge of the saw's shoe would be…
Image


As long as I keep the shoe tight to the "fence"....perfect cut. Once that was done, on to the beveled rip cuts..
Image


Remember those guide blocks? I use one of them to set the bevel cut on the saw. I set the fence for the cut, about like the crosscut ones..
Image


Same as before, keep the shoe tight to the fence. After both edges were ripped, a dry fit to see how they will meet up..
Image


Looks better…Will need to plane the edges a bit, to remove a few saw marks. As for the bottom panels?
Image


About a 2" gap. I can make a filler, and have it also support the middle area. As for plane work..
Image


I have these to clean up, glue lines, saw marks. I also have dovetails to plane smooth. Mondays, the shop is usually closed….maybe Tuesday, I can get back to work?

Stay tuned….
 

Attachments

#20 ·
glue ups, and some lid work

Took a while, was fighting things like it was a Monday….Grooves were made…..but needed adjusted..
Image


Tried the 1/4" cutter….skates on the plane wouldn't close up enough…..will fix at a later date. I put a slightly wider cutter in. Was a bit rough to recut some of the grooves. Got all four done. Needed to plane the poplar panels down a bit….they were sawn Riff….meaning one edge was thicker than the other…
Image


At least Poplar is easy to plane. Had the fan going in the shop….legs stayed cool….shavings blew everywhere..
Image


May have been too thin of a shaving? Got the panels dry fitted..
Image


Took a few tries. Turned out the two panels were not quite wide enough…will need a filler between them, later.

Had 5 pipe clamps at the ready….two needed visegrip keepers so they'd stay clamped..new bottle of glue, was able to get most of my fingers…
Image


There goes the neighborhood. Had to add the fifth pipe clamp along the back edge, and two "F" style ones front to back….let this mess sit awhile ( while I peel dried glue off my fingers)

Got to thinking ( Dangerous?) about how the lid will meet the top shelf…..went to Roy Underhill's site to find out how to find the meeting angle. Meanwhile, clamps are coming off….didn't like how the top shelf match the lid…
Image


Dug through the stash, and found a better match. Needed trimmed down a bit. The way the two pieces were meeting at the angle..
Image


Just wasn't getting it….I used Underhill's ideas. A scrap of plywood was held on the inside of the case, and the edge was traced. I got out some scrap the same thickness as the lid, drew two more lines showing where the two pieces crossed at. Bevel gauge to mark the angle. I found a stick of pine scrap, and made a guide block for the angles..
Image


Laid these on the edge of the side, to make sure they would work. First off, I needed to trim things square on the ends, and to length. No tablesaw? I do have a vintage saw..
Image


Might even be as old as I am? I dug out a scrap of pine that had a good straight, smooth edge. I marked a cut line, and then where the edge of the saw's shoe would be…
Image


As long as I keep the shoe tight to the "fence"....perfect cut. Once that was done, on to the beveled rip cuts..
Image


Remember those guide blocks? I use one of them to set the bevel cut on the saw. I set the fence for the cut, about like the crosscut ones..
Image


Same as before, keep the shoe tight to the fence. After both edges were ripped, a dry fit to see how they will meet up..
Image


Looks better…Will need to plane the edges a bit, to remove a few saw marks. As for the bottom panels?
Image


About a 2" gap. I can make a filler, and have it also support the middle area. As for plane work..
Image


I have these to clean up, glue lines, saw marks. I also have dovetails to plane smooth. Mondays, the shop is usually closed….maybe Tuesday, I can get back to work?

Stay tuned….
Bandit you do a good job on all ur projects. Especially considering how many hand tools u use
Another good job
 

Attachments

#22 ·
Lid work, hinges, PIP

Ok, I went back down and planed every edge..
Image


Glued on the Book Rest..
Image

Fans…gotta have them ON..
Image

Cleaned up the dovetails…
Image


Fitted a gap filler for the bottom..
Image


And got things ready for hinges….Bookrest was even planed smooth..
Image


I also used this same Stanley, Made in England #4c to clean the dovetails up.
Image


Didn't do too badly on the figured wood…

Did I mention how I hate doing hinges?
Image

Have to dig out a space for the hinge to set in (on a beveled edge, no less)use a pointy thing to start a hold, then a push drill to make the pilot holes..
Image


Then dig out an old screwdriver to install the screws..
Image


Then do it all over again three more times. Lay the lid and top on the desk, Forstner bit to drill a few holes..
Image


Then that push drill again for more pilot holes. I used a cordless drill to drive the screws, as it's clutch will prevent snapping a screw's head off. Placed a cutter in the drill press, and made some tapered plugs..
Image


Use a small screwdriver to pop each out, add a blob of glue and hammer them in place..
Image


Then sit around waiting on the glue to dry. Chisel to pare them close to flush, block plane to finish the job.

PIP: After a coat of that Smelly BLO was brushed onto everything ( except me..)
Image


The BLO made the grain show off…
Image


Dovetails showed up..
Image


Even the lid looks better..
Image


Walnut plugs. Will let this sit a few days…..I think a top coat will just about do it..
Image


Will post as a Project when the finish is done. Thanks for following along!

BTW: I needed to clear the bench, as this plank will need some work done…
Image


7/16" thick, with a wee bit of figure..
Image


But, that will be another Blog story…..
 

Attachments