LumberJocks Woodworking Forum banner
61 - 80 of 80 Posts
Discussion starter · #61 ·
Another "boring" post

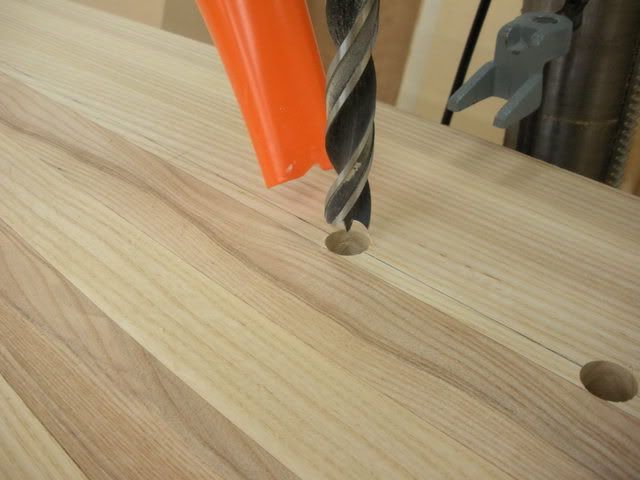
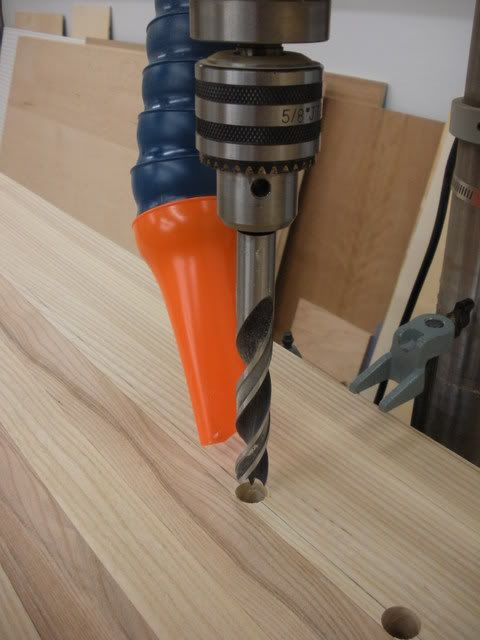
After buying the 3/4" Colt Maxicut forstner bit, I still wasn't happy with my hole boring operation. The Maxicut is great, but I just felt that for holes almost 4" deep there had to be another option. I ended up buying another Colt product - their Twinland Brad Point bit. THIS was the answer I was looking for! This bit hogs out a nice clean hole and the leaves smooth exit as well.

Photobucket

Photobucket

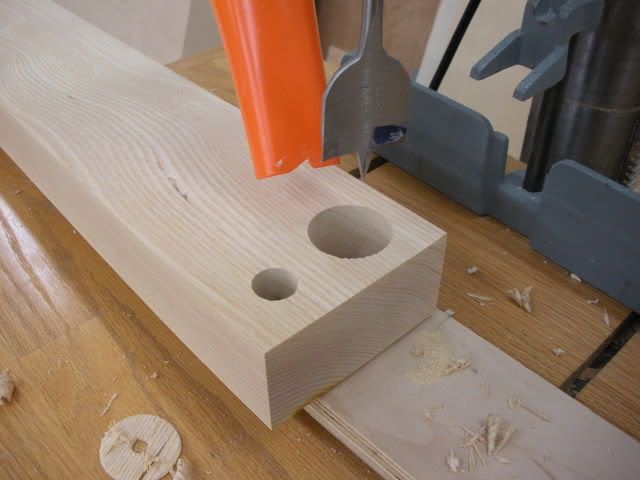
Next I had to decide how to best drill the 1 1/2" holes for the screws on the Veritas Twin Screw Vise - I ended up trying an "Irwin Speedbor 1 1/2 spade bit. I've not had much luck with space bits in the past. They normally leave a really rough hole and a terrible exit. I was very pleasantly surprised with the Speedbor bit. As log as I slowed the feed rate at the entry and exit it was very smooth with little/no tearout. Here's a picture of both holes in my scrap.

Photobucket

Now that I have the proper boring bits it's time to turn to vise installation.
 
Discussion starter · #62 ·
Time to install the tail vise

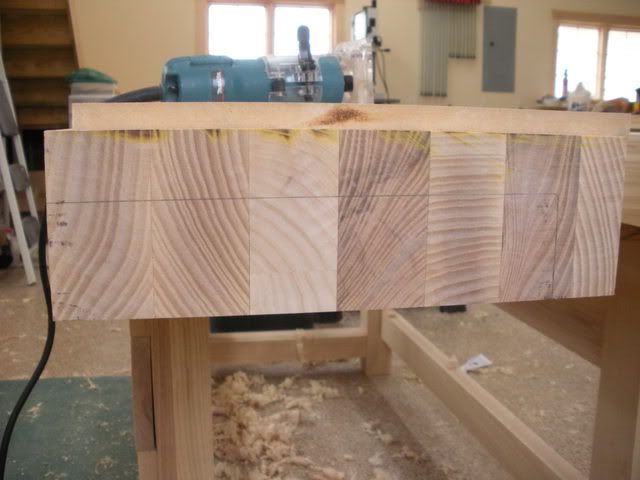
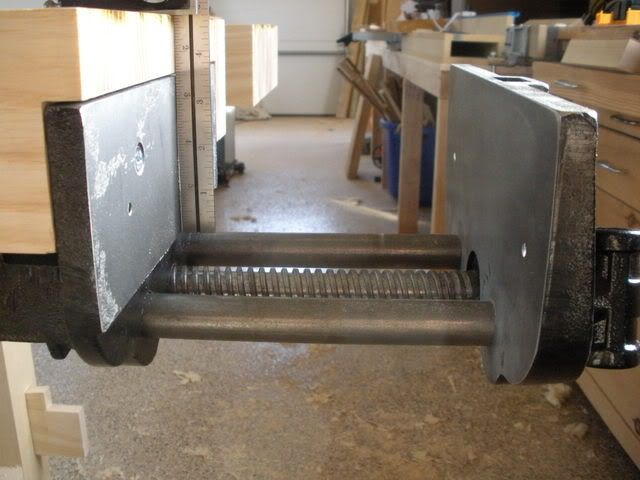
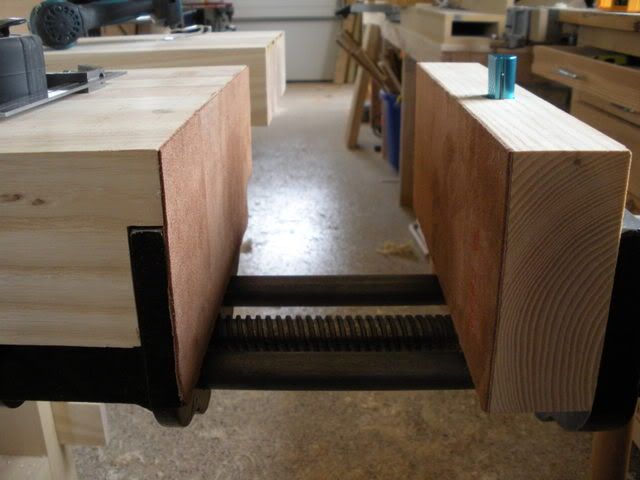
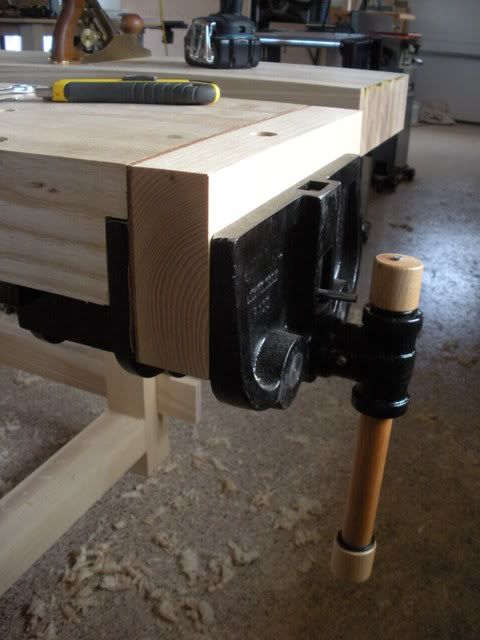
For the tail vise I chose the Jorgensen 41012 quick-release vise. The vise comes with lag screws to attach it to the bottom of the bench, but I decided to thru-bolt it to the bench for increased security. To mark the holes for the vise I flipped it upside down on the top of the bench and marked the centers for the holes, but this location deosn't take into account the fact that the face of the vise will be mortised into the end of the bench in order for it to be flush, so I then moved the center marks back into the bench an amount equal to the depth of the vise face. I did the same procedure on the bottom of the bench so that I could verify their position before drilling the holes. Having these holes in the wrong spot would be a major foul-up.
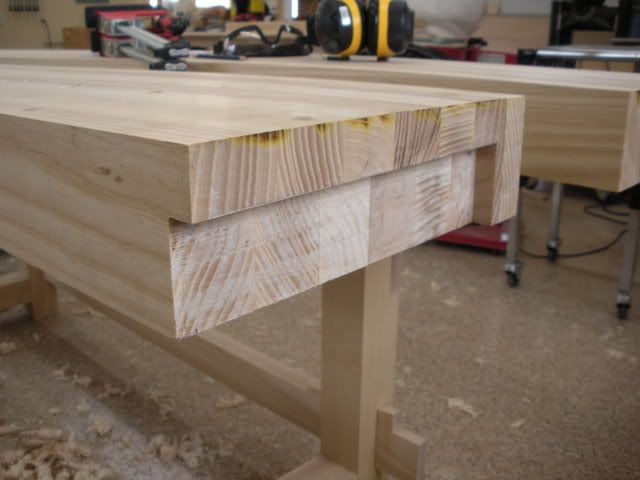
Then I marked out the edge of the vise face on the end of the bench.

Photobucket

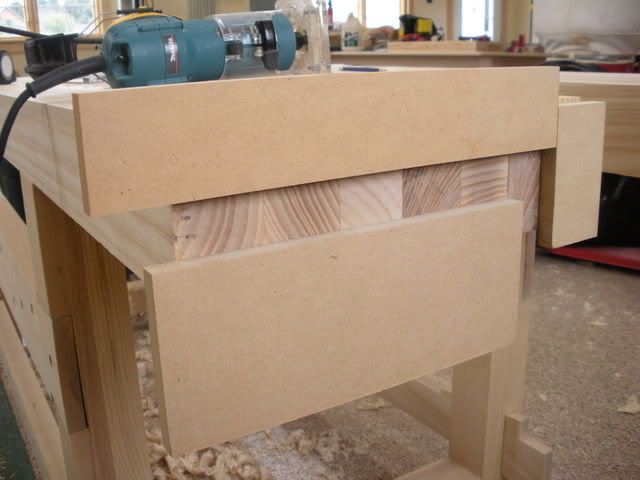
Then I secured some 1/2" MDF to the end of the bench with double-sided tape and used a pattern bit in my trim router to route out the mortise. At this point I was concentrating on getting a nice clean line where the edge of the vise will meet the bench top.

Photobucket

Removing the waste at the very bottom edge of the notch was difficult because the router base no longer had any support and wanted to tip into the bench. My solution here was to secure another piece of MDF to the bottom of the bench that extended out to meet the end of the bench. That gave me an edge to rest the base on and the base was wide enough to straddle the MDF and the edge of the bench.

Photobucket

Now I was able to verify the hole locations and drill them. I started with a 7/8" forstner bit in order to counter sink the bolt head about 3/16" below the top of the bench, then I finished the hole using guide block that I had made. After the initial fitting of the vise it because obvious I was going to have to shim the behind the bolts just a touch to bring the face parallel to the end of the bench. I used a few cut washers as shims and it worked like a champ.

Photobucket

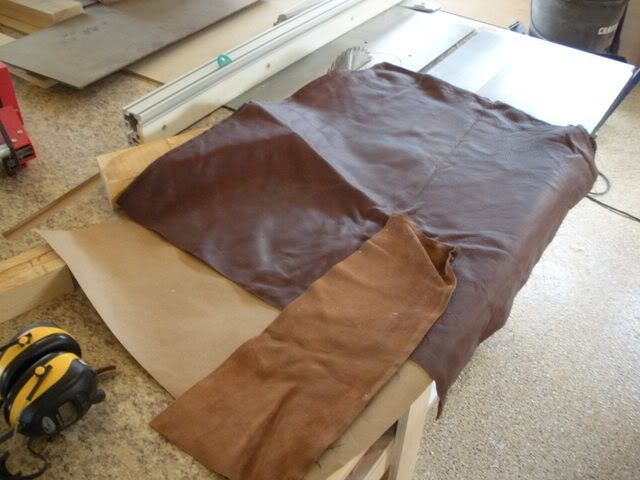
Next it was time to apply the leather to the faces. For this vise I decided to apply it to both faces. I had the leather and it's easy enough to remove if I decide I only want it on the metal side later. The leather came from seat cushion cover from a leather sofa we have that was damaged during shipment and replaced by the manufacturer. I applied it with spray contact cement adhesive - sprayed to the leather only.

Photobucket

Photobucket

Photobucket

I'm very happy with this vise. It grips tenaciously and the quick-release is very easy to use, just 1/2 turn back and slide around to where you want it.
The bench is looking great so far!

I have some Elk leather. That looks like a pretty good idea!
 
Time to install the tail vise

For the tail vise I chose the Jorgensen 41012 quick-release vise. The vise comes with lag screws to attach it to the bottom of the bench, but I decided to thru-bolt it to the bench for increased security. To mark the holes for the vise I flipped it upside down on the top of the bench and marked the centers for the holes, but this location deosn't take into account the fact that the face of the vise will be mortised into the end of the bench in order for it to be flush, so I then moved the center marks back into the bench an amount equal to the depth of the vise face. I did the same procedure on the bottom of the bench so that I could verify their position before drilling the holes. Having these holes in the wrong spot would be a major foul-up.
Then I marked out the edge of the vise face on the end of the bench.

Photobucket

Then I secured some 1/2" MDF to the end of the bench with double-sided tape and used a pattern bit in my trim router to route out the mortise. At this point I was concentrating on getting a nice clean line where the edge of the vise will meet the bench top.

Photobucket

Removing the waste at the very bottom edge of the notch was difficult because the router base no longer had any support and wanted to tip into the bench. My solution here was to secure another piece of MDF to the bottom of the bench that extended out to meet the end of the bench. That gave me an edge to rest the base on and the base was wide enough to straddle the MDF and the edge of the bench.

Photobucket

Now I was able to verify the hole locations and drill them. I started with a 7/8" forstner bit in order to counter sink the bolt head about 3/16" below the top of the bench, then I finished the hole using guide block that I had made. After the initial fitting of the vise it because obvious I was going to have to shim the behind the bolts just a touch to bring the face parallel to the end of the bench. I used a few cut washers as shims and it worked like a champ.

Photobucket

Next it was time to apply the leather to the faces. For this vise I decided to apply it to both faces. I had the leather and it's easy enough to remove if I decide I only want it on the metal side later. The leather came from seat cushion cover from a leather sofa we have that was damaged during shipment and replaced by the manufacturer. I applied it with spray contact cement adhesive - sprayed to the leather only.

Photobucket

Photobucket

Photobucket

I'm very happy with this vise. It grips tenaciously and the quick-release is very easy to use, just 1/2 turn back and slide around to where you want it.
wow! Great work , and superb bench! I really enjoy this blog

thanks for sharing
 
Time to install the tail vise

For the tail vise I chose the Jorgensen 41012 quick-release vise. The vise comes with lag screws to attach it to the bottom of the bench, but I decided to thru-bolt it to the bench for increased security. To mark the holes for the vise I flipped it upside down on the top of the bench and marked the centers for the holes, but this location deosn't take into account the fact that the face of the vise will be mortised into the end of the bench in order for it to be flush, so I then moved the center marks back into the bench an amount equal to the depth of the vise face. I did the same procedure on the bottom of the bench so that I could verify their position before drilling the holes. Having these holes in the wrong spot would be a major foul-up.
Then I marked out the edge of the vise face on the end of the bench.

Photobucket

Then I secured some 1/2" MDF to the end of the bench with double-sided tape and used a pattern bit in my trim router to route out the mortise. At this point I was concentrating on getting a nice clean line where the edge of the vise will meet the bench top.

Photobucket

Removing the waste at the very bottom edge of the notch was difficult because the router base no longer had any support and wanted to tip into the bench. My solution here was to secure another piece of MDF to the bottom of the bench that extended out to meet the end of the bench. That gave me an edge to rest the base on and the base was wide enough to straddle the MDF and the edge of the bench.

Photobucket

Now I was able to verify the hole locations and drill them. I started with a 7/8" forstner bit in order to counter sink the bolt head about 3/16" below the top of the bench, then I finished the hole using guide block that I had made. After the initial fitting of the vise it because obvious I was going to have to shim the behind the bolts just a touch to bring the face parallel to the end of the bench. I used a few cut washers as shims and it worked like a champ.

Photobucket

Next it was time to apply the leather to the faces. For this vise I decided to apply it to both faces. I had the leather and it's easy enough to remove if I decide I only want it on the metal side later. The leather came from seat cushion cover from a leather sofa we have that was damaged during shipment and replaced by the manufacturer. I applied it with spray contact cement adhesive - sprayed to the leather only.

Photobucket

Photobucket

Photobucket

I'm very happy with this vise. It grips tenaciously and the quick-release is very easy to use, just 1/2 turn back and slide around to where you want it.
Great pictures! must to be a really good camera!
 
Time to install the tail vise

For the tail vise I chose the Jorgensen 41012 quick-release vise. The vise comes with lag screws to attach it to the bottom of the bench, but I decided to thru-bolt it to the bench for increased security. To mark the holes for the vise I flipped it upside down on the top of the bench and marked the centers for the holes, but this location deosn't take into account the fact that the face of the vise will be mortised into the end of the bench in order for it to be flush, so I then moved the center marks back into the bench an amount equal to the depth of the vise face. I did the same procedure on the bottom of the bench so that I could verify their position before drilling the holes. Having these holes in the wrong spot would be a major foul-up.
Then I marked out the edge of the vise face on the end of the bench.

Photobucket

Then I secured some 1/2" MDF to the end of the bench with double-sided tape and used a pattern bit in my trim router to route out the mortise. At this point I was concentrating on getting a nice clean line where the edge of the vise will meet the bench top.

Photobucket

Removing the waste at the very bottom edge of the notch was difficult because the router base no longer had any support and wanted to tip into the bench. My solution here was to secure another piece of MDF to the bottom of the bench that extended out to meet the end of the bench. That gave me an edge to rest the base on and the base was wide enough to straddle the MDF and the edge of the bench.

Photobucket

Now I was able to verify the hole locations and drill them. I started with a 7/8" forstner bit in order to counter sink the bolt head about 3/16" below the top of the bench, then I finished the hole using guide block that I had made. After the initial fitting of the vise it because obvious I was going to have to shim the behind the bolts just a touch to bring the face parallel to the end of the bench. I used a few cut washers as shims and it worked like a champ.

Photobucket

Next it was time to apply the leather to the faces. For this vise I decided to apply it to both faces. I had the leather and it's easy enough to remove if I decide I only want it on the metal side later. The leather came from seat cushion cover from a leather sofa we have that was damaged during shipment and replaced by the manufacturer. I applied it with spray contact cement adhesive - sprayed to the leather only.

Photobucket

Photobucket

Photobucket

I'm very happy with this vise. It grips tenaciously and the quick-release is very easy to use, just 1/2 turn back and slide around to where you want it.
This is looking great. Until I read Chris Swarz's book I would not have thought about using leather in the vice. It appears to be a nice improvement in the clamping power of the vice.
 
Time to install the tail vise

For the tail vise I chose the Jorgensen 41012 quick-release vise. The vise comes with lag screws to attach it to the bottom of the bench, but I decided to thru-bolt it to the bench for increased security. To mark the holes for the vise I flipped it upside down on the top of the bench and marked the centers for the holes, but this location deosn't take into account the fact that the face of the vise will be mortised into the end of the bench in order for it to be flush, so I then moved the center marks back into the bench an amount equal to the depth of the vise face. I did the same procedure on the bottom of the bench so that I could verify their position before drilling the holes. Having these holes in the wrong spot would be a major foul-up.
Then I marked out the edge of the vise face on the end of the bench.

Photobucket

Then I secured some 1/2" MDF to the end of the bench with double-sided tape and used a pattern bit in my trim router to route out the mortise. At this point I was concentrating on getting a nice clean line where the edge of the vise will meet the bench top.

Photobucket

Removing the waste at the very bottom edge of the notch was difficult because the router base no longer had any support and wanted to tip into the bench. My solution here was to secure another piece of MDF to the bottom of the bench that extended out to meet the end of the bench. That gave me an edge to rest the base on and the base was wide enough to straddle the MDF and the edge of the bench.

Photobucket

Now I was able to verify the hole locations and drill them. I started with a 7/8" forstner bit in order to counter sink the bolt head about 3/16" below the top of the bench, then I finished the hole using guide block that I had made. After the initial fitting of the vise it because obvious I was going to have to shim the behind the bolts just a touch to bring the face parallel to the end of the bench. I used a few cut washers as shims and it worked like a champ.

Photobucket

Next it was time to apply the leather to the faces. For this vise I decided to apply it to both faces. I had the leather and it's easy enough to remove if I decide I only want it on the metal side later. The leather came from seat cushion cover from a leather sofa we have that was damaged during shipment and replaced by the manufacturer. I applied it with spray contact cement adhesive - sprayed to the leather only.

Photobucket

Photobucket

Photobucket

I'm very happy with this vise. It grips tenaciously and the quick-release is very easy to use, just 1/2 turn back and slide around to where you want it.
Thanks for the update.
 
Discussion starter · #68 ·
Project Completion: The tool trays are completed & installed

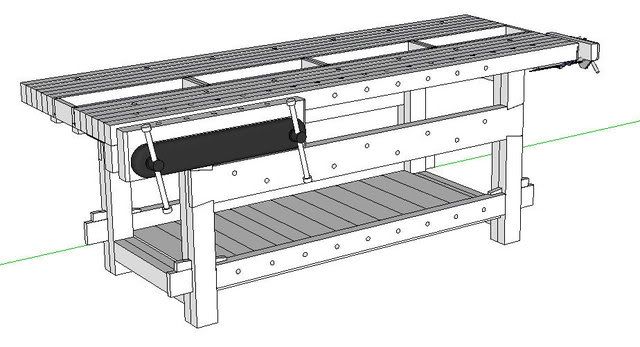
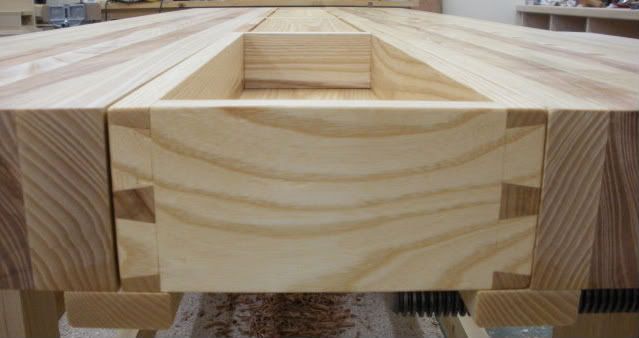
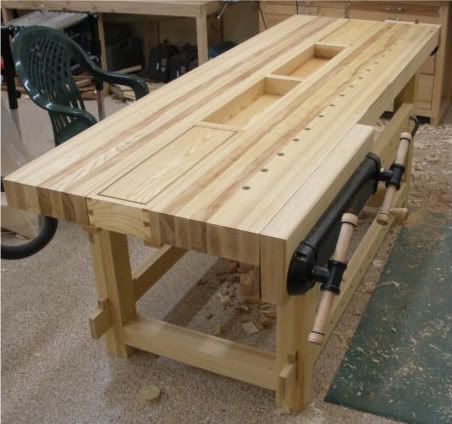
After several weeks of working on hanging doors, trim work and building a bathroom vanity I finally got a chance to finish up my workbench. One of the features that really attracted me to this workbench design in the first place was the reversible tool trays. I really don't like the idea of having a big trough running down the middle of my bench, but being able to flip the trays over and have flat surface was very appealing. I decided to dovetail the trays rather than use the rabbet joint that Bob Lang had used. Although that would have been much easier I didn't want to have to look at rabbeted drawers for the rest of my life. I also decided to use a 67 1/2* shaker panel raising bit for the tray bottoms. It was simply more aesthetically pleasing to me.

Photobucket

Photobucket
That is an amazing looking workbench!!! That should be a great tool to use for any future projects.
 
Project Completion: The tool trays are completed & installed

After several weeks of working on hanging doors, trim work and building a bathroom vanity I finally got a chance to finish up my workbench. One of the features that really attracted me to this workbench design in the first place was the reversible tool trays. I really don't like the idea of having a big trough running down the middle of my bench, but being able to flip the trays over and have flat surface was very appealing. I decided to dovetail the trays rather than use the rabbet joint that Bob Lang had used. Although that would have been much easier I didn't want to have to look at rabbeted drawers for the rest of my life. I also decided to use a 67 1/2* shaker panel raising bit for the tray bottoms. It was simply more aesthetically pleasing to me.

Photobucket

Photobucket
Absolutely amazing! The 21st Century Workbench at its finest! I want to build the same one. I am going to favorite your bench and definitely refer back to it when it's my turn to build it. I like the contrasting woods that you used. Very nice.
 
Project Completion: The tool trays are completed & installed

After several weeks of working on hanging doors, trim work and building a bathroom vanity I finally got a chance to finish up my workbench. One of the features that really attracted me to this workbench design in the first place was the reversible tool trays. I really don't like the idea of having a big trough running down the middle of my bench, but being able to flip the trays over and have flat surface was very appealing. I decided to dovetail the trays rather than use the rabbet joint that Bob Lang had used. Although that would have been much easier I didn't want to have to look at rabbeted drawers for the rest of my life. I also decided to use a 67 1/2* shaker panel raising bit for the tray bottoms. It was simply more aesthetically pleasing to me.

Photobucket

Photobucket
you can rightfully be proud of that one.
 
Project Completion: The tool trays are completed & installed

After several weeks of working on hanging doors, trim work and building a bathroom vanity I finally got a chance to finish up my workbench. One of the features that really attracted me to this workbench design in the first place was the reversible tool trays. I really don't like the idea of having a big trough running down the middle of my bench, but being able to flip the trays over and have flat surface was very appealing. I decided to dovetail the trays rather than use the rabbet joint that Bob Lang had used. Although that would have been much easier I didn't want to have to look at rabbeted drawers for the rest of my life. I also decided to use a 67 1/2* shaker panel raising bit for the tray bottoms. It was simply more aesthetically pleasing to me.

Photobucket

Photobucket
That's incredibly gorgeous… Are you busting at the seems to work on it? I'd be afraid to muff up something that nice… Great work!!!!
 
Project Completion: The tool trays are completed & installed

After several weeks of working on hanging doors, trim work and building a bathroom vanity I finally got a chance to finish up my workbench. One of the features that really attracted me to this workbench design in the first place was the reversible tool trays. I really don't like the idea of having a big trough running down the middle of my bench, but being able to flip the trays over and have flat surface was very appealing. I decided to dovetail the trays rather than use the rabbet joint that Bob Lang had used. Although that would have been much easier I didn't want to have to look at rabbeted drawers for the rest of my life. I also decided to use a 67 1/2* shaker panel raising bit for the tray bottoms. It was simply more aesthetically pleasing to me.

Photobucket

Photobucket
That is one awesome bench. Great work.

thanks for sharing the progress with us.
 
Project Completion: The tool trays are completed & installed

After several weeks of working on hanging doors, trim work and building a bathroom vanity I finally got a chance to finish up my workbench. One of the features that really attracted me to this workbench design in the first place was the reversible tool trays. I really don't like the idea of having a big trough running down the middle of my bench, but being able to flip the trays over and have flat surface was very appealing. I decided to dovetail the trays rather than use the rabbet joint that Bob Lang had used. Although that would have been much easier I didn't want to have to look at rabbeted drawers for the rest of my life. I also decided to use a 67 1/2* shaker panel raising bit for the tray bottoms. It was simply more aesthetically pleasing to me.

Photobucket

Photobucket
Great job, the tool trays in the middle are a great touch. The workbench should last a lifetime.
 
Project Completion: The tool trays are completed & installed

After several weeks of working on hanging doors, trim work and building a bathroom vanity I finally got a chance to finish up my workbench. One of the features that really attracted me to this workbench design in the first place was the reversible tool trays. I really don't like the idea of having a big trough running down the middle of my bench, but being able to flip the trays over and have flat surface was very appealing. I decided to dovetail the trays rather than use the rabbet joint that Bob Lang had used. Although that would have been much easier I didn't want to have to look at rabbeted drawers for the rest of my life. I also decided to use a 67 1/2* shaker panel raising bit for the tray bottoms. It was simply more aesthetically pleasing to me.

Photobucket

Photobucket
Very nice. Looks impressive! Congrats!
 
Project Completion: The tool trays are completed & installed

After several weeks of working on hanging doors, trim work and building a bathroom vanity I finally got a chance to finish up my workbench. One of the features that really attracted me to this workbench design in the first place was the reversible tool trays. I really don't like the idea of having a big trough running down the middle of my bench, but being able to flip the trays over and have flat surface was very appealing. I decided to dovetail the trays rather than use the rabbet joint that Bob Lang had used. Although that would have been much easier I didn't want to have to look at rabbeted drawers for the rest of my life. I also decided to use a 67 1/2* shaker panel raising bit for the tray bottoms. It was simply more aesthetically pleasing to me.

Photobucket

Photobucket
Thats a nice looking workbench.
 
Project Completion: The tool trays are completed & installed

After several weeks of working on hanging doors, trim work and building a bathroom vanity I finally got a chance to finish up my workbench. One of the features that really attracted me to this workbench design in the first place was the reversible tool trays. I really don't like the idea of having a big trough running down the middle of my bench, but being able to flip the trays over and have flat surface was very appealing. I decided to dovetail the trays rather than use the rabbet joint that Bob Lang had used. Although that would have been much easier I didn't want to have to look at rabbeted drawers for the rest of my life. I also decided to use a 67 1/2* shaker panel raising bit for the tray bottoms. It was simply more aesthetically pleasing to me.

Photobucket

Photobucket
I was just looking back over the entire workbench series and this looks like a great project.

As I understand, this bench is designed with knock-down components so it can be disassembled at some point.

How are the slab tops attached to the upright leg frames that they still remain removable? I tried to extract this information from pictures, but didn't catch that part.
 
Discussion starter · #78 ·
Project Completion: The tool trays are completed & installed

After several weeks of working on hanging doors, trim work and building a bathroom vanity I finally got a chance to finish up my workbench. One of the features that really attracted me to this workbench design in the first place was the reversible tool trays. I really don't like the idea of having a big trough running down the middle of my bench, but being able to flip the trays over and have flat surface was very appealing. I decided to dovetail the trays rather than use the rabbet joint that Bob Lang had used. Although that would have been much easier I didn't want to have to look at rabbeted drawers for the rest of my life. I also decided to use a 67 1/2* shaker panel raising bit for the tray bottoms. It was simply more aesthetically pleasing to me.

Photobucket

Photobucket
The bench top is secured to the legs with lag screws. Two per slab per leg. Eight screws in total.

If you are considering making this bench then there are a couple of modifications I would make now that I've used it for a few years.
1) eliminate the top cross-member. You don't need it. The bench does not rack at all with it removed. If you are concerned about that you could always increase the width of the bottom crossmember.
2) add a sliding deadman. Elimination of the crossmember will allow you to install the sliding deadman. As it stands I find that panel edges often fall in the gap above and below the top cross member and I have no easy way to support it.
3) eliminate the trays and just make a gap 1 1/2" - 2" wide to allow you to get a clamp through it.
4) fill the gap with a filler that creates a 3/8" gap to store chisels and saws in while working. If you create the filler piece to be taller than the bench top slabs by 3/8" and then notch it around the leg cross braces you will be able to flip it over and have a nice planing stop. My trays are rarely flipped over. They looked great, but don't get much use in reality. I made another bench with a split-top as described and I like it a lot better.
5) make the bench top slabs asymmetrical with the wider one in the the front and the narrower one in the back. That will give you as much room as possible to work without having to maneuver around things stores in the slot.
 
Project Completion: The tool trays are completed & installed

After several weeks of working on hanging doors, trim work and building a bathroom vanity I finally got a chance to finish up my workbench. One of the features that really attracted me to this workbench design in the first place was the reversible tool trays. I really don't like the idea of having a big trough running down the middle of my bench, but being able to flip the trays over and have flat surface was very appealing. I decided to dovetail the trays rather than use the rabbet joint that Bob Lang had used. Although that would have been much easier I didn't want to have to look at rabbeted drawers for the rest of my life. I also decided to use a 67 1/2* shaker panel raising bit for the tray bottoms. It was simply more aesthetically pleasing to me.

Photobucket

Photobucket
Mark,

thanks very much for sharing all this information. I hope that now in 2015 you're still happy with it!

Mariano
 
Discussion starter · #80 ·
Project Completion: The tool trays are completed & installed

After several weeks of working on hanging doors, trim work and building a bathroom vanity I finally got a chance to finish up my workbench. One of the features that really attracted me to this workbench design in the first place was the reversible tool trays. I really don't like the idea of having a big trough running down the middle of my bench, but being able to flip the trays over and have flat surface was very appealing. I decided to dovetail the trays rather than use the rabbet joint that Bob Lang had used. Although that would have been much easier I didn't want to have to look at rabbeted drawers for the rest of my life. I also decided to use a 67 1/2* shaker panel raising bit for the tray bottoms. It was simply more aesthetically pleasing to me.

Photobucket

Photobucket
Thanks Mariano. After many years of using this bench it is doing great. However, see my comment above for lessons learned.
 
61 - 80 of 80 Posts