LumberJocks Woodworking Forum banner
21 - 40 of 80 Posts
Discussion starter · #21 ·
Mortise & Tenon's are rought cut

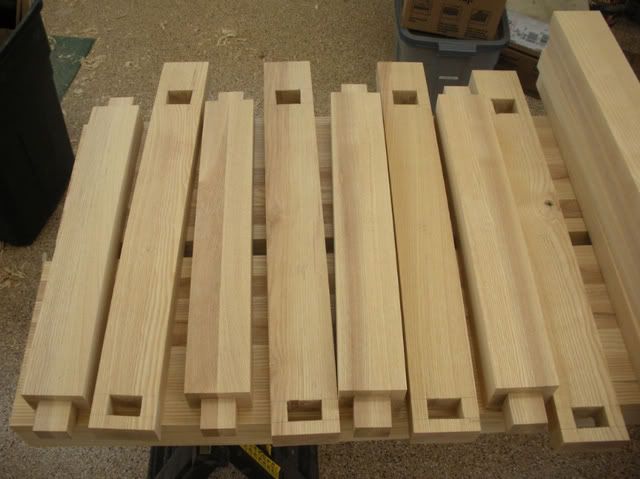
I got to spend a few hours in the shop yesterday and I got the top planed although I discovered that one half of the top has developed a little twist. I'll wait until it's attached to the base and in position before I worry about hand planing it flat. I got the mortises chopped out and the tenons rough cut. Here's where I sit now:

Photobucket
Cylis, to cut the mortises I started with a forstner bit. I drilled out the majority of the waste, then I used a 1/2" hollow chisel mortising bit on my drill press for the corners. When that was complete I chopped out the rest of the waste. I don't have a mortising chisel but really wish I did now!
 
Mortise & Tenon's are rought cut

I got to spend a few hours in the shop yesterday and I got the top planed although I discovered that one half of the top has developed a little twist. I'll wait until it's attached to the base and in position before I worry about hand planing it flat. I got the mortises chopped out and the tenons rough cut. Here's where I sit now:

Photobucket
Nice moritse and tenons.
 
Discussion starter · #23 ·
Assembling the wedged mortise & tenons

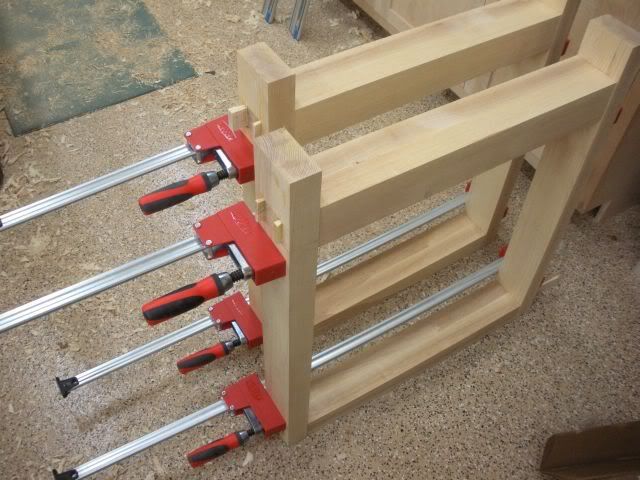
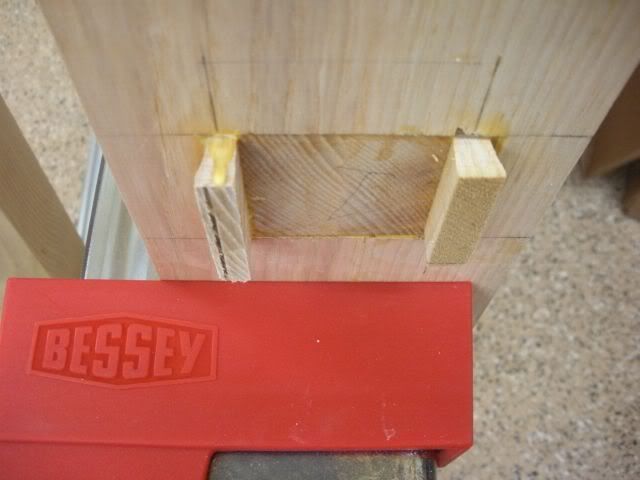
I spent a few hours…quite a few hours refining the fit of the mortise and tenons. They were pretty close, but when your working with 8/4 stock and seriously hard wood it seems to take forever to make small adjustments. I have a Veritas medium shoulder plane, but a true rabbet plane would really have come in handy. So would a much better set of rasp's.
After I got the tenons properly fit I took them over to the band saw and cut a kerf for the wedges. I left about 1/8" of wood outside of the kerf. After testing several pieces, that seemed to be about as thick as I could and have the wood bend into the open part of the mortise.
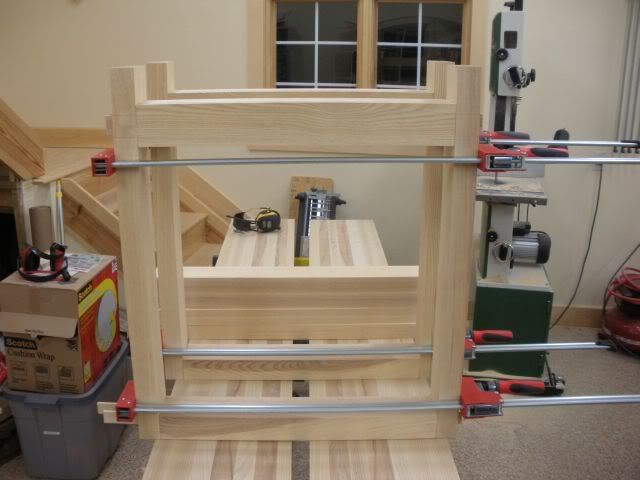
I glued everything up and to my great surprise it all came together perfectly square without any tweeking. NExt week I'll work on the rails.

Photobucket

Photobucket

Photobucket
Sweet… nice clean job. Looks too nice to use! lol.

Make sure you post some final picts.
 
Assembling the wedged mortise & tenons

I spent a few hours…quite a few hours refining the fit of the mortise and tenons. They were pretty close, but when your working with 8/4 stock and seriously hard wood it seems to take forever to make small adjustments. I have a Veritas medium shoulder plane, but a true rabbet plane would really have come in handy. So would a much better set of rasp's.
After I got the tenons properly fit I took them over to the band saw and cut a kerf for the wedges. I left about 1/8" of wood outside of the kerf. After testing several pieces, that seemed to be about as thick as I could and have the wood bend into the open part of the mortise.
I glued everything up and to my great surprise it all came together perfectly square without any tweeking. NExt week I'll work on the rails.

Photobucket

Photobucket

Photobucket
Nice Mark,

I want to see how you flattented the top :D
 
Assembling the wedged mortise & tenons

I spent a few hours…quite a few hours refining the fit of the mortise and tenons. They were pretty close, but when your working with 8/4 stock and seriously hard wood it seems to take forever to make small adjustments. I have a Veritas medium shoulder plane, but a true rabbet plane would really have come in handy. So would a much better set of rasp's.
After I got the tenons properly fit I took them over to the band saw and cut a kerf for the wedges. I left about 1/8" of wood outside of the kerf. After testing several pieces, that seemed to be about as thick as I could and have the wood bend into the open part of the mortise.
I glued everything up and to my great surprise it all came together perfectly square without any tweeking. NExt week I'll work on the rails.

Photobucket

Photobucket

Photobucket
Beautiful. Looks like a work of art so far.
 
Assembling the wedged mortise & tenons

I spent a few hours…quite a few hours refining the fit of the mortise and tenons. They were pretty close, but when your working with 8/4 stock and seriously hard wood it seems to take forever to make small adjustments. I have a Veritas medium shoulder plane, but a true rabbet plane would really have come in handy. So would a much better set of rasp's.
After I got the tenons properly fit I took them over to the band saw and cut a kerf for the wedges. I left about 1/8" of wood outside of the kerf. After testing several pieces, that seemed to be about as thick as I could and have the wood bend into the open part of the mortise.
I glued everything up and to my great surprise it all came together perfectly square without any tweeking. NExt week I'll work on the rails.

Photobucket

Photobucket

Photobucket
Mark, this is looking good. I have one of these on my to-do list (as soon as I decide the style and can free up some time from my "assigned" projects) so I am enjoying following this.
 
Discussion starter · #28 ·
Assembling the wedged mortise & tenons

I spent a few hours…quite a few hours refining the fit of the mortise and tenons. They were pretty close, but when your working with 8/4 stock and seriously hard wood it seems to take forever to make small adjustments. I have a Veritas medium shoulder plane, but a true rabbet plane would really have come in handy. So would a much better set of rasp's.
After I got the tenons properly fit I took them over to the band saw and cut a kerf for the wedges. I left about 1/8" of wood outside of the kerf. After testing several pieces, that seemed to be about as thick as I could and have the wood bend into the open part of the mortise.
I glued everything up and to my great surprise it all came together perfectly square without any tweeking. NExt week I'll work on the rails.

Photobucket

Photobucket

Photobucket
Chico, I did the initial flattening with a #7 jointer plane. I only planed one side and used winding sticks to see if it was flat. Then I took each side and ran them thru my planer (part of the beauty of this design is that each half of the top is only 11 3/4" wide). That's when I realized that one side has some twist in it. Next I'll wait until the base is assembled and then I'll slide the two halves up against each other, shim the side with twist and plane the whole thing flat, then I'll run them through the planer again to make the other side parallel. The top is quite a bit thicker than required so I've got plenty of wood to work with to get everything flat.
 
Assembling the wedged mortise & tenons

I spent a few hours…quite a few hours refining the fit of the mortise and tenons. They were pretty close, but when your working with 8/4 stock and seriously hard wood it seems to take forever to make small adjustments. I have a Veritas medium shoulder plane, but a true rabbet plane would really have come in handy. So would a much better set of rasp's.
After I got the tenons properly fit I took them over to the band saw and cut a kerf for the wedges. I left about 1/8" of wood outside of the kerf. After testing several pieces, that seemed to be about as thick as I could and have the wood bend into the open part of the mortise.
I glued everything up and to my great surprise it all came together perfectly square without any tweeking. NExt week I'll work on the rails.

Photobucket

Photobucket

Photobucket
Thanks Mark,

You should include a picture of your biceps. That sounds like a lot of work LOL.
 
Assembling the wedged mortise & tenons

I spent a few hours…quite a few hours refining the fit of the mortise and tenons. They were pretty close, but when your working with 8/4 stock and seriously hard wood it seems to take forever to make small adjustments. I have a Veritas medium shoulder plane, but a true rabbet plane would really have come in handy. So would a much better set of rasp's.
After I got the tenons properly fit I took them over to the band saw and cut a kerf for the wedges. I left about 1/8" of wood outside of the kerf. After testing several pieces, that seemed to be about as thick as I could and have the wood bend into the open part of the mortise.
I glued everything up and to my great surprise it all came together perfectly square without any tweeking. NExt week I'll work on the rails.

Photobucket

Photobucket

Photobucket
Beautiful bench, Mark.
 
Discussion starter · #31 ·
Half-lapping the side rails

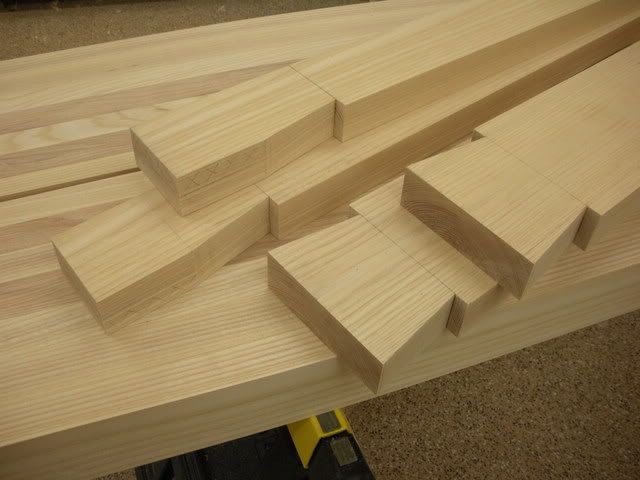
Last night I got to put in a few hours on the bench project. I've been working on half-lapping the side rails. First marked out the dovetails then I cut them on the band saw. The upper stretcher is a full half-lapped dovetail and the bottom rails has a half-lapped dovetail only on the bottom side. The top side gets a wedge pin to complete the dovetail.

Photobucket

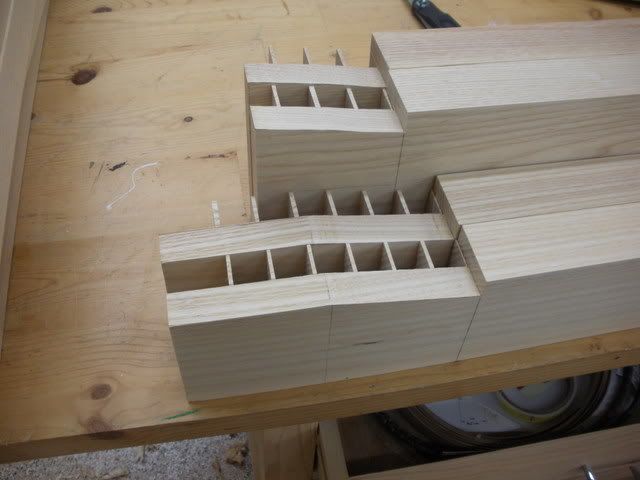
After I had the dovetails cut I cut the shoulders with a hand saw then I headed over to the table saw where I used my dado head to clean out the waste.

Photobucket

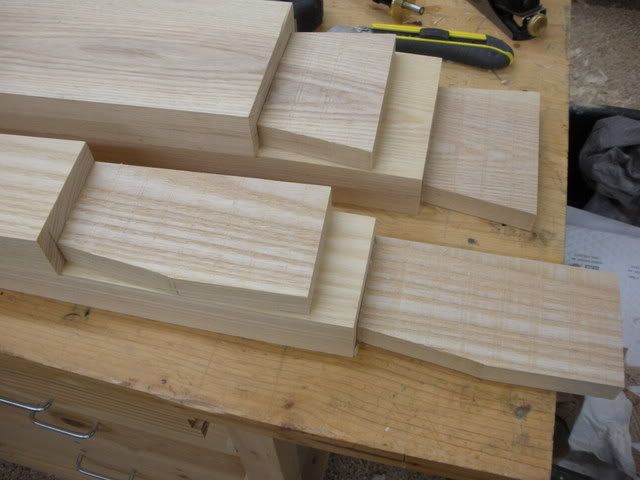
Then I took a chisel and cleaned off the remaining support pieces and then used a rasp to clean up the faces and true up the edges of the dovetails.

Photobucket

Tonight hopefully I'll mark out the corresponding dovetail sockets on the legs and then clean them out. When that's done I should have a usable base!
Nice looking! Keep up the good work.
 
Half-lapping the side rails

Last night I got to put in a few hours on the bench project. I've been working on half-lapping the side rails. First marked out the dovetails then I cut them on the band saw. The upper stretcher is a full half-lapped dovetail and the bottom rails has a half-lapped dovetail only on the bottom side. The top side gets a wedge pin to complete the dovetail.

Photobucket

After I had the dovetails cut I cut the shoulders with a hand saw then I headed over to the table saw where I used my dado head to clean out the waste.

Photobucket

Then I took a chisel and cleaned off the remaining support pieces and then used a rasp to clean up the faces and true up the edges of the dovetails.

Photobucket

Tonight hopefully I'll mark out the corresponding dovetail sockets on the legs and then clean them out. When that's done I should have a usable base!
THose are some huge and good looking dovetails you have there….
 
Half-lapping the side rails

Last night I got to put in a few hours on the bench project. I've been working on half-lapping the side rails. First marked out the dovetails then I cut them on the band saw. The upper stretcher is a full half-lapped dovetail and the bottom rails has a half-lapped dovetail only on the bottom side. The top side gets a wedge pin to complete the dovetail.

Photobucket

After I had the dovetails cut I cut the shoulders with a hand saw then I headed over to the table saw where I used my dado head to clean out the waste.

Photobucket

Then I took a chisel and cleaned off the remaining support pieces and then used a rasp to clean up the faces and true up the edges of the dovetails.

Photobucket

Tonight hopefully I'll mark out the corresponding dovetail sockets on the legs and then clean them out. When that's done I should have a usable base!
esplendid work!
 
Discussion starter · #35 ·
Completeing the leg joinery

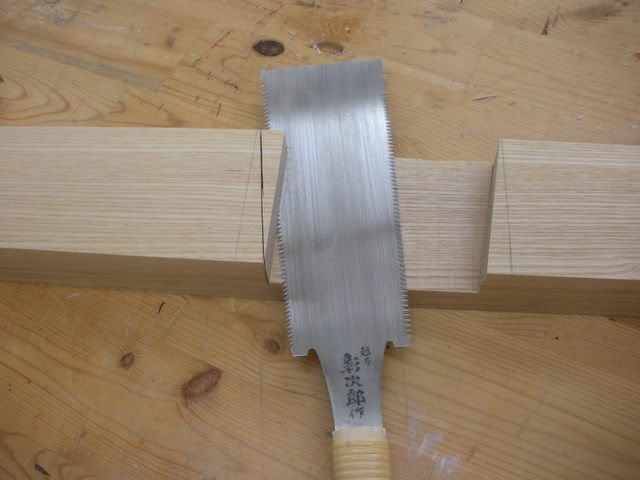
Having finished milling the half lapped dovetails for the rails yesterday, today I was working on milling the matching dovetails on the outer part of the legs to receive the rails. The legs are made up of two sections of 8/4 ash which are glued together after the milling is complete. Doing it this way makes it very easy to create the dovetailed through mortise for the bottom rail. I started by marking all the joints using the dovetails already cut on the rails. Each piece is made to match it's partner so they all had to be numbered to match. After they were all marked, then I cut just inside the line with a hand saw. After that I went back to the table saw and - making sure I'm starting from the narrow side of the dovetail - cut out all the waste that I could. That left me with a wedge shaped piece that needed to be removed. For that I turned to my Japanese Ryoba saw. Because it is kind of like a huge flush cut saw and has both a rip and a crosscut side it works great for this task.

Photobucket

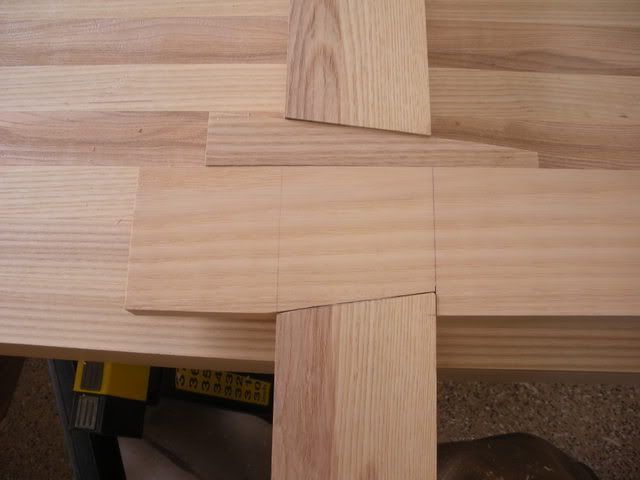
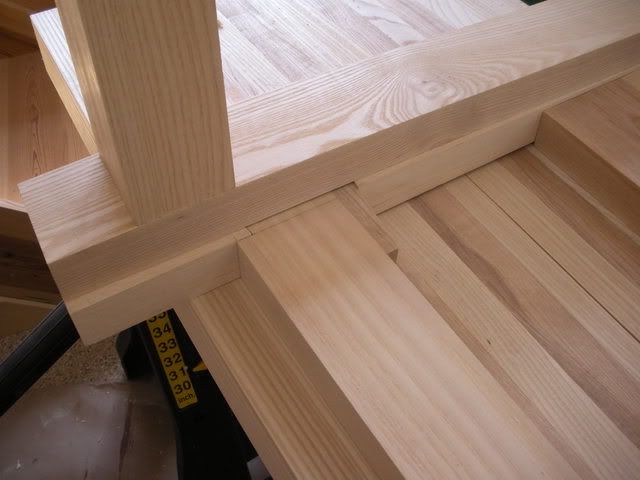
After I had removed all the waste, then I tried a test fit. One of them fit right in, but the rest needed to be tuned up with a shoulder plane and a rasp. This was the second time that I found a really good place to use a rabbet plane, too bad I don't have one. I then headed back over to the table saw and raised the blade about 1/16" and took just a little more material out of the dovetail on the lower rails. The reason for this is that I had cut everything to be a perfect half lap, but the bottom rails need to be able to slide into the mortise so those mortises need to be slightly wider. After that was done and cleaned up, I wend for a test fit. Here's a picture of what the wedged dovetail joint on the lower rail will look like, but after it's glued up you won't be able to get this perspective.

Photobucket

The bench base is made from knock-down but very secure joinery. Here I set the leg frame assembly on top of the outer leg so you can see what the result will look like in the end. I intentionally opset the two halves of the leg so you can se how it's all set up.

Photobucket

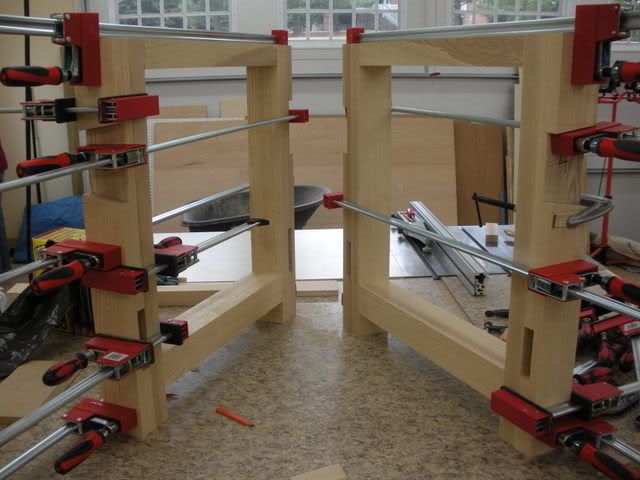
Last but not least I glued the finished outer legs to their corresponding inner leg to make a finished assembly.

Photobucket

Tomorrow I should be able to get the thing supporting it's own weight!
Mark, this is looking good. Your posts have clearly detailed the step-wise progress that the bench is undergoing and primed me, personally, for getting started on my own version. Thanks for the inspiration.
 
Completeing the leg joinery

Having finished milling the half lapped dovetails for the rails yesterday, today I was working on milling the matching dovetails on the outer part of the legs to receive the rails. The legs are made up of two sections of 8/4 ash which are glued together after the milling is complete. Doing it this way makes it very easy to create the dovetailed through mortise for the bottom rail. I started by marking all the joints using the dovetails already cut on the rails. Each piece is made to match it's partner so they all had to be numbered to match. After they were all marked, then I cut just inside the line with a hand saw. After that I went back to the table saw and - making sure I'm starting from the narrow side of the dovetail - cut out all the waste that I could. That left me with a wedge shaped piece that needed to be removed. For that I turned to my Japanese Ryoba saw. Because it is kind of like a huge flush cut saw and has both a rip and a crosscut side it works great for this task.

Photobucket

After I had removed all the waste, then I tried a test fit. One of them fit right in, but the rest needed to be tuned up with a shoulder plane and a rasp. This was the second time that I found a really good place to use a rabbet plane, too bad I don't have one. I then headed back over to the table saw and raised the blade about 1/16" and took just a little more material out of the dovetail on the lower rails. The reason for this is that I had cut everything to be a perfect half lap, but the bottom rails need to be able to slide into the mortise so those mortises need to be slightly wider. After that was done and cleaned up, I wend for a test fit. Here's a picture of what the wedged dovetail joint on the lower rail will look like, but after it's glued up you won't be able to get this perspective.

Photobucket

The bench base is made from knock-down but very secure joinery. Here I set the leg frame assembly on top of the outer leg so you can see what the result will look like in the end. I intentionally opset the two halves of the leg so you can se how it's all set up.

Photobucket

Last but not least I glued the finished outer legs to their corresponding inner leg to make a finished assembly.

Photobucket

Tomorrow I should be able to get the thing supporting it's own weight!
That, gentlemen IS joinery.

(fill in superlative here) job Loog!!!!!!
 
Completeing the leg joinery

Having finished milling the half lapped dovetails for the rails yesterday, today I was working on milling the matching dovetails on the outer part of the legs to receive the rails. The legs are made up of two sections of 8/4 ash which are glued together after the milling is complete. Doing it this way makes it very easy to create the dovetailed through mortise for the bottom rail. I started by marking all the joints using the dovetails already cut on the rails. Each piece is made to match it's partner so they all had to be numbered to match. After they were all marked, then I cut just inside the line with a hand saw. After that I went back to the table saw and - making sure I'm starting from the narrow side of the dovetail - cut out all the waste that I could. That left me with a wedge shaped piece that needed to be removed. For that I turned to my Japanese Ryoba saw. Because it is kind of like a huge flush cut saw and has both a rip and a crosscut side it works great for this task.

Photobucket

After I had removed all the waste, then I tried a test fit. One of them fit right in, but the rest needed to be tuned up with a shoulder plane and a rasp. This was the second time that I found a really good place to use a rabbet plane, too bad I don't have one. I then headed back over to the table saw and raised the blade about 1/16" and took just a little more material out of the dovetail on the lower rails. The reason for this is that I had cut everything to be a perfect half lap, but the bottom rails need to be able to slide into the mortise so those mortises need to be slightly wider. After that was done and cleaned up, I wend for a test fit. Here's a picture of what the wedged dovetail joint on the lower rail will look like, but after it's glued up you won't be able to get this perspective.

Photobucket

The bench base is made from knock-down but very secure joinery. Here I set the leg frame assembly on top of the outer leg so you can see what the result will look like in the end. I intentionally opset the two halves of the leg so you can se how it's all set up.

Photobucket

Last but not least I glued the finished outer legs to their corresponding inner leg to make a finished assembly.

Photobucket

Tomorrow I should be able to get the thing supporting it's own weight!
That looks like fun. Coming along nicely.
 
Completeing the leg joinery

Having finished milling the half lapped dovetails for the rails yesterday, today I was working on milling the matching dovetails on the outer part of the legs to receive the rails. The legs are made up of two sections of 8/4 ash which are glued together after the milling is complete. Doing it this way makes it very easy to create the dovetailed through mortise for the bottom rail. I started by marking all the joints using the dovetails already cut on the rails. Each piece is made to match it's partner so they all had to be numbered to match. After they were all marked, then I cut just inside the line with a hand saw. After that I went back to the table saw and - making sure I'm starting from the narrow side of the dovetail - cut out all the waste that I could. That left me with a wedge shaped piece that needed to be removed. For that I turned to my Japanese Ryoba saw. Because it is kind of like a huge flush cut saw and has both a rip and a crosscut side it works great for this task.

Photobucket

After I had removed all the waste, then I tried a test fit. One of them fit right in, but the rest needed to be tuned up with a shoulder plane and a rasp. This was the second time that I found a really good place to use a rabbet plane, too bad I don't have one. I then headed back over to the table saw and raised the blade about 1/16" and took just a little more material out of the dovetail on the lower rails. The reason for this is that I had cut everything to be a perfect half lap, but the bottom rails need to be able to slide into the mortise so those mortises need to be slightly wider. After that was done and cleaned up, I wend for a test fit. Here's a picture of what the wedged dovetail joint on the lower rail will look like, but after it's glued up you won't be able to get this perspective.

Photobucket

The bench base is made from knock-down but very secure joinery. Here I set the leg frame assembly on top of the outer leg so you can see what the result will look like in the end. I intentionally opset the two halves of the leg so you can se how it's all set up.

Photobucket

Last but not least I glued the finished outer legs to their corresponding inner leg to make a finished assembly.

Photobucket

Tomorrow I should be able to get the thing supporting it's own weight!
Its like a Finley built car, smooth lines, everything fits, I love it!
I am just getting into Joinery myself and I was looking for programs that offer Joinery. I only have one in my area (But from what I was told that is rare enough) and I was wondering if anyone could give me some advice on if its worth it to go here. Quite an investment I must say.
I was looking at http://www.teachwoodworking.com and there are links to the programs I was looking at attending.
Thanks in advance for your help.

Just
 
Completeing the leg joinery

Having finished milling the half lapped dovetails for the rails yesterday, today I was working on milling the matching dovetails on the outer part of the legs to receive the rails. The legs are made up of two sections of 8/4 ash which are glued together after the milling is complete. Doing it this way makes it very easy to create the dovetailed through mortise for the bottom rail. I started by marking all the joints using the dovetails already cut on the rails. Each piece is made to match it's partner so they all had to be numbered to match. After they were all marked, then I cut just inside the line with a hand saw. After that I went back to the table saw and - making sure I'm starting from the narrow side of the dovetail - cut out all the waste that I could. That left me with a wedge shaped piece that needed to be removed. For that I turned to my Japanese Ryoba saw. Because it is kind of like a huge flush cut saw and has both a rip and a crosscut side it works great for this task.

Photobucket

After I had removed all the waste, then I tried a test fit. One of them fit right in, but the rest needed to be tuned up with a shoulder plane and a rasp. This was the second time that I found a really good place to use a rabbet plane, too bad I don't have one. I then headed back over to the table saw and raised the blade about 1/16" and took just a little more material out of the dovetail on the lower rails. The reason for this is that I had cut everything to be a perfect half lap, but the bottom rails need to be able to slide into the mortise so those mortises need to be slightly wider. After that was done and cleaned up, I wend for a test fit. Here's a picture of what the wedged dovetail joint on the lower rail will look like, but after it's glued up you won't be able to get this perspective.

Photobucket

The bench base is made from knock-down but very secure joinery. Here I set the leg frame assembly on top of the outer leg so you can see what the result will look like in the end. I intentionally opset the two halves of the leg so you can se how it's all set up.

Photobucket

Last but not least I glued the finished outer legs to their corresponding inner leg to make a finished assembly.

Photobucket

Tomorrow I should be able to get the thing supporting it's own weight!
Looks like you is having fun.
 
21 - 40 of 80 Posts