LumberJocks Woodworking Forum banner

Tabletop glue up questions

Tags
glue
11K views 36 replies 19 participants last post by  Aj2  
#1 · (Edited by Moderator)
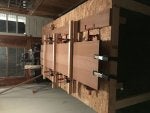
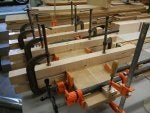
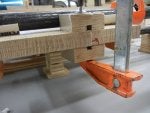
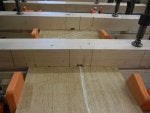
I've purchased a bunch of Sapele and paid to have it jointed and planned. I'm preparing to do my fist glue up. The hair pin leg table I'm building will be 6.5 feet long and 40 inches wide. The tabletop I am gluing up will have 6 boards - 4 six inch wide boards and 2 eight inch wide boards. I built a temporary work table out of dimensional lumber that is 8 feet by 4 feet and I have a collection of clamps. I also have boards to use as cauls. I'm using Titebond III glue. Here are my glue related questions:
1) once I glue up the boards and apply the clamps, how long do I wait before removing the clamps? 2) how do I determine when the clamps are tight enough and how do I avoid clamps that are too tight or too lose. 3) how many of the 8 boards should I glue up at one time? 4) what else should I do to ensure success. Thanks in advance for any advice the glue up portion of this project is a little intimidating for me but I'm excited about the challenge of learning a new woodworking skill
 
#2 ·
Just because you paid someone to joint and plane the wood doesn't mean that it will be flat and true. I joint and plane my wood but always need to do some fine tuning with my hand planes before glue-up.
1) I leave the clamps on overnight.
2)I tighten my clamps until I can't tighten anymore by hand.
3)As many as you can flatten after glue-up, ie. I will only glue-up as many boards as I can fit in my 20" planer after glue-up. If you are going to flatten by hand or by sander after glue-up, then it doesn't matter how many boards you glue up at a time.
4)Cauls across the width of the glue-up to try and keep it flat
 
#3 ·
Doing #2 above will get you in trouble depending on your clamps and hand strength. Over tightening will cause bows and more work for you. Tighten enough to get a bit of glue squeeze out out.

Stumpy nubs did a video on a counter top glue up
see if it has any info that will help.
Also dry fit everything together first and see how well you can get it to fit up. You don't have to glue the whole top up at once,you can do it in stages if you are more comfortable that way. Do two or three boards at once so you can get the hang of it and see if you can do anything better on the next small glue up. If you mess up it's easier to go back one step then it is to cut a part a bunch of glue joints.
 
#4 · (Edited by Moderator)
personally I would dowel your boards.
This serves to have the positioning of your boards work done before you even open a glue bottle. It will make your glue up a lot easier and more accurate and help with general flatness.

EDIT an example on a small scale can be seen on one of my projects here.
 
#5 ·
Do not tighten the clamps as tight as you can because it's possible to squeeze out the glue and leave the joint starved. Just pull the joint together. Big +1 on cauls. Dowels or biscuits might ensure even joints, but they will not ensure a flat surface. Even better, build a torsion box surface for your glue ups. Done right, they are dead flat.

Forget the Titebond III. It's often mistakenly assumed it's stronger because it's one higher, but in fact, its intent is for use in outdoor environments. It has an odd greyish-brown color that can make joints stand out. Titebond II is all you need-and it costs less. Now if they ever come out with Titebond XI, go for it, because hey, it's eleven (Spinal Tap reference).

There's probably more to cover, but I'll leave it at that for now.
 
#6 ·
Might I suggest you buy a few pieces of the "select" pine sold at most BORGs, and do a practice glue up before committing your Sapele to a less than good outcome. If you can get a satisfactory joint from them, move ahead. If not keep tweaking. It is the stuff that has absolutely no knots, clean crisp edges, and if they are straight you can glue up satisfactorily without prep. Most places just call it select, but it is Radiata pine. To look for likely pieces lay them side to side on the floor until you have as much as you would for your table top. I say the floor, because it will help let you see any that are twisted, cupped, bowed, or otherwise not so straight.

You will have a better feel for how much glue you use, clamp pressure, cleaning up squeeze out, seeing if you feel the need for cauls, or other positioning aids. It is an added cost, but could end up saving a lot of money if you mess up the first glue up, on expensive wood.

You can talk and read all you want before hand, but until you have them glued up, and are trying to clamp them, you won't know, but after you will tank me for mentioning this.
 
#8 · (Edited by Moderator)
Might I suggest you buy a few pieces of the "select" pine sold at most BORGs, and do a practice glue up before committing your Sapele to a less than good outcome.

- therealSteveN
A brilliant suggestion. It's not like you have to do a full-size model, but practice makes perfect. Any cheap hardwood, even poplar, will help you get a feel for what you're attempting. And, if you fail, better that than expensive sapele.
 
#9 · (Edited by Moderator)
Call Titebond and see what they suggest for Sapele. I glued up a bunch of 12" x 40" stair treads a while ago . I called Titebond and they suggested Titebond III and also wiping the surface with denatured alcohol or acetone to remove any oil that may be present. I always use splines for alignment. As suggested above try a small mock up first. Before you apply any glue to the Sapele make sure you set it up completely in the clamps dry and make any corrections that need to be done. If possible take a straight edge and check form corner to corner in an X pattern to see if your setup is flat. The number of boards that you are able to glue up at one time may be determined by the number of people helping you. If you are doing this alone you don't have a very long open time and the glue may tend to dry too much before you have a chance to get all of the clamps tightened up. I would suggest someone to help if possible or doing only one or two glue joints on the first try. I only apply glue to one surface.

As far as clamping time this may be determined by you shop conditions. Temperature, humidity and how well your joints fit together when you did the dry fit. When you talk to Titebond ask them about the clamping time. I believe the information on the bottle may say that 20 minuets may be enough in some situations. I usually keep my clamped for two hours before adding other boards. This is in the South Florida environment.
I have a set of old I beam bar clamps and I do not apply a tremendous amount of pressure. Different types of clamps apply a different amount of pressure. You should have glue squeeze out. Here is a link to a discussion about clamping. http://www.woodweb.com/knowledge_base/Gluing_and_clamping_pressure.html
The replies from Gene Wengert are from an expert. https://www.woodworkingnetwork.com/author-works/genewengert
 
#10 · (Edited by Moderator)
A lot of good suggestions. Definitely a dry fit (before doweling, biscuits or splines), pre-joining doesn't mean perfectly square and you may end up flipping or turning the board to get a better fit. Splines are easy, cut a groove with a router, just don't go all the way to the end. Definitely cauls, and enough pressure to close the gap. I like the color of titebond III on darker woods, the light glue is more noticeable. And, if you don't have a planer or sander, glue all at once.
 
#11 ·
Since part of the discussion is around glue, consider the Titebond II with fluorescent dye. On a somewhat porous wood like sapele, it and a $10 UV flashlight will allow you to see any traces of glue before they bite you in the butt at finishing time. I did a blog post about it last year and use it exclusively when I use PVA glue. Hide glue is another good option since it also fluoresces and is very friendly with finishes.
 
#12 ·
Woodworking is my hobby. Since I retired from the real world I have more time than money and more opinions than facts.

If this was my first big project I would number the boards 1-6 then glue one seam at a time thus allowing plenty of time to get the two boards perfectly aligned and evenly clamped. Probably in the order of 1 to 2, 3 to 4, 5 to 6 then 1/2 to 3/4 and 1/2/3/4 to 5/6 or if I felt confident enough after the first two glue- ups, I may do 1/2 to 3/4 to 5/6 all at once.

I have done the spline trick and like it for alignment if you don't have a flat surface to work from. It doesn't take much in misalignment to result in lots of sanding. That said; sanding might tire you out but it won't kill you :) don't be afraid to try and have fun.
 
#13 ·
Question: is it essential to get rid of all glue that squeezes out of the joint before it dries or can you scrape it off when it is dry? I am concerned because the cauls will cover part of the joint and I'm unsure how I will get to the extra glue that is under the cauls
 
#14 · (Edited by Moderator)
Question: is it essential to get rid of all glue that squeezes out of the joint before it dries or can you scrape it off when it is dry? I am concerned because the cauls will cover part of the joint and I'm unsure how I will get to the extra glue that is under the cauls

- Neophyte74
It'll stay wet under the cauls. I do find it easiest to wait until the squeezed out bead is just about completely translucent and then scrape it off. That way you don't get wet glue smearing around, but it's not so hard you can't scrape it. I use a chisel plane, but any thin bladed tool will work.

You can take the cauls off before it gets to that stage and the wet glue under the cauls will dry enough to scrape as well.
 
#15 ·
Question: is it essential to get rid of all glue that squeezes out of the joint before it dries or can you scrape it off when it is dry? I am concerned because the cauls will cover part of the joint and I'm unsure how I will get to the extra glue that is under the cauls

- Neophyte74
With a very wet rag , Wipe as much glue off the project as you can while you can and when you can, I then tend to dry where I have wiped with a nice clean dry towel or rag. you will however get the dry glue off later though. If you use dowels have them pre glued into the boards so whilst doing your main glue up you dont have to fluff about with loose dowels, have them pre set. I wrap my steel clamps in glad wrap cling film so as the steel doesnt stain the workpiece, also your cauls wrapped in glad wrap then they wont stick to your project when the glue oozes out.
Rehearse what you are going to do over and over, have everything at your fingertips.
 
#16 · (Edited by Moderator)
I always allow 24 hrs in clamps, but depending on shop temp, it can be shorter.

Clamping pressure is subjective. I don't think you can overclamp, but extreme clamping pressure it not necessary.

On a top that wide I recommend gluing up in at 2-3 sections.

There are a couple ways to handle squeeze out, wipe off right way or allow to rubberize and peel off with a putty knife or blade. Personally I don't like to let the glue dry as scraping dry glue on can result in tear out in certain woods.

Be sure to put packing tape on the cauls.

My only other tip I can think of is be sure you keep your panel stored so it receives equal air flow on both sides both during and especially after clamping. The worst thing you can do is lay a panel flat down on table for a few days,which will usually result in some kind of warping or cupping.

Proper jointing and alignment are the two keys to a successful panel glue up. If you're starting out with nice, straight, perfectly jointed boards, that makes it a lot easier.

I can't emphasize how important perfect jointing is. Straight and 90°. Don't trust the place that jointed them. Check every edge at several points along the board. I alternate faces against the fence on the jointer this way complimentary angles cancel out any minor discerpancy off 90.

Along those lines, often you're not dealing with "perfect" boards. Sometimes there is a bow, IOW after jointing, the board moves. Minor gaps can be clamped out, especially in the middle of a board. However, gaps on the ends are bad and need to be rejointed.

Getting the boards flush is the most stressful part. Alignment aids will help (dowels, Dominoes, biscuits, etc). Personally, I can usually bring every thing in with some incremental clamping pressure and a judicious strike from a rubber mallet.

That said, IMO one of the keys to a good panel glue up is to keep it thick as long as possible. Planing to final thickness prior to glue up really creates a lot of pressure to get it perfect.

Of course this assumes you have the ability to joint and plane something 12" or wider.

Hope this helps!
 
#17 · (Edited by Moderator)
I just did my first big panel glue-up, so take what you want from this as I am obviously not an expert, but this is my very recent experience.

I glued up a 36Ă—60" panel of 6 maple 4/4 boards for a farmhouse table top. I used biscuits every 10 inches. I do not have a jointer, but my wood was milled on 2 sides so I had a square edge to work from. I used my thickness planer to flatten the other side of each board, and used my table saw with a good 24T rip blade to joint the rough edge. I had to tune a few spots with a hand plane to get perfectly matched edges.

I used 3 bar clamps on the bottom and 3 pipe clamps on the top with a pair of cauls on each end when I glued up. I wrapped my cauls in wax paper so they wouldn't end up glued to the table. It all worked fine and I left clamps on overnight.

Everything went pretty well. I was encouraged by advise here before starting, and by countless testimonies not to expect perfection. Good thing, because it was not perfect. The glue lines were frankly as good as I could have gotten them and there were NO gaps. There were several spots where one board was elevated less than 1/64" of an inch in various places along the glue lines, even having used biscuits. I spent maybe an hour and a half of a nice Sunday morning hand-planing those smooth. Once I did that, it was as "perfect" as I could get it, and I am frankly please (and surprised) with how well it came out.

In a nutshell: Go slow, be patient, don't expect perfection, ask the experts, use as many clamps as you have, use a hand-plane to smooth when you're done. I found the hand planing to be very relaxing. YMMV.
 
#18 ·
The advice to get some practice lumber is excellent. You may need to do 2or 3 practice glue up before committing to the sapele.

I find a hand plane indispensable for panel glue ups. I leave a very slight gap, enough to just see through, in the middle of the joint so that several inches of each end have full contact - best done with a plane. Joint the edges as book ends, the angle doesnt matter only the straightness of the edges. Not many have a planer or drum sander to flatten a 30" or wider panel - but a hand plane can.

I only wipe wet glue if I really screwed up and put so much its running all over. Let it bead and get almost dry or dry. Chisels and cabinet scrapers are great for removing the squeeze out, or a flush plane really works well. A hand plane will remove all glue traces during flattening.

Tried all manner of joint alignment aids. Cauls work best for me, no contest. Tighten clamps only as much as needed to close joints. The tighter you go the more issues you can create. Usually leave clamped minimu 4 hrs. Prefer to stand up a panel after removing clamps and let it set for a few days to let all glue moisture out and let it stabilize. Best if your shop has constant temp and humidity but not always possible.
 
#19 ·
Image


I did a dry run with no glue. I practiced clamping 3 boards. It really revealed the importance of cauls. It was not until the 3rd caul that it was completely flat. Please feel free to critique the clamping setup. I plan to glue up on Saturday. I really appreciate the advice I have received on this site - lots of things have been covered that I never would have been aware to be concerned about - thank you to everyone who has shared expertise
 

Attachments

#21 ·
Looks good to me. When I have to do a lot of flat joints I use a 3inch paint roller.
One with the short nap. I also dampen it and add a little bit of water to the glue to spreads like thick paint.
Wet both sides.
Clamps lots of clamps. And leave it in there's as long as possible over night is good.
2or 3 days is better.

Good Luck
 
#22 ·
Put some cauls on each end. Also a piece of painters plastic on the table under the glue joints will make your clean up a lot easier. Hopefully you also put some plastic packing tape on your cauls to prevent them from sticking to the walnut. The other tool I always keep close by is a fairly heavy rubber mallet to help some boards even up.
 
#23 ·
You may already know to do this, but I would make sure that you place waxed paper or freezer paper between your cauls and the planks you are gluing…otherwise squeeze-out will glue the cauls to the Sapele. If this occurs you will discover "Titebond" is aptly named.
 
#25 ·
Robert had given you excellent advise…

#1… Not a big fan of titebond III.
#2…Titebond II should be fine. The finish on top of the table is what's important..
#3…Alternate the clamps top and bottom with two clamps close to each end to make sure the ends are flat and not cupped….
#4… I tighten with a lot of pressure but you don't have to kill it to be tight enough…
#5….Don't unclamp till ready to sand and finish…You don't want it too cup sitting in waiting…
 
#26 ·
I'm certainly too late to the game, but still…......

I focus on getting each glue joint dead-nuts. I do one at a time. A card scraper is all I need to clean it all up.

I also do a lot of work with QSWO. Big open pores. If glue gets smeared in there by the cauls its sanding forever. And so - When the glue has set up to "rubbery" everything comes off. I have a very ugly stained card scraper I use to peel off the glue line. Then a good card scraper to finish the joint. The cauls are slanted [using jointer] , not curved, but same effect

Image


Image


Image
 

Attachments