LumberJocks Woodworking Forum banner

Picture frame trouble with miters

6.9K views 14 replies 11 participants last post by  woodworm  
#1 · (Edited by Moderator)
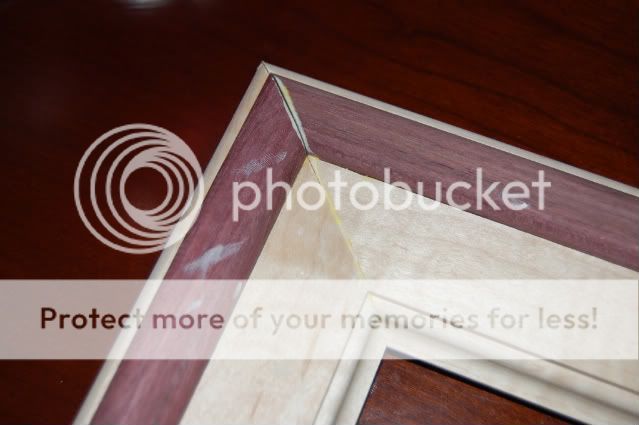
I'll save you the long story, but I had to pick up and leave immediately after putting glue and clamps on a picture frame I'm making for a christmas gift. I wasn't able to fiddle with the joints or scrape the glue off of them, so now I'm in a pickle. I've got three of the four joints that are showing a gap and I've got squeeze out on all four joints. I can get rid of the glue with some scraping and sanding, but how in the heck am I'm going to close those joints?

I'm using maple and purpleheart, my finish will be oil, so wood filler really isn't an option. Should I put the frame back on the saw and cut out the joints? I don't have a lot of room, but I've got enough for a saw kerf. Pics below should help explain the situation better.

Any help will be greatly appreciated.

Image


Image


Image
 
#5 ·
Greetings Cory: Probably the first thing I would do is take the frame apart and start over. Try to remove as much glue as possible. Then recut the miters ever so slightly. Is your miter gage a true 45 degrees? I'd set the miter to 45, and place a playing card or two(depends on how many you need) between a piece of scrap and miter gage and try that to see if you get a good 45. Some miter gauges are off a little, so "tweeking" is a good way to test it.
Once you get the miter right, I'd use pocket screws to pull it together and it'll be tight. You might put just a dab of glue on the joint( very little) before using the p.s. But try it on scrap first. Hope this helps. Keep on keeping on.
 
#7 ·
If the frame is square, you could cut a shallow groove and put some inlay in it to hide the cracks. But if you go that route, those joints are going to need some kind of serious reinforcement like a spline and a patch on the back. Were the crack there during your dry fit?
 
#8 ·
Thanks for all the help. As I was dry fitting the joints, they were very tight. I had to sand one of them a little for a perfect fit, but they were dead on. I used my table saw and a miter gauge which I trued up using an engineering square (rather than going on the markings on the gauge). I think I got a little bit of racking during the clamp up, and since I had to jet away i didn't get to adjust it.

I'm going to re-cut them today and only glue up one joint at a time. I'll make darn sure those are perfect, then work my way around the frame.
 
#12 ·
Another fix you want to consider is filling the gaps with slurry when you put the oil finish on the frame.
I know it's not as desirable as having a perfectly built frame but you'll be the only one that knows about the fix up.
Just take some 360 grit sand paper and lightly sand the corners with the gaps while the oil is still wet and work the slurry into the gaps. Once the gaps are full, smooth out the finish and carefully wipe off the excess oil and slurry.
Something else for you to think about! :)
Michael
 
#13 ·
Sorry for the late reply, but it's been a hectic couple of weeks. I managed to re-cut my miters and re-assemble the frame. Since I don't have a fine handsaw, I just made sure my miter gauge was perfect and cut them on the table saw. I took extra care with the glue up process, too. They turned out pretty darn good, if I do say so myself.

Thanks to all of you for your help.

Image