Zig Zag Cutting Board - How To:
For those of you who asked me for a tutorial on how to make the zig zag legless vegetable death table (cutting board), here is my best shot. I am far too impatient to take photos when I work, so I decided to illustrate the process using some good old Adobe PhotoShop. I hope you find this useful and informative.
I will outline the process in 10 steps below. I have assumed that when viewing these steps that basic woodworking skills are familiar to you. If you have questions, or run into snags, PM me and I'll do my best to help out.
If you want to see what these boards look like, take a look at my projects. There are a few in there.
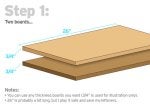
Keep in mind that because these are endgrain boards, you should ideally chose the original boards with interesting endgrain. Makes sense right?
![Image]()
I typically measure all of my initial boards and add a few inches. I'd rather end up with scrap pieces, then a scrapped piece. I went big on the 26" length, but after you do a few of these you can create your own ideal measurements. I also try to start out with boards of thicknesses larger than 3/4", but it was easier math for the illustration to use 3/4" thickness.
![Image]()
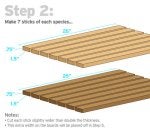
You can make boards of all sizes. I'm limited to a 12" thickness planer, so that's why I am illustrating 7 sticks of each species. Again, experiment with different sizes, so long as the individual sticks are twice as wide as they are thick.
![Image]()
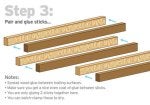
I can't stress enough the importance of only mating two sticks at a time. No three sticks should be mated with glue. Use your preferred clamping methods, but make sure these are nice and tight. You don't want any gaps for bacteria to hide in.
![Image]()
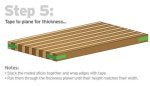
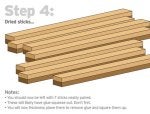
After these sticks dry, pull them out of the clamps. They are ready to be planed down a bit to make sure they are all even and dimensional. I tape them all (squeeze-out side up) together and run them through the planer.
![Image]()
After these are planed, it's important to pull them apart and make sure they are dimensional (as wide as they are tall). If they differ, run them through the planer individually until they are square.
![Image]()
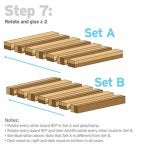
In order to get the zig zag pattern, you have to cut the original sticks in half so that you can make two sets of patterns. This is the tricky part that I was never able to show folks without illustrations. We'll call them Set A and Set B for this demo.
![Image]()
Now, the reason I went with 26" as the original length is so that this next step allows you to be creative. You can make a very long (two maybe) board that is thin, or make a very heavy-duty board. Thickness is up to you.
![Image]()
Now you are ready for your final glue-up. Take your time and really see this board for what it will become. Look at the end grains and make sure they are uniform. I have flipped boards upside down and noticed this too late. And remember "ENDGRAINS UP!" Maybe I'll make a TShirt with that phrase on it one day.
![Image]()
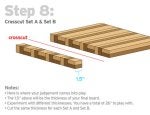
After the glue dries, you should be left with a not-square-yet board.
![Image]()
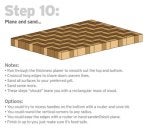
Trim edges using any method you prefer. I run mine across my crosscut sled to make sure they are as true as possible.
I hope this tutorial was helpful and that you are inspired to try one of these boards out.
UPDATE: I have created an additional blog entry with some patterns to try out using the techniques listed above. Check out Zig Zag Cutting Board Patterns - Inspirational
For those of you who asked me for a tutorial on how to make the zig zag legless vegetable death table (cutting board), here is my best shot. I am far too impatient to take photos when I work, so I decided to illustrate the process using some good old Adobe PhotoShop. I hope you find this useful and informative.
I will outline the process in 10 steps below. I have assumed that when viewing these steps that basic woodworking skills are familiar to you. If you have questions, or run into snags, PM me and I'll do my best to help out.
If you want to see what these boards look like, take a look at my projects. There are a few in there.
Keep in mind that because these are endgrain boards, you should ideally chose the original boards with interesting endgrain. Makes sense right?
I typically measure all of my initial boards and add a few inches. I'd rather end up with scrap pieces, then a scrapped piece. I went big on the 26" length, but after you do a few of these you can create your own ideal measurements. I also try to start out with boards of thicknesses larger than 3/4", but it was easier math for the illustration to use 3/4" thickness.
You can make boards of all sizes. I'm limited to a 12" thickness planer, so that's why I am illustrating 7 sticks of each species. Again, experiment with different sizes, so long as the individual sticks are twice as wide as they are thick.
I can't stress enough the importance of only mating two sticks at a time. No three sticks should be mated with glue. Use your preferred clamping methods, but make sure these are nice and tight. You don't want any gaps for bacteria to hide in.
After these sticks dry, pull them out of the clamps. They are ready to be planed down a bit to make sure they are all even and dimensional. I tape them all (squeeze-out side up) together and run them through the planer.
After these are planed, it's important to pull them apart and make sure they are dimensional (as wide as they are tall). If they differ, run them through the planer individually until they are square.
In order to get the zig zag pattern, you have to cut the original sticks in half so that you can make two sets of patterns. This is the tricky part that I was never able to show folks without illustrations. We'll call them Set A and Set B for this demo.
Now, the reason I went with 26" as the original length is so that this next step allows you to be creative. You can make a very long (two maybe) board that is thin, or make a very heavy-duty board. Thickness is up to you.
Now you are ready for your final glue-up. Take your time and really see this board for what it will become. Look at the end grains and make sure they are uniform. I have flipped boards upside down and noticed this too late. And remember "ENDGRAINS UP!" Maybe I'll make a TShirt with that phrase on it one day.
After the glue dries, you should be left with a not-square-yet board.
Trim edges using any method you prefer. I run mine across my crosscut sled to make sure they are as true as possible.
I hope this tutorial was helpful and that you are inspired to try one of these boards out.
UPDATE: I have created an additional blog entry with some patterns to try out using the techniques listed above. Check out Zig Zag Cutting Board Patterns - Inspirational