LumberJocks Woodworking Forum banner
14K views 22 replies 9 participants last post by  TZH  
#1 · (Edited by Moderator)
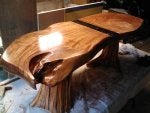
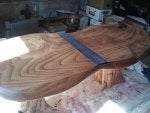
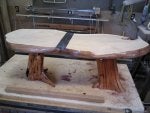
This coffee table for our daughter has been a long time in the works:

Image


Image


I've had a lot of starts, stops, and do-overs, but it was finally starting to come together when I ran into one last problem (hopefully).

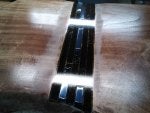
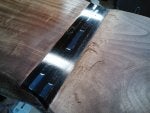
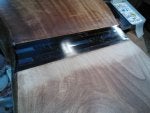
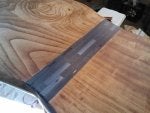
As you can see in the photo below, on either side of the epoxy inlay, there are strips of what appear to be areas that either aren't accepting the varnish (they accepted the penetrating stain just fine) or there's something else going on. And, that's where you, my fellow LJ'ers come in. Help, please!

Image


The wood is cottonwood. The stain is dark oak oil based penetrating stain. The varnish I've been using is hand rubbed Minwax. One coat of stain, and what you see in the photo above is actually the third coat of Minwax varnish.

In between coats, I did the requisite fine sanding with synthetic 0000 steel wool (dry). The last time before applying the third coat, I sanded using mineral spirits in the synthetic steel wool, wiped up excess, and let it thoroughly dry before applying another coat of varnish.

Those strips of fuzzy were there before the mineral spirits sanding, but I thought they'd disappear with more coats of varnish--- NOT!

The rest of the table top is coming along better than I expected, but those two strips are really perplexing me.

My thought was to let everything cure overnight, go at it again tomorrow with the mineral spirits sanding, dry thoroughly, and then apply multiple coats of water based varnish over everything.

Any ideas, suggestions, recommendations? This one has me stumped!

Thanks.
 

Attachments

#2 ·
Just a guess here, as I've only worked a few projects with cottonwood.
It appears that you may have "burnished" the wood when you were leveling the epoxy inlay.
If that's the case, I'm not sure what you can do short of re sanding and re finishing.
Sorry!
 
#3 ·
Gene, that's definitely a possibility to consider. Question - doesn't "burnishing" result in almost a glassy smooth effect on the wood? This is kind of fuzzy, and the stain was accepted just fine. That's why I'm really puzzled by this. Do you think sanding a little bit in those areas and putting a light coat of dewaxed shellac on them might help?

Thanks.
TZH
 
#4 ·
TZH - That's bizarre. I was going to say that I thought you sealed up the pores close to the epoxy strip with epoxy overrun, but it seems like the stain wouldn't have worked and the poly would have if that was the case. Seems like the pores still must be open if it is accepting stain.

Did your sanding pattern change in that area where the strips are? Did you sand the epoxy portion separately from the wood?

My advice would be to keep on adding coats of poly. Especially when you hand rub them, they are going to be super thin. I have had to put 8 coats of wipe on poly onto wood before to get the sheen and feel equal throughout the piece.

One last thought… Did you tape off the boundaries of the epoxy strip before you poured it? If so, it would stand to reason that the tape might have raised the grain, or somehow reacted with the wood in the exact areas where you are getting the weird fuzziness.

Good Luck
 
#5 ·
Some thoughts,

Cottonwood to my understanding is a stringy wood. I'm wondering if you sealed the wood before staining? There may be a difference in the density causing the current issues?

Great looking table!
 
#6 ·
TheWoodenOyster, thanks. You've raised some very interesting questions here. I agree about the first part on the stain and varnish, and that's really the part that's puzzling me the most.

The sanding pattern didn't change - I used a random orbital sander for the entire top, although the epoxy run onto the wood did happen. I did tape off the boundaries and the tape could have raised the grain, but I thought I'd taken care of that issue when I did my final sanding prior to applying the stain, itself. The tape I used may, in fact, have been the wrong kind - packing tape. I'd used it on another project and it seemed to adhere better when subjected to the epoxy.

Have you ever applied water based varnish over oil based varnish? if so, how did that go for you? I'm thinking because the water based is a little thicker, it might seal up the pores in that area better than the Minwax.

Thanks, again.
TZH
 
#7 ·
Sorry to say, but you'd probably have to sand off the existing finish to get rid of it. Maybe some epoxy wicked into the cottonwood pores and just needs more sanding in that area. I would start with a sealer coat of dewaxed shellac, maybe tinted to match the coloring you want. Then any finish you want on top. That should make the topcoat absorption more even.
 
#8 ·
DocSavage45, no I didn't seal the wood because I wanted maximum penetration for the stain. I'd already used Watco Danish Oil Natural on it and had to strip it all away when my daughter said it wasn't dark enough. By that time, the Watco wouldn't allow anything else to penetrate and darken the color any more. So, I sanded it all down to bare wood again, and applied the dark oak stain over that bare wood. It was just the right color, so I started with the varnish after that. I think the areas affected in the photo are too "uniform" to be an inconsistency in the wood - at least as far as I can tell.

Thanks,
TZH
 
#9 ·
The tape I used may, in fact, have been the wrong kind - packing tape. I d used it on another project and it seemed to adhere better when subjected to the epoxy.

- TZH
I'm wondering if this is part of the issue from the way those strips are oriented. Could some adhesive residue from the packing tape be what is causing the problem?
 
#10 ·
Sorry to say, but you d probably have to sand off the existing finish to get rid of it. Maybe some epoxy wicked into the cottonwood pores and just needs more sanding in that area. I would start with a sealer coat of dewaxed shellac, maybe tinted to match the coloring you want. Then any finish you want on top. That should make the topcoat absorption more even.

- bobasaurus
How would you recommend tinting the shellac?
 
#11 ·
How deep is the epoxy inlay? I've seen epoxy take up to a month to fully cure. Up to that point, it may still be gassing off as it cures. I also would agree that some of it probably did wick into the surrounding wood, and it may also be curing, causing the top varnish to matte as it gasses through the varnish.
 
#13 ·
The tape I used may, in fact, have been the wrong kind - packing tape. I d used it on another project and it seemed to adhere better when subjected to the epoxy.

- TZH

I m wondering if this is part of the issue from the way those strips are oriented. Could some adhesive residue from the packing tape be what is causing the problem?

- JayT
It's beginning to look that way from the feedback I've been getting - may just have to bite the bullet and start over---again.
TZH
 
#14 ·
How deep is the epoxy inlay? I ve seen epoxy take up to a month to fully cure. Up to that point, it may still be gassing off as it cures. I also would agree that some of it probably did wick into the surrounding wood, and it may also be curing, causing the top varnish to matte as it gasses through the varnish.

- Tennessee
The inlay is about 1/2 inch deep with embedded tiles.
TZH
 
#15 ·
Thanks to EVERYONE for your feedback, ideas, suggestions, recommendations. This is just one of the many reasons why this website is so beautiful - the people in it! All I can say is WOW!

TZH
 
#16 ·
Well, for those who'd like to know, I wound up having to strip everything down to bare wood on the top of the table. Started out hand sanding the affected areas with 400 grit:

Image


Not taking it down at all. Switched to 200 grit:

Image


Not taking it down at all. Switched to 60 grit:

Image


That seemed to work pretty well, but the results left the rest of the tabletop in need of similar sanding. So, got out the trusty old belt sander and took the rest of the finish off - pretty quickly, I might add:

Image


Random orbital sanding to take out the scratches made by the belt sander, and I'm done for the day. Shoulders ache, mind says keep going, but body says NOT!

Seems, too, like when one problem is solved (at least eyeballing it tells me it is), another one rears its ugly head. Now, because the problem area I removed was so deeply embedded in the wood, the epoxy is sitting a little proud of the rest of the top. Anyone have ideas, suggestions, recommendations on how to take it down to level?

Again, thanks to everyone for all the help. In my case, I guess I just can't fix stupid (my own)!
TZH
 

Attachments

#17 ·
I would run that piece through the drum sander (or go to a cab shop and have them run it through their wide belt sander to level the epoxy perfectly). I suspect the original problem was due to the top not being perfectly flat as the epoxy is a lot harder to remove than the cottonwood. Then the "problem strips" got more/less sanding when you sanded/steel wooled between coats.

That is a beautiful tabletop from a wood that is often maligned by woodworkers. Keep us posted.
 
#18 ·
I would run that piece through the drum sander (or go to a cab shop and have them run it through their wide belt sander to level the epoxy perfectly). I suspect the original problem was due to the top not being perfectly flat as the epoxy is a lot harder to remove than the cottonwood. Then the "problem strips" got more/less sanding when you sanded/steel wooled between coats.

That is a beautiful tabletop from a wood that is often maligned by woodworkers. Keep us posted.

- gfadvm
Thanks, gfadvm. I will. I actually like working with cottonwood, but it is a challenge for sure. I'm going to talk to a friend who has a wide drum sander to see if that might work and how much he might charge me to do it. I don't have a whole lot to work with before the epoxy on top is gone and the tiles are exposed, so must also consider that.

I've been watching a few youtube videos on the use of lacquer to get that mirror finish I'm looking for. Maybe I'll try that, too. Man, this project has had so many starts and stops I don't know anymore if I'm coming or going.
 
#19 ·
You could try sanding just the epoxy section down a little, avoiding the cottonwood, to make it even-ish. You probably don't need the top to be 100% perfectly flat anyways.
 
#20 · (Edited by Moderator)
You could try sanding just the epoxy section down a little, avoiding the cottonwood, to make it even-ish. You probably don t need the top to be 100% perfectly flat anyways.

- bobasaurus
Thanks for the suggestion. You're right, it doesn't need to be perfectly flat. I'll give that a try today and let you know how it works (trying to keep costs as low as they can possibly be and using available resources to get the job done).

TZH
 
#22 ·
TZH-
What you have is a correctable finishing problem on top of a stunningly beautiful table. And it seems that you are well on the way to solving the finishing problem. Wonderful work. Lucky daughter.
chuck

- upchuck
Thanks, upchuck. Will definitely let everyone know how this all turns out. And, we consider ourselves to be the lucky parents of our daughter, too.
 
#23 · (Edited by Moderator)
For those who might be interested, I sanded everything down on the top including the epoxy strip this morning using a 60 grit on my random orbital to begin with. Still wasn't taking the epoxy down to where I needed it, though, so switched to the belt sander knowing the scratches would be significant, but also knowing with a little patience (actually a whole lot of patience) I'd be able to get them out. It worked! Epoxy was flat enough.

Next step was to go back to the 60 grit to remove scratches. When that was done, switched to 80 grit, and to 120 grit last. Then it was hand sanding with 150 grit and that was enough.

Here's the end of the sanding:

Image


Hauled the table upstairs (man, is that thing heavy) for staining, and this is the result (that little lighter square in the photo on the table is just light from a window shining on it):

Image


And, finally, the area that caused the problem to begin with - looks pretty good if I do say so myself:

Image


I've decided to go with a lacquer finish after having gotten some advice to do so from several sources, and because I found this in my collection of miscellaneous stuff:

Image


I'll let ya'll know how this goes after tomorrow sometime.

Again, thanks for all your advice and encouragement. They mean a LOT!
TZH
 

Attachments