Intro and first step of cleaning & rust removal
There are many good blogs, articles and web pages out there that give you all you need to know about restoring old hand planes. Most of what I learned I got from other peoples advice. Even though there are many resources out there for restoring planes I found myself learning new tips and tricks from each and every one of them. I decided to do a series of blogs on my methods for restoring planes. Most of what I discuss you may all ready know from reading other blogs and sites but hopefully I can offer some new tips and advice that you may be able to use.
NOTE: Of all the How to's that I have read I have learned that there are many different methods to doing this stuff. My blogs may not offer the best possible way to do it but rather just my method of doing things. If you have any of your own advice feel free to share it with me as I am always looking for new tips.
Choosing which planes to restore - Choosing what is worth restoring is all a personal preference. I have read sites and blogs where the writer says not to waist your time on certain planes. I say its your time and you can spend it how ever you want to spend it. The first plane I ever restored was a Shelton Jack Plane. When researching Shelton planes I found many comments saying they were junk and not to waist your time restoring them. I did it anyway and the Shelton IMO is just as well built and good as my Stanley Bailey planes. Had I not "waisted" my time on it then I would have missed out on a good plane and forked over more money to buy a Stanley. Don't get me wrong old Stanley planes are great to restore but there are other plane makes out there that have the same design as the Stanley Bailey planes that will work just as well as the Stanley's. Its not up to me or anyone else to tell you how to spend your free time so don't let anyone make you think something is not worth the time. Even if the plane is considered a junk plane, you will learn a lot restoring it and if your like me you will have a lot of fun and get a lot of enjoyment out of the whole process.
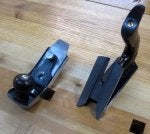
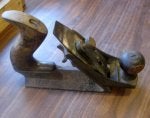
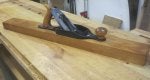
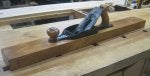
Step 1- Cleaning and Rust Removal - I personally look for the planes with the most rust. For one they are usually a lot cheaper on Ebay and I also like the challenge. I get such joy out of taking a hunk of rust and making it look new again. Don't be scared of Rust. I have never not been able to remove all rust from a tool.
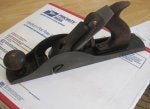
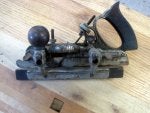
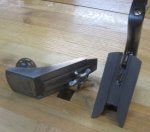
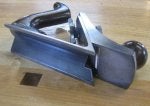
The pictures that I post throughout this blog series will be from a number of different planes that I have restored.


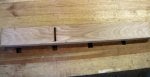
The first thing I do is take the plane apart. You may need to spray some WD-40 on the screws if they wont turn. Make sure all parts are there and nothing is broke. If anything is missing or broke you may not want to restore. Many parts can be bought on Ebay so if its just a screw or two its not a big deal. I take the planes apart next to my kitchen sink. Once apart I wash each part off with simple green. I don't take a lot of time washing them, just enough to get any chunks sawdust and dirt off. Once cleaned the rusted parts are ready to be soaked over night in Evapo-Rust
EVAPO-RUST Every woodworker should have a jug of Evapo-Rust in their shop. This stuff is amazing. Most woodworkers deal with rust on their tools. Saw blades, router bits, nuts, bolts, saws, ext ext. Soak it in this stuff over night and the rust will be gone. I have cleaned rust off of all of my tools with this stuff. Even a badly rusted plane or tool will come out pretty much rust free after a nights soaking. You can find this at auto parts shops and Harbor Freight sells it as well. I have seen it in two sizes. The larger jug is 20 dollars and the smaller is 10 dollars. For 20 dollars you get a lot more. It is kind of expensive but I came up with some ways to help make it last.

For the smaller screws and parts I just pour a small amount of Evapo-Rust in an empty glass jar. You only need enough to cover the parts.


For the larger parts of the plane I came up with a good way to soak them without using up all of the solution. What I do is put the larger plane parts in a plastic bag. A zip lock freezer bag will work best but any bag will do. If its not a heavy duty bag you may want to double or even triple up the bags. The sharp parts can poke through the plastic. Once in the bag bring you can pour in the Evapo-Rust. You will want to do this over the sink or an empty container in case you have a hole and some leaks out. Using a bag will allow you to completely cover the object without using much solution. Tie off the bag and let it soak over night. After soaking for a night (don't panic if you let it soak longer) you can remove the plane from the bag. Carefully take the parts out of the bag and into the sink or a container to be washed. The left over Evapo-Rust in the bag is not to throw away. You can use this again, and again and again. If you have it in a zip lock bag you can just zip it and leave it for next time. Another thing you can do is put the bag in a funnel with a few coffee filters and poke some holes in the bag. Filter the solution into another container. The filters will clear out any larger chunks and you can seal the rest in another container to use again down the road. You can also filter the solution that is in the jar with the smaller parts.
After your parts are removed from the Evapo-Rust you will want to wash them right away. The parts will still have loose rust and dirt on them, you don't want that to harden as it will take more time to get it off. I use a green abrasive pad and scrub them with soap and water in the sink. After a good scrubbing you will all ready see a huge improvement in the looks.
Once you are done washing you will want to dry them right away! Dry them off as good as you can and then some. I have found if you let them sit a day or so you will start to see some surface rust form again.
If you have not used the Evapo-Rust before you will be amazed at the difference it makes. If you choose you can go head and rust proof your plane or tool with some wax or spray, tune it and start using it after the cleaning and rust removal. I like to do a complete restore though and really make it shine. My next blog entry will discuss the finer detail steps with many more pics. Thats all for now. Hope these tips help someone.
Thanks for reading and watch for more.
There are many good blogs, articles and web pages out there that give you all you need to know about restoring old hand planes. Most of what I learned I got from other peoples advice. Even though there are many resources out there for restoring planes I found myself learning new tips and tricks from each and every one of them. I decided to do a series of blogs on my methods for restoring planes. Most of what I discuss you may all ready know from reading other blogs and sites but hopefully I can offer some new tips and advice that you may be able to use.
NOTE: Of all the How to's that I have read I have learned that there are many different methods to doing this stuff. My blogs may not offer the best possible way to do it but rather just my method of doing things. If you have any of your own advice feel free to share it with me as I am always looking for new tips.
Choosing which planes to restore - Choosing what is worth restoring is all a personal preference. I have read sites and blogs where the writer says not to waist your time on certain planes. I say its your time and you can spend it how ever you want to spend it. The first plane I ever restored was a Shelton Jack Plane. When researching Shelton planes I found many comments saying they were junk and not to waist your time restoring them. I did it anyway and the Shelton IMO is just as well built and good as my Stanley Bailey planes. Had I not "waisted" my time on it then I would have missed out on a good plane and forked over more money to buy a Stanley. Don't get me wrong old Stanley planes are great to restore but there are other plane makes out there that have the same design as the Stanley Bailey planes that will work just as well as the Stanley's. Its not up to me or anyone else to tell you how to spend your free time so don't let anyone make you think something is not worth the time. Even if the plane is considered a junk plane, you will learn a lot restoring it and if your like me you will have a lot of fun and get a lot of enjoyment out of the whole process.
Step 1- Cleaning and Rust Removal - I personally look for the planes with the most rust. For one they are usually a lot cheaper on Ebay and I also like the challenge. I get such joy out of taking a hunk of rust and making it look new again. Don't be scared of Rust. I have never not been able to remove all rust from a tool.
The pictures that I post throughout this blog series will be from a number of different planes that I have restored.


The first thing I do is take the plane apart. You may need to spray some WD-40 on the screws if they wont turn. Make sure all parts are there and nothing is broke. If anything is missing or broke you may not want to restore. Many parts can be bought on Ebay so if its just a screw or two its not a big deal. I take the planes apart next to my kitchen sink. Once apart I wash each part off with simple green. I don't take a lot of time washing them, just enough to get any chunks sawdust and dirt off. Once cleaned the rusted parts are ready to be soaked over night in Evapo-Rust
EVAPO-RUST Every woodworker should have a jug of Evapo-Rust in their shop. This stuff is amazing. Most woodworkers deal with rust on their tools. Saw blades, router bits, nuts, bolts, saws, ext ext. Soak it in this stuff over night and the rust will be gone. I have cleaned rust off of all of my tools with this stuff. Even a badly rusted plane or tool will come out pretty much rust free after a nights soaking. You can find this at auto parts shops and Harbor Freight sells it as well. I have seen it in two sizes. The larger jug is 20 dollars and the smaller is 10 dollars. For 20 dollars you get a lot more. It is kind of expensive but I came up with some ways to help make it last.

For the smaller screws and parts I just pour a small amount of Evapo-Rust in an empty glass jar. You only need enough to cover the parts.


For the larger parts of the plane I came up with a good way to soak them without using up all of the solution. What I do is put the larger plane parts in a plastic bag. A zip lock freezer bag will work best but any bag will do. If its not a heavy duty bag you may want to double or even triple up the bags. The sharp parts can poke through the plastic. Once in the bag bring you can pour in the Evapo-Rust. You will want to do this over the sink or an empty container in case you have a hole and some leaks out. Using a bag will allow you to completely cover the object without using much solution. Tie off the bag and let it soak over night. After soaking for a night (don't panic if you let it soak longer) you can remove the plane from the bag. Carefully take the parts out of the bag and into the sink or a container to be washed. The left over Evapo-Rust in the bag is not to throw away. You can use this again, and again and again. If you have it in a zip lock bag you can just zip it and leave it for next time. Another thing you can do is put the bag in a funnel with a few coffee filters and poke some holes in the bag. Filter the solution into another container. The filters will clear out any larger chunks and you can seal the rest in another container to use again down the road. You can also filter the solution that is in the jar with the smaller parts.
After your parts are removed from the Evapo-Rust you will want to wash them right away. The parts will still have loose rust and dirt on them, you don't want that to harden as it will take more time to get it off. I use a green abrasive pad and scrub them with soap and water in the sink. After a good scrubbing you will all ready see a huge improvement in the looks.
Once you are done washing you will want to dry them right away! Dry them off as good as you can and then some. I have found if you let them sit a day or so you will start to see some surface rust form again.
If you have not used the Evapo-Rust before you will be amazed at the difference it makes. If you choose you can go head and rust proof your plane or tool with some wax or spray, tune it and start using it after the cleaning and rust removal. I like to do a complete restore though and really make it shine. My next blog entry will discuss the finer detail steps with many more pics. Thats all for now. Hope these tips help someone.
Thanks for reading and watch for more.


 )
)