Design Considerations
The topic of tool chests has been quite polarizing on lumberjocks.com. The benefits, some would argue, are that they protect the tools, efficiently store them, cause one to think about what tools are absolutely necessary (i.e., getting back to the basics), and last of all, provide the woodworker with somewhere to sit. Others see tool chests as antiquated storage devices that were theft deterrents in their age and provided some mobility to those who worked on job sites, rather in their own shops or garages. They say that compared to drawers or wall cabinets tool chests are essentially difficult to use since one has to bend down to find the tools in the dark tool chest. Still others would say it's just a matter of taste or aesthetic. For me, I didn't really see much of an advantage to tool chests, especially since I was relatively new to hand tools and was still putting together a basic set of tools.
Now I have planes in tills, saws in tills, chisels and other hand tools hanging on the walls, and just a bunch of other tools sitting in a tool tote haphazardly. There's a place for everything, but my whole system just doesn't make sense. Thus, the need for better organization got me starting to think about tool chests, but also the desire to separate my finer, more used tools from the others. For instance, I have seven or eight back saws, but primarily use three of them. I own dozens of bench planes, but I usually only grab for one of about five frequently used planes. Building a tool chest will help make the whole process of which tools to use slightly more efficient. Yet what turned out to be the ultimate motivating factor was that many of my planes, sitting in their open till, were starting to show signs of rust, which makes it imperative to get them into an enclosed box of some sort.
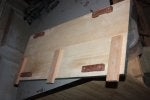
Many people here are familiar with Chris Schwarz and his book, The Anarchist's Tool Chest, which I would crudely describe as being one part memoir, one part hand-tool apologetic, and one part tool chest design and instruction. Here's the traditional-style tool chest which he builds in that book:
![Image]()
[source]
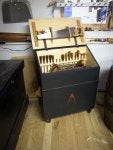
I was never fully convinced that this is what I needed in my situation, especially since real estate in my one-car garage is very limited. Yet when Chris Schwarz was at the Highland Woodworking Hand Tool event back in February and he brought with him his newly crafted smaller "Dutch tool chest."
![Image]()
[source]
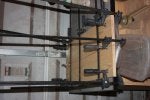
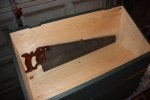
To be honest, I don't know much about Dutch tool chests, their provenance, history, and prevalence, but in terms of style they really appealed to me. I was especially attracted the one that Schwarz brought with him to Atlanta. I've seen Schwarz' larger Dutch tool chest and liked some of the features of that one as well.
![Image]()
[source]
See also, the accompanying YouTube video:
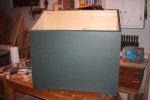
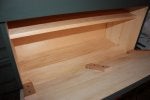
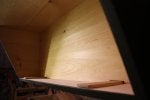
What I like first and foremost about these Dutch tool chests is the accessibility of all the tools in the top section: planes, saws (big and small), and smaller hand tools. Compare this to a traditional tool chest which may hide many of those critical tools underneath sliding tills that tend to get in the way. In the Dutch tool chest, the tools that are used less frequently can be placed in the lower shelf/shelves accessible from the front. The Dutch tool chest also appeals to me aesthetically. Here's a beautiful example of an older tool chest:
![Image]()
[source]
Here's What I'm Doing
My own design of the tool chest fits somewhere in between the smaller and larger Dutch tool chests built by Schwarz. Honestly, I don't know the exact dimensions of his tool chests, but mine will be based on need. First, I wanted to fit a few of my larger planes in there, including a jointer plane, and my larger hand saws, including my D-7 ripsaw which is about 31" long with the handle. I also liked the idea of including a smaller shelf for items that site flat such as a bow saw (for this idea I credit the Frontier Carpenter ). My tool chest doesn't need to be as small as Schwarz's because I don't lug my tools around the country, thus I'm adding some casters on the bottom to make it easier to move around in my garage. Also, unlike the Anarchist's tool chest, this one will not be a demonstration of fine joinery. I'm hoping to be done with it sooner rather than later and so I'll be using screws for most of the joints. The hardware will probably be on the cheaper side as well. Lastly, like Schwarz, I'm building it out of light, white pine in order to keep the weight and price of it fairly low.
I don't have any fancy plans for it, just some crude drawings, so I don't think I'll be posting any sketch up drawings or anything like that. I think Schwarz plans on writing an article on the Dutch tool chest in an upcoming issue of Popular Woodworking, so there will be much better information contained in that, I presume.
The next blog will start walking through some of the construction. Questions and comments are welcome as always.
The topic of tool chests has been quite polarizing on lumberjocks.com. The benefits, some would argue, are that they protect the tools, efficiently store them, cause one to think about what tools are absolutely necessary (i.e., getting back to the basics), and last of all, provide the woodworker with somewhere to sit. Others see tool chests as antiquated storage devices that were theft deterrents in their age and provided some mobility to those who worked on job sites, rather in their own shops or garages. They say that compared to drawers or wall cabinets tool chests are essentially difficult to use since one has to bend down to find the tools in the dark tool chest. Still others would say it's just a matter of taste or aesthetic. For me, I didn't really see much of an advantage to tool chests, especially since I was relatively new to hand tools and was still putting together a basic set of tools.
Now I have planes in tills, saws in tills, chisels and other hand tools hanging on the walls, and just a bunch of other tools sitting in a tool tote haphazardly. There's a place for everything, but my whole system just doesn't make sense. Thus, the need for better organization got me starting to think about tool chests, but also the desire to separate my finer, more used tools from the others. For instance, I have seven or eight back saws, but primarily use three of them. I own dozens of bench planes, but I usually only grab for one of about five frequently used planes. Building a tool chest will help make the whole process of which tools to use slightly more efficient. Yet what turned out to be the ultimate motivating factor was that many of my planes, sitting in their open till, were starting to show signs of rust, which makes it imperative to get them into an enclosed box of some sort.
Many people here are familiar with Chris Schwarz and his book, The Anarchist's Tool Chest, which I would crudely describe as being one part memoir, one part hand-tool apologetic, and one part tool chest design and instruction. Here's the traditional-style tool chest which he builds in that book:
[source]
I was never fully convinced that this is what I needed in my situation, especially since real estate in my one-car garage is very limited. Yet when Chris Schwarz was at the Highland Woodworking Hand Tool event back in February and he brought with him his newly crafted smaller "Dutch tool chest."
[source]
To be honest, I don't know much about Dutch tool chests, their provenance, history, and prevalence, but in terms of style they really appealed to me. I was especially attracted the one that Schwarz brought with him to Atlanta. I've seen Schwarz' larger Dutch tool chest and liked some of the features of that one as well.
[source]
See also, the accompanying YouTube video:
What I like first and foremost about these Dutch tool chests is the accessibility of all the tools in the top section: planes, saws (big and small), and smaller hand tools. Compare this to a traditional tool chest which may hide many of those critical tools underneath sliding tills that tend to get in the way. In the Dutch tool chest, the tools that are used less frequently can be placed in the lower shelf/shelves accessible from the front. The Dutch tool chest also appeals to me aesthetically. Here's a beautiful example of an older tool chest:
[source]
Here's What I'm Doing
My own design of the tool chest fits somewhere in between the smaller and larger Dutch tool chests built by Schwarz. Honestly, I don't know the exact dimensions of his tool chests, but mine will be based on need. First, I wanted to fit a few of my larger planes in there, including a jointer plane, and my larger hand saws, including my D-7 ripsaw which is about 31" long with the handle. I also liked the idea of including a smaller shelf for items that site flat such as a bow saw (for this idea I credit the Frontier Carpenter ). My tool chest doesn't need to be as small as Schwarz's because I don't lug my tools around the country, thus I'm adding some casters on the bottom to make it easier to move around in my garage. Also, unlike the Anarchist's tool chest, this one will not be a demonstration of fine joinery. I'm hoping to be done with it sooner rather than later and so I'll be using screws for most of the joints. The hardware will probably be on the cheaper side as well. Lastly, like Schwarz, I'm building it out of light, white pine in order to keep the weight and price of it fairly low.
I don't have any fancy plans for it, just some crude drawings, so I don't think I'll be posting any sketch up drawings or anything like that. I think Schwarz plans on writing an article on the Dutch tool chest in an upcoming issue of Popular Woodworking, so there will be much better information contained in that, I presume.
The next blog will start walking through some of the construction. Questions and comments are welcome as always.


")