

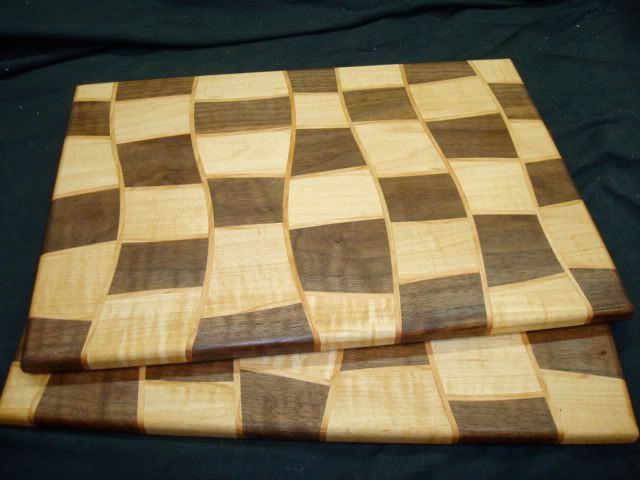
Drunken Alice in Wonderland Cutting Board
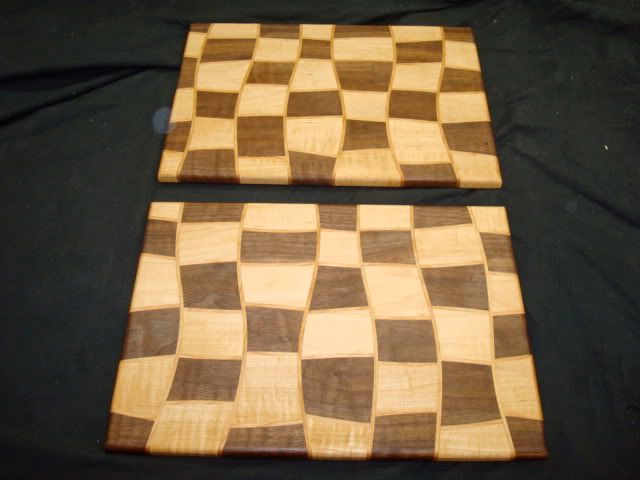
Hey everybody, after a few personal messages here is my version of a how to on a Drunken Checker Board. I of coarse bow to the Chairman of the Board and pay tribute with beer. This is a Off-Checker pattern I call "Drunken Alice in Wonderland" The "serendipitous" nature of this piece is appealing in a far out sort of way. Here Goes…
![Image]()
So first I prepare the Material. I am using Hard Maple and Walnut both are surfaced flat and cut 1" x 9" x 14" You only need ONE piece of each, for two boards. (In this multi part blog I'll be making four boards).
![Image]()
I'm also using 1/8" Cherry strips for the outline in between the blocks. I rip some 3/16" x 1" x 28" long. and surface each side to 1/8" on my planer so both faces are smooth.
![Image]()
![Image]()
We will be making 5 rips and 6 cross cuts in two boards so make plenty of strips the first time so they are all uniform.
![Image]()
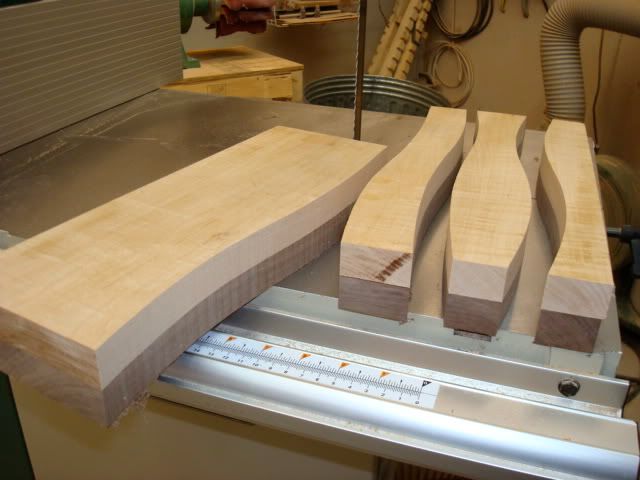
Then Double sided tape one Walnut and one Hard Maple blank together, flat and square, to run through bandsaw.
I make 5 length-wise rips with a S shape and a Opposing S shape making what I call a vase shape. Your Imagination is your only limit here and the fact that you have to clamp it back together.
![Image]()
![Image]()
I then lightly sand the cuts smooth trying not to change the shape of the cut at all.
![Image]()
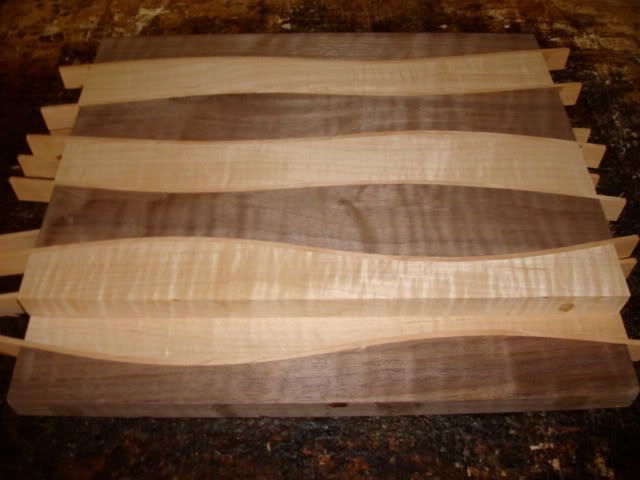
In a orderly fashion pull pieces apart and alternating pieces lay out two matching boards.
![Image]()
Place Cherry strips in between each cut. Glue everything in between, and clamp till dry.
![Image]()
![Image]()
I surface our curvy blanks flat and square so we can tape them back together.
Ok, we now have two curvy blanks with strips. Half-way there.
![Image]()
Double sided Tape them back together. (This is where the serendipity happened for me).
Tape them together so a dark color is over a light color this will create the checkerboard part during the next series of cross cuts. For the Drunken Alice in Wonderland effect when taping the two together make sure the curves also oppose each other the stripes will not match up.
![Image]()
![Image]()
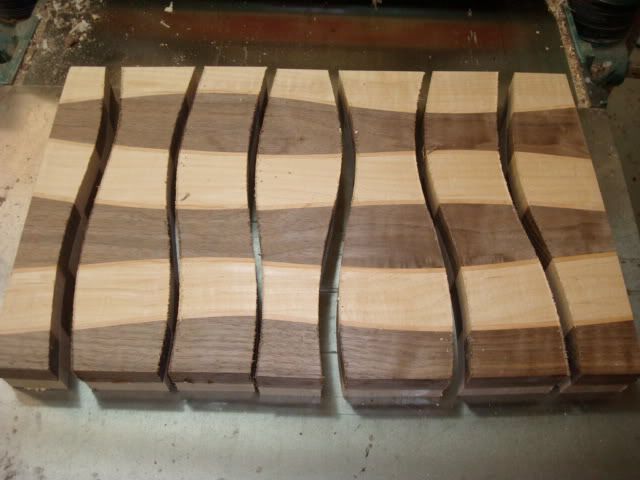
Make Six cross cuts using the same style a S cut and a opposing S cut or Vase cut like so.
![Image]()
Once again sand, pull apart in order, alternate pieces making two boards with a checkerboard pattern.
Add Strips, glue, and clamp. When clamping I try to line up the edges of the pieces as best I can this is important to get a good tight fit in the curves, through heavy pressure, to avoid any gaps I use my big pipe clamps
![Image]()
![Image]()
I trim, surface, sand, rout edges, and apply mineral oil.
![Image]()
![Image]()
Part two of this blog will be much the same process however I will illustrate how to produce a smooth flowing Drunken checkerboard pattern, Where the strips line up in a smooth wave.
Ok, I thank you all for the inspiration you have given me and I will challenge you all to come up with the different possibilities this basic design offers. We are only limited by our imaginations and clamping capacities.
I dedicate this post to my grandfather Theodore M Porosky who taught me the joys of woodworking, 20 years ago by making cutting boards in his work shop.
Hey everybody, after a few personal messages here is my version of a how to on a Drunken Checker Board. I of coarse bow to the Chairman of the Board and pay tribute with beer. This is a Off-Checker pattern I call "Drunken Alice in Wonderland" The "serendipitous" nature of this piece is appealing in a far out sort of way. Here Goes…
So first I prepare the Material. I am using Hard Maple and Walnut both are surfaced flat and cut 1" x 9" x 14" You only need ONE piece of each, for two boards. (In this multi part blog I'll be making four boards).

I'm also using 1/8" Cherry strips for the outline in between the blocks. I rip some 3/16" x 1" x 28" long. and surface each side to 1/8" on my planer so both faces are smooth.


We will be making 5 rips and 6 cross cuts in two boards so make plenty of strips the first time so they are all uniform.

Then Double sided tape one Walnut and one Hard Maple blank together, flat and square, to run through bandsaw.
I make 5 length-wise rips with a S shape and a Opposing S shape making what I call a vase shape. Your Imagination is your only limit here and the fact that you have to clamp it back together.

I then lightly sand the cuts smooth trying not to change the shape of the cut at all.

In a orderly fashion pull pieces apart and alternating pieces lay out two matching boards.

Place Cherry strips in between each cut. Glue everything in between, and clamp till dry.


I surface our curvy blanks flat and square so we can tape them back together.
Ok, we now have two curvy blanks with strips. Half-way there.

Double sided Tape them back together. (This is where the serendipity happened for me).
Tape them together so a dark color is over a light color this will create the checkerboard part during the next series of cross cuts. For the Drunken Alice in Wonderland effect when taping the two together make sure the curves also oppose each other the stripes will not match up.

Make Six cross cuts using the same style a S cut and a opposing S cut or Vase cut like so.
Once again sand, pull apart in order, alternate pieces making two boards with a checkerboard pattern.
Add Strips, glue, and clamp. When clamping I try to line up the edges of the pieces as best I can this is important to get a good tight fit in the curves, through heavy pressure, to avoid any gaps I use my big pipe clamps


I trim, surface, sand, rout edges, and apply mineral oil.

Part two of this blog will be much the same process however I will illustrate how to produce a smooth flowing Drunken checkerboard pattern, Where the strips line up in a smooth wave.
Ok, I thank you all for the inspiration you have given me and I will challenge you all to come up with the different possibilities this basic design offers. We are only limited by our imaginations and clamping capacities.
I dedicate this post to my grandfather Theodore M Porosky who taught me the joys of woodworking, 20 years ago by making cutting boards in his work shop.


