

Cutlist and Layout from Sketchup
If you're a fan of Sketchup for creating woodworking models, then the next obvious step is to use Sketchup to help you create cutlists and layouts. Sketchup plugin Cutlist 4.1 does just that. CutList 4.1 sketchup plugin helps you determine how much of each material you need to produce your design, taking into account nominal sized lumber with allowances for finishing to final size. Then it goes one further and lays out all of the pieces on boards or sheet good sizes of your choosing. Then you should be all set to head for the lumber yard to get all of the materials that you will need with no return trips.
CutList 4.1 was beta tested by our very own Lumberjocks and is now ready for download.
It's being released exclusively to Lumberjocks first. You can download v4.1.10 here . This is a completely free plugin. This plugin has been around since about 2005 but continues to be maintained and enhanced. It's got the look and feel of old Woodsmith magazine cutlists and layouts. A very early version v3.3 was reviewed in the Fine Woodworking blog 'Design.Click.Build.' by Dave Richards and a later follow up.
Note that there is now a forum on Lumberjocks for further discussion.
Cutlist 4.1 has been tested with both Skletchup 7, Sketchup 8, SU2013 and SU2014 on both Macs and on Windows PCs.
Installing. There are now 3 ways to install this.
Method 1 (easiest) Get and install it from Sketchup Extension Warehouse
Method 2 (easy) Download and install it using the Sketchup extension installer
A relative foolproof way to install is now available with the latest versions (from v4.1.6 and up).
Method 3 (if all else fails) This is a two step process and more error prone
Running on a Mac. This is functional. Only the html output window for the layout does not work because of issues with the Safari browser, however, there is a workaround using the SVG export.
Someone in the forum asked a great question which I will repeat here:
Q. What is the point of the cutting diagram?
A. Why indeed would you want a cutting diagram? There are a few reasons:
So, to sum up, it gives you more accurate project requirements, it minimizes setup time and shop time spent cutting the boards while increasing accuracy and finally it helps to use the resources as efficiently as possible.
Finally here are some screen shots in case you still can't quite figure out what it does or why you would want it or can't imagine what it looks like.
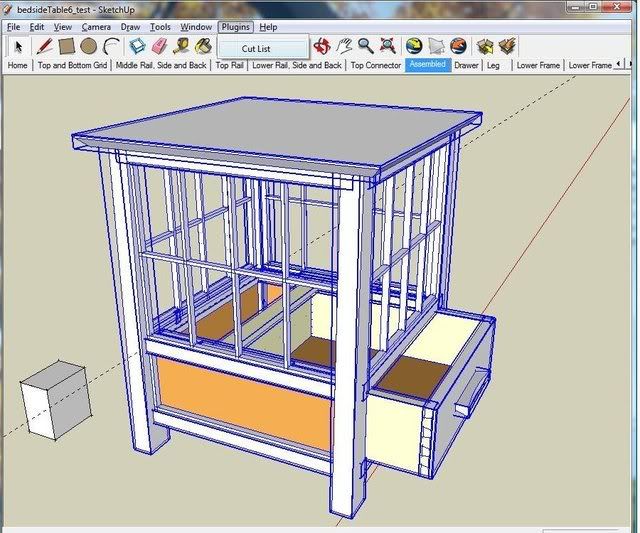
Starting up cutlist. Highlight your project and select CutList from the plugin menu. Make sure all of the parts in your project are named and are either a component or a group. ( Nested components or groups are handled ok as well)
![Image]()
The screen that comes up allows you to select your cutlist options from the type of output you want, what you want to have included in your parts list, which parts are solid wood parts, which are sheet goods parts and which are hardware
![Image]()
and the next page allows you to select the layout options. There is a general options section, a tab for board options and a tab for sheet options.
![Image]()
Here is a sample of cutlist output. This is the cutting list in html format. This page can be printed.
![Image]()
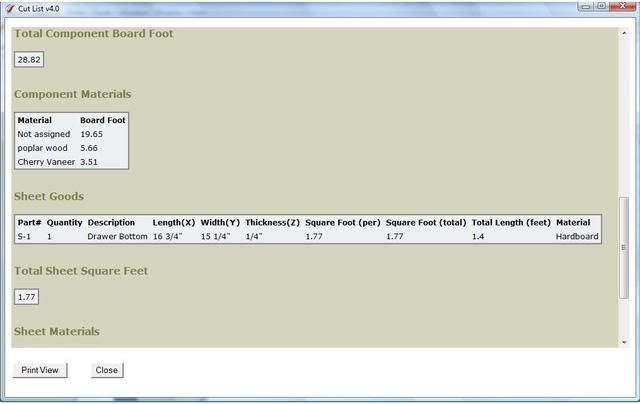
If you scroll down, then there is a summary of the board feet and the materials and sheet parts and hardware are broken down to their own lists with their own summaries
![Image]()
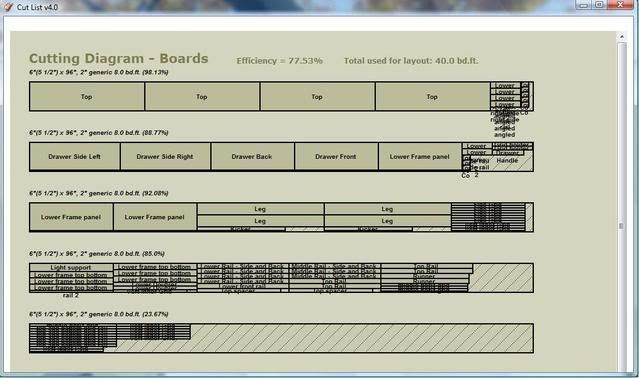
If you selected the layout output, then another window will open and place all of the selected parts on boards of your choosing in a layout which minimizes waste.
![Image]()
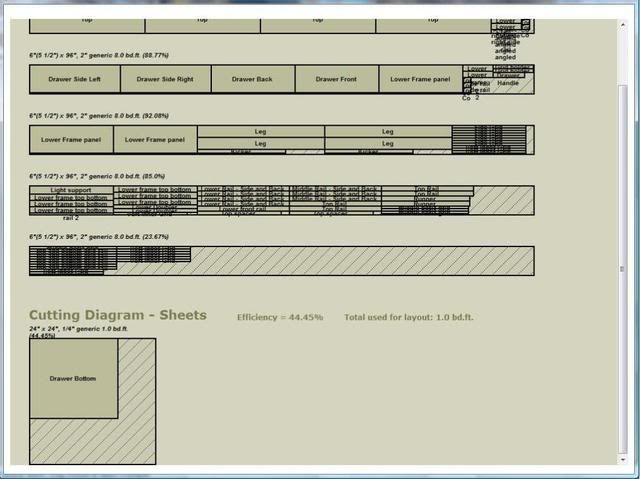
Sheet parts layout is placed on the sheet sizes you specified.
![Image]()
There's lots more. There is built in help on each option. Just click on the blue ? next to the option.
Feel free to pass along any comments, questions, enhancement requests or bug reports. I'm committed to maintaining the plugin and make it as useful as possible.
If you're a fan of Sketchup for creating woodworking models, then the next obvious step is to use Sketchup to help you create cutlists and layouts. Sketchup plugin Cutlist 4.1 does just that. CutList 4.1 sketchup plugin helps you determine how much of each material you need to produce your design, taking into account nominal sized lumber with allowances for finishing to final size. Then it goes one further and lays out all of the pieces on boards or sheet good sizes of your choosing. Then you should be all set to head for the lumber yard to get all of the materials that you will need with no return trips.
CutList 4.1 was beta tested by our very own Lumberjocks and is now ready for download.
It's being released exclusively to Lumberjocks first. You can download v4.1.10 here . This is a completely free plugin. This plugin has been around since about 2005 but continues to be maintained and enhanced. It's got the look and feel of old Woodsmith magazine cutlists and layouts. A very early version v3.3 was reviewed in the Fine Woodworking blog 'Design.Click.Build.' by Dave Richards and a later follow up.
Note that there is now a forum on Lumberjocks for further discussion.
Cutlist 4.1 has been tested with both Skletchup 7, Sketchup 8, SU2013 and SU2014 on both Macs and on Windows PCs.
Installing. There are now 3 ways to install this.
Method 1 (easiest) Get and install it from Sketchup Extension Warehouse
- Start up Sketchup
- from Sketchup choose: Window->Extension Warehouse
- Search for and select 'CutList'
- click on install ( big red bar on top right)
Method 2 (easy) Download and install it using the Sketchup extension installer
A relative foolproof way to install is now available with the latest versions (from v4.1.6 and up).
- Download it from link above
- Start up Sketchup
- from Sketchup choose: Window->Preferences
- click on 'Extensions'
- click on 'Install Extension', hen navigate to and select the .rbz file you just downloaded
Method 3 (if all else fails) This is a two step process and more error prone
- Click on the link above. This will download a zip file from http://code.google.com/p/cutlist/
- The file is a .rbz (a zipped ruby source) file. Extract the entire contents into your sketchup plugin directory not just the startup ruby script (srcutlist.rb). There is also a folder called srcutlistui which contains everything else it needs to work properly. The exact locations of the directories required for Sketchup plugins for Windows or Mac are found documented further down in the blog.
Running on a Mac. This is functional. Only the html output window for the layout does not work because of issues with the Safari browser, however, there is a workaround using the SVG export.
Someone in the forum asked a great question which I will repeat here:
Q. What is the point of the cutting diagram?
A. Why indeed would you want a cutting diagram? There are a few reasons:
- Regardless of whether or not you have a cutting diagram, eventually you are going to have to cut some wood to get a project built. How many boards do you need to buy? If you go by the board feet measured ( or calculated by something like the cutlist plugin) you're going to find that it falls short. Why? because when you to to cut the pieces out of the board, you'll find that you will inevitable have waste. By having the cutting diagram, you can see how much waste there is going to be and you know how much to get when you to the lumber yard.
- You've got a lot of parts to cut and you want your parts to be as accurate as possible before you even do anything else to the pieces. Ideally you want one setup for each size of part, so that you can cut each of the parts which are the same size at the same time. The cutting diagram lets you visualize how parts may be laid out to minimize on the cuts and the number of setups.
- Ok, you've decided to build your project out of sustainably harvested plantation teak. It's selling for $50/square foot(!) for 3/4". You might be interested in using those $200 boards as efficiently as possible. A cutting diagram may also be used to minimize waste. Even if you have waste if you could have a larger part left over which you could reuse for another project vs having a lot of offcuts, you've saved yourself some money and you are using the planet's resources efficiently and responsibly.
So, to sum up, it gives you more accurate project requirements, it minimizes setup time and shop time spent cutting the boards while increasing accuracy and finally it helps to use the resources as efficiently as possible.
Finally here are some screen shots in case you still can't quite figure out what it does or why you would want it or can't imagine what it looks like.
Starting up cutlist. Highlight your project and select CutList from the plugin menu. Make sure all of the parts in your project are named and are either a component or a group. ( Nested components or groups are handled ok as well)
The screen that comes up allows you to select your cutlist options from the type of output you want, what you want to have included in your parts list, which parts are solid wood parts, which are sheet goods parts and which are hardware

and the next page allows you to select the layout options. There is a general options section, a tab for board options and a tab for sheet options.

Here is a sample of cutlist output. This is the cutting list in html format. This page can be printed.

If you scroll down, then there is a summary of the board feet and the materials and sheet parts and hardware are broken down to their own lists with their own summaries
If you selected the layout output, then another window will open and place all of the selected parts on boards of your choosing in a layout which minimizes waste.
Sheet parts layout is placed on the sheet sizes you specified.
There's lots more. There is built in help on each option. Just click on the blue ? next to the option.
Feel free to pass along any comments, questions, enhancement requests or bug reports. I'm committed to maintaining the plugin and make it as useful as possible.
")


