LumberJocks Woodworking Forum banner
241 - 260 of 320 Posts
Cutlist and Layout from Sketchup

If you're a fan of Sketchup for creating woodworking models, then the next obvious step is to use Sketchup to help you create cutlists and layouts. Sketchup plugin Cutlist 4.1 does just that. CutList 4.1 sketchup plugin helps you determine how much of each material you need to produce your design, taking into account nominal sized lumber with allowances for finishing to final size. Then it goes one further and lays out all of the pieces on boards or sheet good sizes of your choosing. Then you should be all set to head for the lumber yard to get all of the materials that you will need with no return trips.

CutList 4.1 was beta tested by our very own Lumberjocks and is now ready for download.

It's being released exclusively to Lumberjocks first. You can download v4.1.10 here . This is a completely free plugin. This plugin has been around since about 2005 but continues to be maintained and enhanced. It's got the look and feel of old Woodsmith magazine cutlists and layouts. A very early version v3.3 was reviewed in the Fine Woodworking blog 'Design.Click.Build.' by Dave Richards and a later follow up.

Note that there is now a forum on Lumberjocks for further discussion.

Cutlist 4.1 has been tested with both Skletchup 7, Sketchup 8, SU2013 and SU2014 on both Macs and on Windows PCs.

Installing. There are now 3 ways to install this.

Method 1 (easiest) Get and install it from Sketchup Extension Warehouse
  • Start up Sketchup
  • from Sketchup choose: Window->Extension Warehouse
  • Search for and select 'CutList'
  • click on install ( big red bar on top right)

Method 2 (easy) Download and install it using the Sketchup extension installer
A relative foolproof way to install is now available with the latest versions (from v4.1.6 and up).
  • Download it from link above
  • Start up Sketchup
  • from Sketchup choose: Window->Preferences
  • click on 'Extensions'
  • click on 'Install Extension', hen navigate to and select the .rbz file you just downloaded

Method 3 (if all else fails) This is a two step process and more error prone

  • The file is a .rbz (a zipped ruby source) file. Extract the entire contents into your sketchup plugin directory not just the startup ruby script (srcutlist.rb). There is also a folder called srcutlistui which contains everything else it needs to work properly. The exact locations of the directories required for Sketchup plugins for Windows or Mac are found documented further down in the blog.

Running on a Mac. This is functional. Only the html output window for the layout does not work because of issues with the Safari browser, however, there is a workaround using the SVG export.

Someone in the forum asked a great question which I will repeat here:

Q. What is the point of the cutting diagram?

A. Why indeed would you want a cutting diagram? There are a few reasons:
  1. Regardless of whether or not you have a cutting diagram, eventually you are going to have to cut some wood to get a project built. How many boards do you need to buy? If you go by the board feet measured ( or calculated by something like the cutlist plugin) you're going to find that it falls short. Why? because when you to to cut the pieces out of the board, you'll find that you will inevitable have waste. By having the cutting diagram, you can see how much waste there is going to be and you know how much to get when you to the lumber yard.
  2. You've got a lot of parts to cut and you want your parts to be as accurate as possible before you even do anything else to the pieces. Ideally you want one setup for each size of part, so that you can cut each of the parts which are the same size at the same time. The cutting diagram lets you visualize how parts may be laid out to minimize on the cuts and the number of setups.
  3. Ok, you've decided to build your project out of sustainably harvested plantation teak. It's selling for $50/square foot(!) for 3/4". You might be interested in using those $200 boards as efficiently as possible. A cutting diagram may also be used to minimize waste. Even if you have waste if you could have a larger part left over which you could reuse for another project vs having a lot of offcuts, you've saved yourself some money and you are using the planet's resources efficiently and responsibly.

So, to sum up, it gives you more accurate project requirements, it minimizes setup time and shop time spent cutting the boards while increasing accuracy and finally it helps to use the resources as efficiently as possible.

Finally here are some screen shots in case you still can't quite figure out what it does or why you would want it or can't imagine what it looks like.

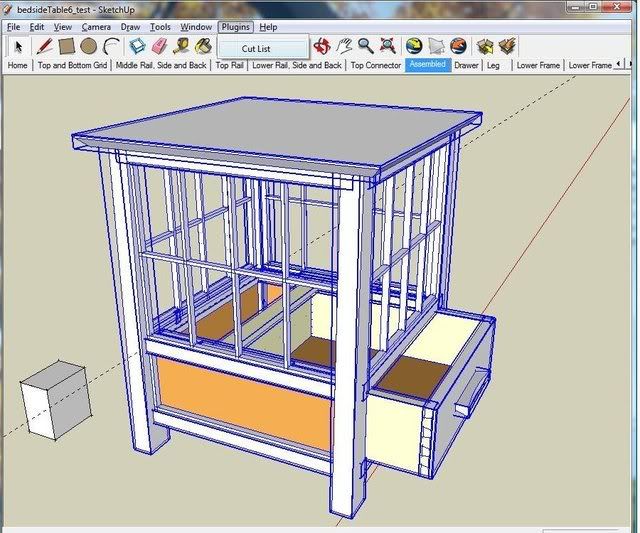
Starting up cutlist. Highlight your project and select CutList from the plugin menu. Make sure all of the parts in your project are named and are either a component or a group. ( Nested components or groups are handled ok as well)
Image


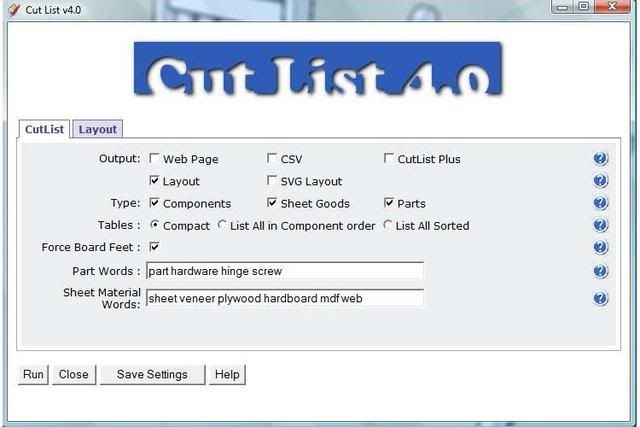
The screen that comes up allows you to select your cutlist options from the type of output you want, what you want to have included in your parts list, which parts are solid wood parts, which are sheet goods parts and which are hardware
Image


and the next page allows you to select the layout options. There is a general options section, a tab for board options and a tab for sheet options.

Image


Here is a sample of cutlist output. This is the cutting list in html format. This page can be printed.

Image


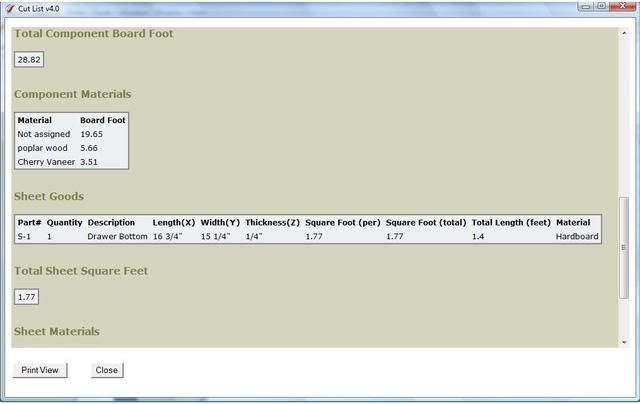
If you scroll down, then there is a summary of the board feet and the materials and sheet parts and hardware are broken down to their own lists with their own summaries
Image


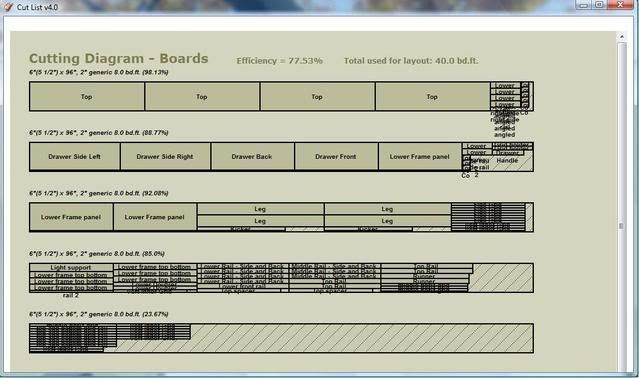
If you selected the layout output, then another window will open and place all of the selected parts on boards of your choosing in a layout which minimizes waste.
Image


Sheet parts layout is placed on the sheet sizes you specified.
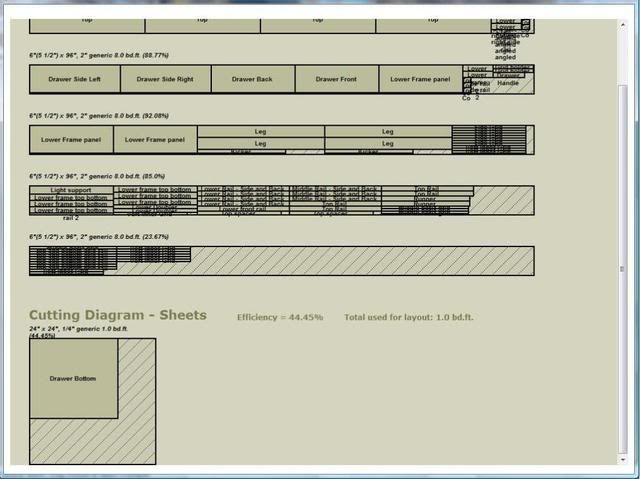
Image


There's lots more. There is built in help on each option. Just click on the blue ? next to the option.

Feel free to pass along any comments, questions, enhancement requests or bug reports. I'm committed to maintaining the plugin and make it as useful as possible.
Thanks for the explanation, I just sent you my project file.

I have no problem using the SVG option. I just tried it now. One suggestion though, it would be helpful to have a web page that links to the SVG files so I can just click on them and access them directly instead of navigating to the directory and opening them individually. Maybe some sort of frames thing where you can click on links from a list in the left frame and the SVG file would display on the right frame.
 
Discussion starter · #242 ·
Cutlist and Layout from Sketchup

If you're a fan of Sketchup for creating woodworking models, then the next obvious step is to use Sketchup to help you create cutlists and layouts. Sketchup plugin Cutlist 4.1 does just that. CutList 4.1 sketchup plugin helps you determine how much of each material you need to produce your design, taking into account nominal sized lumber with allowances for finishing to final size. Then it goes one further and lays out all of the pieces on boards or sheet good sizes of your choosing. Then you should be all set to head for the lumber yard to get all of the materials that you will need with no return trips.

CutList 4.1 was beta tested by our very own Lumberjocks and is now ready for download.

It's being released exclusively to Lumberjocks first. You can download v4.1.10 here . This is a completely free plugin. This plugin has been around since about 2005 but continues to be maintained and enhanced. It's got the look and feel of old Woodsmith magazine cutlists and layouts. A very early version v3.3 was reviewed in the Fine Woodworking blog 'Design.Click.Build.' by Dave Richards and a later follow up.

Note that there is now a forum on Lumberjocks for further discussion.

Cutlist 4.1 has been tested with both Skletchup 7, Sketchup 8, SU2013 and SU2014 on both Macs and on Windows PCs.

Installing. There are now 3 ways to install this.

Method 1 (easiest) Get and install it from Sketchup Extension Warehouse
  • Start up Sketchup
  • from Sketchup choose: Window->Extension Warehouse
  • Search for and select 'CutList'
  • click on install ( big red bar on top right)

Method 2 (easy) Download and install it using the Sketchup extension installer
A relative foolproof way to install is now available with the latest versions (from v4.1.6 and up).
  • Download it from link above
  • Start up Sketchup
  • from Sketchup choose: Window->Preferences
  • click on 'Extensions'
  • click on 'Install Extension', hen navigate to and select the .rbz file you just downloaded

Method 3 (if all else fails) This is a two step process and more error prone

  • The file is a .rbz (a zipped ruby source) file. Extract the entire contents into your sketchup plugin directory not just the startup ruby script (srcutlist.rb). There is also a folder called srcutlistui which contains everything else it needs to work properly. The exact locations of the directories required for Sketchup plugins for Windows or Mac are found documented further down in the blog.

Running on a Mac. This is functional. Only the html output window for the layout does not work because of issues with the Safari browser, however, there is a workaround using the SVG export.

Someone in the forum asked a great question which I will repeat here:

Q. What is the point of the cutting diagram?

A. Why indeed would you want a cutting diagram? There are a few reasons:
  1. Regardless of whether or not you have a cutting diagram, eventually you are going to have to cut some wood to get a project built. How many boards do you need to buy? If you go by the board feet measured ( or calculated by something like the cutlist plugin) you're going to find that it falls short. Why? because when you to to cut the pieces out of the board, you'll find that you will inevitable have waste. By having the cutting diagram, you can see how much waste there is going to be and you know how much to get when you to the lumber yard.
  2. You've got a lot of parts to cut and you want your parts to be as accurate as possible before you even do anything else to the pieces. Ideally you want one setup for each size of part, so that you can cut each of the parts which are the same size at the same time. The cutting diagram lets you visualize how parts may be laid out to minimize on the cuts and the number of setups.
  3. Ok, you've decided to build your project out of sustainably harvested plantation teak. It's selling for $50/square foot(!) for 3/4". You might be interested in using those $200 boards as efficiently as possible. A cutting diagram may also be used to minimize waste. Even if you have waste if you could have a larger part left over which you could reuse for another project vs having a lot of offcuts, you've saved yourself some money and you are using the planet's resources efficiently and responsibly.

So, to sum up, it gives you more accurate project requirements, it minimizes setup time and shop time spent cutting the boards while increasing accuracy and finally it helps to use the resources as efficiently as possible.

Finally here are some screen shots in case you still can't quite figure out what it does or why you would want it or can't imagine what it looks like.

Starting up cutlist. Highlight your project and select CutList from the plugin menu. Make sure all of the parts in your project are named and are either a component or a group. ( Nested components or groups are handled ok as well)

Image


The screen that comes up allows you to select your cutlist options from the type of output you want, what you want to have included in your parts list, which parts are solid wood parts, which are sheet goods parts and which are hardware

Image


and the next page allows you to select the layout options. There is a general options section, a tab for board options and a tab for sheet options.

Image


Here is a sample of cutlist output. This is the cutting list in html format. This page can be printed.

Image


If you scroll down, then there is a summary of the board feet and the materials and sheet parts and hardware are broken down to their own lists with their own summaries

Image


If you selected the layout output, then another window will open and place all of the selected parts on boards of your choosing in a layout which minimizes waste.

Image


Sheet parts layout is placed on the sheet sizes you specified.

Image


There's lots more. There is built in help on each option. Just click on the blue ? next to the option.

Feel free to pass along any comments, questions, enhancement requests or bug reports. I'm committed to maintaining the plugin and make it as useful as possible.
Hi David ( BassPlayer),

Received and responded to your email. You have the classic symptoms of having reached the limits of the windows output (which is actually a limit because of the way the graphics is drawn, not the window itself).

Having a window with clickable links to the svg files generated is an excellent idea! Having it display there might work too as long as I can be sure that MSIE and Apple's Safari both support svg. I have no choice with Sketchup because these are its default browser selections when running as a plugin ( it ignores your default browser setting). Thanks for the idea!
 
Cutlist and Layout from Sketchup

If you're a fan of Sketchup for creating woodworking models, then the next obvious step is to use Sketchup to help you create cutlists and layouts. Sketchup plugin Cutlist 4.1 does just that. CutList 4.1 sketchup plugin helps you determine how much of each material you need to produce your design, taking into account nominal sized lumber with allowances for finishing to final size. Then it goes one further and lays out all of the pieces on boards or sheet good sizes of your choosing. Then you should be all set to head for the lumber yard to get all of the materials that you will need with no return trips.

CutList 4.1 was beta tested by our very own Lumberjocks and is now ready for download.

It's being released exclusively to Lumberjocks first. You can download v4.1.10 here . This is a completely free plugin. This plugin has been around since about 2005 but continues to be maintained and enhanced. It's got the look and feel of old Woodsmith magazine cutlists and layouts. A very early version v3.3 was reviewed in the Fine Woodworking blog 'Design.Click.Build.' by Dave Richards and a later follow up.

Note that there is now a forum on Lumberjocks for further discussion.

Cutlist 4.1 has been tested with both Skletchup 7, Sketchup 8, SU2013 and SU2014 on both Macs and on Windows PCs.

Installing. There are now 3 ways to install this.

Method 1 (easiest) Get and install it from Sketchup Extension Warehouse
  • Start up Sketchup
  • from Sketchup choose: Window->Extension Warehouse
  • Search for and select 'CutList'
  • click on install ( big red bar on top right)

Method 2 (easy) Download and install it using the Sketchup extension installer
A relative foolproof way to install is now available with the latest versions (from v4.1.6 and up).
  • Download it from link above
  • Start up Sketchup
  • from Sketchup choose: Window->Preferences
  • click on 'Extensions'
  • click on 'Install Extension', hen navigate to and select the .rbz file you just downloaded

Method 3 (if all else fails) This is a two step process and more error prone

  • The file is a .rbz (a zipped ruby source) file. Extract the entire contents into your sketchup plugin directory not just the startup ruby script (srcutlist.rb). There is also a folder called srcutlistui which contains everything else it needs to work properly. The exact locations of the directories required for Sketchup plugins for Windows or Mac are found documented further down in the blog.

Running on a Mac. This is functional. Only the html output window for the layout does not work because of issues with the Safari browser, however, there is a workaround using the SVG export.

Someone in the forum asked a great question which I will repeat here:

Q. What is the point of the cutting diagram?

A. Why indeed would you want a cutting diagram? There are a few reasons:
  1. Regardless of whether or not you have a cutting diagram, eventually you are going to have to cut some wood to get a project built. How many boards do you need to buy? If you go by the board feet measured ( or calculated by something like the cutlist plugin) you're going to find that it falls short. Why? because when you to to cut the pieces out of the board, you'll find that you will inevitable have waste. By having the cutting diagram, you can see how much waste there is going to be and you know how much to get when you to the lumber yard.
  2. You've got a lot of parts to cut and you want your parts to be as accurate as possible before you even do anything else to the pieces. Ideally you want one setup for each size of part, so that you can cut each of the parts which are the same size at the same time. The cutting diagram lets you visualize how parts may be laid out to minimize on the cuts and the number of setups.
  3. Ok, you've decided to build your project out of sustainably harvested plantation teak. It's selling for $50/square foot(!) for 3/4". You might be interested in using those $200 boards as efficiently as possible. A cutting diagram may also be used to minimize waste. Even if you have waste if you could have a larger part left over which you could reuse for another project vs having a lot of offcuts, you've saved yourself some money and you are using the planet's resources efficiently and responsibly.

So, to sum up, it gives you more accurate project requirements, it minimizes setup time and shop time spent cutting the boards while increasing accuracy and finally it helps to use the resources as efficiently as possible.

Finally here are some screen shots in case you still can't quite figure out what it does or why you would want it or can't imagine what it looks like.

Starting up cutlist. Highlight your project and select CutList from the plugin menu. Make sure all of the parts in your project are named and are either a component or a group. ( Nested components or groups are handled ok as well)

Image


The screen that comes up allows you to select your cutlist options from the type of output you want, what you want to have included in your parts list, which parts are solid wood parts, which are sheet goods parts and which are hardware

Image


and the next page allows you to select the layout options. There is a general options section, a tab for board options and a tab for sheet options.

Image


Here is a sample of cutlist output. This is the cutting list in html format. This page can be printed.

Image


If you scroll down, then there is a summary of the board feet and the materials and sheet parts and hardware are broken down to their own lists with their own summaries

Image


If you selected the layout output, then another window will open and place all of the selected parts on boards of your choosing in a layout which minimizes waste.

Image


Sheet parts layout is placed on the sheet sizes you specified.

Image


There's lots more. There is built in help on each option. Just click on the blue ? next to the option.

Feel free to pass along any comments, questions, enhancement requests or bug reports. I'm committed to maintaining the plugin and make it as useful as possible.
We looked at using SVG for an in house tool I wrote and AFAIK, pre version 9 internet exploder browsers do not provide native support for SVG. There was an adobe plugin that displayed SVG but since MS is coming out with there own scalable vector format, big surprise, adobe has EOL'd the plugin. =/ No idea on Safari's support.

http://en.wikipedia.org/wiki/Scalable_Vector_Graphics#SVG_and_Microsoft_Internet_Explorer

The Ssrc SVG Plugin looks very interesting.

HTH
db
 
Discussion starter · #244 ·
Cutlist and Layout from Sketchup

If you're a fan of Sketchup for creating woodworking models, then the next obvious step is to use Sketchup to help you create cutlists and layouts. Sketchup plugin Cutlist 4.1 does just that. CutList 4.1 sketchup plugin helps you determine how much of each material you need to produce your design, taking into account nominal sized lumber with allowances for finishing to final size. Then it goes one further and lays out all of the pieces on boards or sheet good sizes of your choosing. Then you should be all set to head for the lumber yard to get all of the materials that you will need with no return trips.

CutList 4.1 was beta tested by our very own Lumberjocks and is now ready for download.

It's being released exclusively to Lumberjocks first. You can download v4.1.10 here . This is a completely free plugin. This plugin has been around since about 2005 but continues to be maintained and enhanced. It's got the look and feel of old Woodsmith magazine cutlists and layouts. A very early version v3.3 was reviewed in the Fine Woodworking blog 'Design.Click.Build.' by Dave Richards and a later follow up.

Note that there is now a forum on Lumberjocks for further discussion.

Cutlist 4.1 has been tested with both Skletchup 7, Sketchup 8, SU2013 and SU2014 on both Macs and on Windows PCs.

Installing. There are now 3 ways to install this.

Method 1 (easiest) Get and install it from Sketchup Extension Warehouse
  • Start up Sketchup
  • from Sketchup choose: Window->Extension Warehouse
  • Search for and select 'CutList'
  • click on install ( big red bar on top right)

Method 2 (easy) Download and install it using the Sketchup extension installer
A relative foolproof way to install is now available with the latest versions (from v4.1.6 and up).
  • Download it from link above
  • Start up Sketchup
  • from Sketchup choose: Window->Preferences
  • click on 'Extensions'
  • click on 'Install Extension', hen navigate to and select the .rbz file you just downloaded

Method 3 (if all else fails) This is a two step process and more error prone

  • The file is a .rbz (a zipped ruby source) file. Extract the entire contents into your sketchup plugin directory not just the startup ruby script (srcutlist.rb). There is also a folder called srcutlistui which contains everything else it needs to work properly. The exact locations of the directories required for Sketchup plugins for Windows or Mac are found documented further down in the blog.

Running on a Mac. This is functional. Only the html output window for the layout does not work because of issues with the Safari browser, however, there is a workaround using the SVG export.

Someone in the forum asked a great question which I will repeat here:

Q. What is the point of the cutting diagram?

A. Why indeed would you want a cutting diagram? There are a few reasons:
  1. Regardless of whether or not you have a cutting diagram, eventually you are going to have to cut some wood to get a project built. How many boards do you need to buy? If you go by the board feet measured ( or calculated by something like the cutlist plugin) you're going to find that it falls short. Why? because when you to to cut the pieces out of the board, you'll find that you will inevitable have waste. By having the cutting diagram, you can see how much waste there is going to be and you know how much to get when you to the lumber yard.
  2. You've got a lot of parts to cut and you want your parts to be as accurate as possible before you even do anything else to the pieces. Ideally you want one setup for each size of part, so that you can cut each of the parts which are the same size at the same time. The cutting diagram lets you visualize how parts may be laid out to minimize on the cuts and the number of setups.
  3. Ok, you've decided to build your project out of sustainably harvested plantation teak. It's selling for $50/square foot(!) for 3/4". You might be interested in using those $200 boards as efficiently as possible. A cutting diagram may also be used to minimize waste. Even if you have waste if you could have a larger part left over which you could reuse for another project vs having a lot of offcuts, you've saved yourself some money and you are using the planet's resources efficiently and responsibly.

So, to sum up, it gives you more accurate project requirements, it minimizes setup time and shop time spent cutting the boards while increasing accuracy and finally it helps to use the resources as efficiently as possible.

Finally here are some screen shots in case you still can't quite figure out what it does or why you would want it or can't imagine what it looks like.

Starting up cutlist. Highlight your project and select CutList from the plugin menu. Make sure all of the parts in your project are named and are either a component or a group. ( Nested components or groups are handled ok as well)

Image


The screen that comes up allows you to select your cutlist options from the type of output you want, what you want to have included in your parts list, which parts are solid wood parts, which are sheet goods parts and which are hardware

Image


and the next page allows you to select the layout options. There is a general options section, a tab for board options and a tab for sheet options.

Image


Here is a sample of cutlist output. This is the cutting list in html format. This page can be printed.

Image


If you scroll down, then there is a summary of the board feet and the materials and sheet parts and hardware are broken down to their own lists with their own summaries

Image


If you selected the layout output, then another window will open and place all of the selected parts on boards of your choosing in a layout which minimizes waste.

Image


Sheet parts layout is placed on the sheet sizes you specified.

Image


There's lots more. There is built in help on each option. Just click on the blue ? next to the option.

Feel free to pass along any comments, questions, enhancement requests or bug reports. I'm committed to maintaining the plugin and make it as useful as possible.
David ( BassPlayer )

I'm in the thick of my yearly update of the plugin and you'll be pleased to know that , while I haven't yet implemented your idea yet to have clickable link to svg (uniform browser support might still be an issue), I have overcome the issues with displaying an unlimited size layout in a window AND it can be printed now - though it's less than 100% perfect, it's a huge improvement over what was there before. It's also a lot faster

Be on the lookout for a v4.1 pre-release being made available for testing out some of the new features.

Still lots of improvements to go.
 
Discussion starter · #245 ·
Cutlist and Layout from Sketchup

If you're a fan of Sketchup for creating woodworking models, then the next obvious step is to use Sketchup to help you create cutlists and layouts. Sketchup plugin Cutlist 4.1 does just that. CutList 4.1 sketchup plugin helps you determine how much of each material you need to produce your design, taking into account nominal sized lumber with allowances for finishing to final size. Then it goes one further and lays out all of the pieces on boards or sheet good sizes of your choosing. Then you should be all set to head for the lumber yard to get all of the materials that you will need with no return trips.

CutList 4.1 was beta tested by our very own Lumberjocks and is now ready for download.

It's being released exclusively to Lumberjocks first. You can download v4.1.10 here . This is a completely free plugin. This plugin has been around since about 2005 but continues to be maintained and enhanced. It's got the look and feel of old Woodsmith magazine cutlists and layouts. A very early version v3.3 was reviewed in the Fine Woodworking blog 'Design.Click.Build.' by Dave Richards and a later follow up.

Note that there is now a forum on Lumberjocks for further discussion.

Cutlist 4.1 has been tested with both Skletchup 7, Sketchup 8, SU2013 and SU2014 on both Macs and on Windows PCs.

Installing. There are now 3 ways to install this.

Method 1 (easiest) Get and install it from Sketchup Extension Warehouse
  • Start up Sketchup
  • from Sketchup choose: Window->Extension Warehouse
  • Search for and select 'CutList'
  • click on install ( big red bar on top right)

Method 2 (easy) Download and install it using the Sketchup extension installer
A relative foolproof way to install is now available with the latest versions (from v4.1.6 and up).
  • Download it from link above
  • Start up Sketchup
  • from Sketchup choose: Window->Preferences
  • click on 'Extensions'
  • click on 'Install Extension', hen navigate to and select the .rbz file you just downloaded

Method 3 (if all else fails) This is a two step process and more error prone

  • The file is a .rbz (a zipped ruby source) file. Extract the entire contents into your sketchup plugin directory not just the startup ruby script (srcutlist.rb). There is also a folder called srcutlistui which contains everything else it needs to work properly. The exact locations of the directories required for Sketchup plugins for Windows or Mac are found documented further down in the blog.

Running on a Mac. This is functional. Only the html output window for the layout does not work because of issues with the Safari browser, however, there is a workaround using the SVG export.

Someone in the forum asked a great question which I will repeat here:

Q. What is the point of the cutting diagram?

A. Why indeed would you want a cutting diagram? There are a few reasons:
  1. Regardless of whether or not you have a cutting diagram, eventually you are going to have to cut some wood to get a project built. How many boards do you need to buy? If you go by the board feet measured ( or calculated by something like the cutlist plugin) you're going to find that it falls short. Why? because when you to to cut the pieces out of the board, you'll find that you will inevitable have waste. By having the cutting diagram, you can see how much waste there is going to be and you know how much to get when you to the lumber yard.
  2. You've got a lot of parts to cut and you want your parts to be as accurate as possible before you even do anything else to the pieces. Ideally you want one setup for each size of part, so that you can cut each of the parts which are the same size at the same time. The cutting diagram lets you visualize how parts may be laid out to minimize on the cuts and the number of setups.
  3. Ok, you've decided to build your project out of sustainably harvested plantation teak. It's selling for $50/square foot(!) for 3/4". You might be interested in using those $200 boards as efficiently as possible. A cutting diagram may also be used to minimize waste. Even if you have waste if you could have a larger part left over which you could reuse for another project vs having a lot of offcuts, you've saved yourself some money and you are using the planet's resources efficiently and responsibly.

So, to sum up, it gives you more accurate project requirements, it minimizes setup time and shop time spent cutting the boards while increasing accuracy and finally it helps to use the resources as efficiently as possible.

Finally here are some screen shots in case you still can't quite figure out what it does or why you would want it or can't imagine what it looks like.

Starting up cutlist. Highlight your project and select CutList from the plugin menu. Make sure all of the parts in your project are named and are either a component or a group. ( Nested components or groups are handled ok as well)

Image


The screen that comes up allows you to select your cutlist options from the type of output you want, what you want to have included in your parts list, which parts are solid wood parts, which are sheet goods parts and which are hardware

Image


and the next page allows you to select the layout options. There is a general options section, a tab for board options and a tab for sheet options.

Image


Here is a sample of cutlist output. This is the cutting list in html format. This page can be printed.

Image


If you scroll down, then there is a summary of the board feet and the materials and sheet parts and hardware are broken down to their own lists with their own summaries

Image


If you selected the layout output, then another window will open and place all of the selected parts on boards of your choosing in a layout which minimizes waste.

Image


Sheet parts layout is placed on the sheet sizes you specified.

Image


There's lots more. There is built in help on each option. Just click on the blue ? next to the option.

Feel free to pass along any comments, questions, enhancement requests or bug reports. I'm committed to maintaining the plugin and make it as useful as possible.
Cutlist 4.1 pre-release is now available for trialing.

Rather than repeating myself in many places, I've started a new blog series on cutlist 4.1 to inform on new features and updates as available, receive any feedback on any issues and provide fixes - all leading to a release version of 4.1

Please go here for more details
 
Cutlist and Layout from Sketchup

If you're a fan of Sketchup for creating woodworking models, then the next obvious step is to use Sketchup to help you create cutlists and layouts. Sketchup plugin Cutlist 4.1 does just that. CutList 4.1 sketchup plugin helps you determine how much of each material you need to produce your design, taking into account nominal sized lumber with allowances for finishing to final size. Then it goes one further and lays out all of the pieces on boards or sheet good sizes of your choosing. Then you should be all set to head for the lumber yard to get all of the materials that you will need with no return trips.

CutList 4.1 was beta tested by our very own Lumberjocks and is now ready for download.

It's being released exclusively to Lumberjocks first. You can download v4.1.10 here . This is a completely free plugin. This plugin has been around since about 2005 but continues to be maintained and enhanced. It's got the look and feel of old Woodsmith magazine cutlists and layouts. A very early version v3.3 was reviewed in the Fine Woodworking blog 'Design.Click.Build.' by Dave Richards and a later follow up.

Note that there is now a forum on Lumberjocks for further discussion.

Cutlist 4.1 has been tested with both Skletchup 7, Sketchup 8, SU2013 and SU2014 on both Macs and on Windows PCs.

Installing. There are now 3 ways to install this.

Method 1 (easiest) Get and install it from Sketchup Extension Warehouse
  • Start up Sketchup
  • from Sketchup choose: Window->Extension Warehouse
  • Search for and select 'CutList'
  • click on install ( big red bar on top right)

Method 2 (easy) Download and install it using the Sketchup extension installer
A relative foolproof way to install is now available with the latest versions (from v4.1.6 and up).
  • Download it from link above
  • Start up Sketchup
  • from Sketchup choose: Window->Preferences
  • click on 'Extensions'
  • click on 'Install Extension', hen navigate to and select the .rbz file you just downloaded

Method 3 (if all else fails) This is a two step process and more error prone

  • The file is a .rbz (a zipped ruby source) file. Extract the entire contents into your sketchup plugin directory not just the startup ruby script (srcutlist.rb). There is also a folder called srcutlistui which contains everything else it needs to work properly. The exact locations of the directories required for Sketchup plugins for Windows or Mac are found documented further down in the blog.

Running on a Mac. This is functional. Only the html output window for the layout does not work because of issues with the Safari browser, however, there is a workaround using the SVG export.

Someone in the forum asked a great question which I will repeat here:

Q. What is the point of the cutting diagram?

A. Why indeed would you want a cutting diagram? There are a few reasons:
  1. Regardless of whether or not you have a cutting diagram, eventually you are going to have to cut some wood to get a project built. How many boards do you need to buy? If you go by the board feet measured ( or calculated by something like the cutlist plugin) you're going to find that it falls short. Why? because when you to to cut the pieces out of the board, you'll find that you will inevitable have waste. By having the cutting diagram, you can see how much waste there is going to be and you know how much to get when you to the lumber yard.
  2. You've got a lot of parts to cut and you want your parts to be as accurate as possible before you even do anything else to the pieces. Ideally you want one setup for each size of part, so that you can cut each of the parts which are the same size at the same time. The cutting diagram lets you visualize how parts may be laid out to minimize on the cuts and the number of setups.
  3. Ok, you've decided to build your project out of sustainably harvested plantation teak. It's selling for $50/square foot(!) for 3/4". You might be interested in using those $200 boards as efficiently as possible. A cutting diagram may also be used to minimize waste. Even if you have waste if you could have a larger part left over which you could reuse for another project vs having a lot of offcuts, you've saved yourself some money and you are using the planet's resources efficiently and responsibly.

So, to sum up, it gives you more accurate project requirements, it minimizes setup time and shop time spent cutting the boards while increasing accuracy and finally it helps to use the resources as efficiently as possible.

Finally here are some screen shots in case you still can't quite figure out what it does or why you would want it or can't imagine what it looks like.

Starting up cutlist. Highlight your project and select CutList from the plugin menu. Make sure all of the parts in your project are named and are either a component or a group. ( Nested components or groups are handled ok as well)

Image


The screen that comes up allows you to select your cutlist options from the type of output you want, what you want to have included in your parts list, which parts are solid wood parts, which are sheet goods parts and which are hardware

Image


and the next page allows you to select the layout options. There is a general options section, a tab for board options and a tab for sheet options.

Image


Here is a sample of cutlist output. This is the cutting list in html format. This page can be printed.

Image


If you scroll down, then there is a summary of the board feet and the materials and sheet parts and hardware are broken down to their own lists with their own summaries

Image


If you selected the layout output, then another window will open and place all of the selected parts on boards of your choosing in a layout which minimizes waste.

Image


Sheet parts layout is placed on the sheet sizes you specified.

Image


There's lots more. There is built in help on each option. Just click on the blue ? next to the option.

Feel free to pass along any comments, questions, enhancement requests or bug reports. I'm committed to maintaining the plugin and make it as useful as possible.
Would there ever be a possibility of being able to list, by size, several rough cut 8/4 lumber/boards and have cutlist use the sum of that list of various sized boards to generate your "best" Cut List? In other words using 10' 8/4 boards with the following widths: one 6", two 8", three 7 1/2", two 9", etc. the stuff you get from the lumber yard ;-)
 
Discussion starter · #247 ·
Cutlist and Layout from Sketchup

If you're a fan of Sketchup for creating woodworking models, then the next obvious step is to use Sketchup to help you create cutlists and layouts. Sketchup plugin Cutlist 4.1 does just that. CutList 4.1 sketchup plugin helps you determine how much of each material you need to produce your design, taking into account nominal sized lumber with allowances for finishing to final size. Then it goes one further and lays out all of the pieces on boards or sheet good sizes of your choosing. Then you should be all set to head for the lumber yard to get all of the materials that you will need with no return trips.

CutList 4.1 was beta tested by our very own Lumberjocks and is now ready for download.

It's being released exclusively to Lumberjocks first. You can download v4.1.10 here . This is a completely free plugin. This plugin has been around since about 2005 but continues to be maintained and enhanced. It's got the look and feel of old Woodsmith magazine cutlists and layouts. A very early version v3.3 was reviewed in the Fine Woodworking blog 'Design.Click.Build.' by Dave Richards and a later follow up.

Note that there is now a forum on Lumberjocks for further discussion.

Cutlist 4.1 has been tested with both Skletchup 7, Sketchup 8, SU2013 and SU2014 on both Macs and on Windows PCs.

Installing. There are now 3 ways to install this.

Method 1 (easiest) Get and install it from Sketchup Extension Warehouse
  • Start up Sketchup
  • from Sketchup choose: Window->Extension Warehouse
  • Search for and select 'CutList'
  • click on install ( big red bar on top right)

Method 2 (easy) Download and install it using the Sketchup extension installer
A relative foolproof way to install is now available with the latest versions (from v4.1.6 and up).
  • Download it from link above
  • Start up Sketchup
  • from Sketchup choose: Window->Preferences
  • click on 'Extensions'
  • click on 'Install Extension', hen navigate to and select the .rbz file you just downloaded

Method 3 (if all else fails) This is a two step process and more error prone

  • The file is a .rbz (a zipped ruby source) file. Extract the entire contents into your sketchup plugin directory not just the startup ruby script (srcutlist.rb). There is also a folder called srcutlistui which contains everything else it needs to work properly. The exact locations of the directories required for Sketchup plugins for Windows or Mac are found documented further down in the blog.

Running on a Mac. This is functional. Only the html output window for the layout does not work because of issues with the Safari browser, however, there is a workaround using the SVG export.

Someone in the forum asked a great question which I will repeat here:

Q. What is the point of the cutting diagram?

A. Why indeed would you want a cutting diagram? There are a few reasons:
  1. Regardless of whether or not you have a cutting diagram, eventually you are going to have to cut some wood to get a project built. How many boards do you need to buy? If you go by the board feet measured ( or calculated by something like the cutlist plugin) you're going to find that it falls short. Why? because when you to to cut the pieces out of the board, you'll find that you will inevitable have waste. By having the cutting diagram, you can see how much waste there is going to be and you know how much to get when you to the lumber yard.
  2. You've got a lot of parts to cut and you want your parts to be as accurate as possible before you even do anything else to the pieces. Ideally you want one setup for each size of part, so that you can cut each of the parts which are the same size at the same time. The cutting diagram lets you visualize how parts may be laid out to minimize on the cuts and the number of setups.
  3. Ok, you've decided to build your project out of sustainably harvested plantation teak. It's selling for $50/square foot(!) for 3/4". You might be interested in using those $200 boards as efficiently as possible. A cutting diagram may also be used to minimize waste. Even if you have waste if you could have a larger part left over which you could reuse for another project vs having a lot of offcuts, you've saved yourself some money and you are using the planet's resources efficiently and responsibly.

So, to sum up, it gives you more accurate project requirements, it minimizes setup time and shop time spent cutting the boards while increasing accuracy and finally it helps to use the resources as efficiently as possible.

Finally here are some screen shots in case you still can't quite figure out what it does or why you would want it or can't imagine what it looks like.

Starting up cutlist. Highlight your project and select CutList from the plugin menu. Make sure all of the parts in your project are named and are either a component or a group. ( Nested components or groups are handled ok as well)

Image


The screen that comes up allows you to select your cutlist options from the type of output you want, what you want to have included in your parts list, which parts are solid wood parts, which are sheet goods parts and which are hardware

Image


and the next page allows you to select the layout options. There is a general options section, a tab for board options and a tab for sheet options.

Image


Here is a sample of cutlist output. This is the cutting list in html format. This page can be printed.

Image


If you scroll down, then there is a summary of the board feet and the materials and sheet parts and hardware are broken down to their own lists with their own summaries

Image


If you selected the layout output, then another window will open and place all of the selected parts on boards of your choosing in a layout which minimizes waste.

Image


Sheet parts layout is placed on the sheet sizes you specified.

Image


There's lots more. There is built in help on each option. Just click on the blue ? next to the option.

Feel free to pass along any comments, questions, enhancement requests or bug reports. I'm committed to maintaining the plugin and make it as useful as possible.
Hi HorizontalMike - The short answer is yes, someday. I'd like to introduce the idea of listing your own boards and to have the program do its best to lay it out on what you tell it is available. Most of the infrastructure is there, the interface is not. one of these days, I'll get around to putting the interface in and seeing how well it works.

In principle now, it already lays out on boards available, it's just that I limit it to a certain size and an unlimited number of them.

Note: Having the boards available for layout is one thing, the other half of your request - getting the best possible fit - is quite another. My current algorithm is ok but could be improved. I'm sure ( I know ) that is the stuff of PhDs! What I tried to do was to recreate the way we would go about doing it, but believe me, the mind is incredibly complex and adept and doing things which are difficult to describe to a machine!

Stay tuned - just don't hold your breathe!
 
Cutlist and Layout from Sketchup

If you're a fan of Sketchup for creating woodworking models, then the next obvious step is to use Sketchup to help you create cutlists and layouts. Sketchup plugin Cutlist 4.1 does just that. CutList 4.1 sketchup plugin helps you determine how much of each material you need to produce your design, taking into account nominal sized lumber with allowances for finishing to final size. Then it goes one further and lays out all of the pieces on boards or sheet good sizes of your choosing. Then you should be all set to head for the lumber yard to get all of the materials that you will need with no return trips.

CutList 4.1 was beta tested by our very own Lumberjocks and is now ready for download.

It's being released exclusively to Lumberjocks first. You can download v4.1.10 here . This is a completely free plugin. This plugin has been around since about 2005 but continues to be maintained and enhanced. It's got the look and feel of old Woodsmith magazine cutlists and layouts. A very early version v3.3 was reviewed in the Fine Woodworking blog 'Design.Click.Build.' by Dave Richards and a later follow up.

Note that there is now a forum on Lumberjocks for further discussion.

Cutlist 4.1 has been tested with both Skletchup 7, Sketchup 8, SU2013 and SU2014 on both Macs and on Windows PCs.

Installing. There are now 3 ways to install this.

Method 1 (easiest) Get and install it from Sketchup Extension Warehouse
  • Start up Sketchup
  • from Sketchup choose: Window->Extension Warehouse
  • Search for and select 'CutList'
  • click on install ( big red bar on top right)

Method 2 (easy) Download and install it using the Sketchup extension installer
A relative foolproof way to install is now available with the latest versions (from v4.1.6 and up).
  • Download it from link above
  • Start up Sketchup
  • from Sketchup choose: Window->Preferences
  • click on 'Extensions'
  • click on 'Install Extension', hen navigate to and select the .rbz file you just downloaded

Method 3 (if all else fails) This is a two step process and more error prone

  • The file is a .rbz (a zipped ruby source) file. Extract the entire contents into your sketchup plugin directory not just the startup ruby script (srcutlist.rb). There is also a folder called srcutlistui which contains everything else it needs to work properly. The exact locations of the directories required for Sketchup plugins for Windows or Mac are found documented further down in the blog.

Running on a Mac. This is functional. Only the html output window for the layout does not work because of issues with the Safari browser, however, there is a workaround using the SVG export.

Someone in the forum asked a great question which I will repeat here:

Q. What is the point of the cutting diagram?

A. Why indeed would you want a cutting diagram? There are a few reasons:
  1. Regardless of whether or not you have a cutting diagram, eventually you are going to have to cut some wood to get a project built. How many boards do you need to buy? If you go by the board feet measured ( or calculated by something like the cutlist plugin) you're going to find that it falls short. Why? because when you to to cut the pieces out of the board, you'll find that you will inevitable have waste. By having the cutting diagram, you can see how much waste there is going to be and you know how much to get when you to the lumber yard.
  2. You've got a lot of parts to cut and you want your parts to be as accurate as possible before you even do anything else to the pieces. Ideally you want one setup for each size of part, so that you can cut each of the parts which are the same size at the same time. The cutting diagram lets you visualize how parts may be laid out to minimize on the cuts and the number of setups.
  3. Ok, you've decided to build your project out of sustainably harvested plantation teak. It's selling for $50/square foot(!) for 3/4". You might be interested in using those $200 boards as efficiently as possible. A cutting diagram may also be used to minimize waste. Even if you have waste if you could have a larger part left over which you could reuse for another project vs having a lot of offcuts, you've saved yourself some money and you are using the planet's resources efficiently and responsibly.

So, to sum up, it gives you more accurate project requirements, it minimizes setup time and shop time spent cutting the boards while increasing accuracy and finally it helps to use the resources as efficiently as possible.

Finally here are some screen shots in case you still can't quite figure out what it does or why you would want it or can't imagine what it looks like.

Starting up cutlist. Highlight your project and select CutList from the plugin menu. Make sure all of the parts in your project are named and are either a component or a group. ( Nested components or groups are handled ok as well)

Image


The screen that comes up allows you to select your cutlist options from the type of output you want, what you want to have included in your parts list, which parts are solid wood parts, which are sheet goods parts and which are hardware

Image


and the next page allows you to select the layout options. There is a general options section, a tab for board options and a tab for sheet options.

Image


Here is a sample of cutlist output. This is the cutting list in html format. This page can be printed.

Image


If you scroll down, then there is a summary of the board feet and the materials and sheet parts and hardware are broken down to their own lists with their own summaries

Image


If you selected the layout output, then another window will open and place all of the selected parts on boards of your choosing in a layout which minimizes waste.

Image


Sheet parts layout is placed on the sheet sizes you specified.

Image


There's lots more. There is built in help on each option. Just click on the blue ? next to the option.

Feel free to pass along any comments, questions, enhancement requests or bug reports. I'm committed to maintaining the plugin and make it as useful as possible.
This is BY FAR the best cutlist/layout option for mac people! You just have to follow the changes above suggested by daltxguy.

Cheers

Warren
 
Discussion starter · #249 ·
Cutlist and Layout from Sketchup

If you're a fan of Sketchup for creating woodworking models, then the next obvious step is to use Sketchup to help you create cutlists and layouts. Sketchup plugin Cutlist 4.1 does just that. CutList 4.1 sketchup plugin helps you determine how much of each material you need to produce your design, taking into account nominal sized lumber with allowances for finishing to final size. Then it goes one further and lays out all of the pieces on boards or sheet good sizes of your choosing. Then you should be all set to head for the lumber yard to get all of the materials that you will need with no return trips.

CutList 4.1 was beta tested by our very own Lumberjocks and is now ready for download.

It's being released exclusively to Lumberjocks first. You can download v4.1.10 here . This is a completely free plugin. This plugin has been around since about 2005 but continues to be maintained and enhanced. It's got the look and feel of old Woodsmith magazine cutlists and layouts. A very early version v3.3 was reviewed in the Fine Woodworking blog 'Design.Click.Build.' by Dave Richards and a later follow up.

Note that there is now a forum on Lumberjocks for further discussion.

Cutlist 4.1 has been tested with both Skletchup 7, Sketchup 8, SU2013 and SU2014 on both Macs and on Windows PCs.

Installing. There are now 3 ways to install this.

Method 1 (easiest) Get and install it from Sketchup Extension Warehouse
  • Start up Sketchup
  • from Sketchup choose: Window->Extension Warehouse
  • Search for and select 'CutList'
  • click on install ( big red bar on top right)

Method 2 (easy) Download and install it using the Sketchup extension installer
A relative foolproof way to install is now available with the latest versions (from v4.1.6 and up).
  • Download it from link above
  • Start up Sketchup
  • from Sketchup choose: Window->Preferences
  • click on 'Extensions'
  • click on 'Install Extension', hen navigate to and select the .rbz file you just downloaded

Method 3 (if all else fails) This is a two step process and more error prone

  • The file is a .rbz (a zipped ruby source) file. Extract the entire contents into your sketchup plugin directory not just the startup ruby script (srcutlist.rb). There is also a folder called srcutlistui which contains everything else it needs to work properly. The exact locations of the directories required for Sketchup plugins for Windows or Mac are found documented further down in the blog.

Running on a Mac. This is functional. Only the html output window for the layout does not work because of issues with the Safari browser, however, there is a workaround using the SVG export.

Someone in the forum asked a great question which I will repeat here:

Q. What is the point of the cutting diagram?

A. Why indeed would you want a cutting diagram? There are a few reasons:
  1. Regardless of whether or not you have a cutting diagram, eventually you are going to have to cut some wood to get a project built. How many boards do you need to buy? If you go by the board feet measured ( or calculated by something like the cutlist plugin) you're going to find that it falls short. Why? because when you to to cut the pieces out of the board, you'll find that you will inevitable have waste. By having the cutting diagram, you can see how much waste there is going to be and you know how much to get when you to the lumber yard.
  2. You've got a lot of parts to cut and you want your parts to be as accurate as possible before you even do anything else to the pieces. Ideally you want one setup for each size of part, so that you can cut each of the parts which are the same size at the same time. The cutting diagram lets you visualize how parts may be laid out to minimize on the cuts and the number of setups.
  3. Ok, you've decided to build your project out of sustainably harvested plantation teak. It's selling for $50/square foot(!) for 3/4". You might be interested in using those $200 boards as efficiently as possible. A cutting diagram may also be used to minimize waste. Even if you have waste if you could have a larger part left over which you could reuse for another project vs having a lot of offcuts, you've saved yourself some money and you are using the planet's resources efficiently and responsibly.

So, to sum up, it gives you more accurate project requirements, it minimizes setup time and shop time spent cutting the boards while increasing accuracy and finally it helps to use the resources as efficiently as possible.

Finally here are some screen shots in case you still can't quite figure out what it does or why you would want it or can't imagine what it looks like.

Starting up cutlist. Highlight your project and select CutList from the plugin menu. Make sure all of the parts in your project are named and are either a component or a group. ( Nested components or groups are handled ok as well)

Image


The screen that comes up allows you to select your cutlist options from the type of output you want, what you want to have included in your parts list, which parts are solid wood parts, which are sheet goods parts and which are hardware

Image


and the next page allows you to select the layout options. There is a general options section, a tab for board options and a tab for sheet options.

Image


Here is a sample of cutlist output. This is the cutting list in html format. This page can be printed.

Image


If you scroll down, then there is a summary of the board feet and the materials and sheet parts and hardware are broken down to their own lists with their own summaries

Image


If you selected the layout output, then another window will open and place all of the selected parts on boards of your choosing in a layout which minimizes waste.

Image


Sheet parts layout is placed on the sheet sizes you specified.

Image


There's lots more. There is built in help on each option. Just click on the blue ? next to the option.

Feel free to pass along any comments, questions, enhancement requests or bug reports. I'm committed to maintaining the plugin and make it as useful as possible.
That's some pretty head swelling comments there, Warren. Thanks! I hope to keep the plugin functional for all platforms which SU supports.
 
Cutlist and Layout from Sketchup

If you're a fan of Sketchup for creating woodworking models, then the next obvious step is to use Sketchup to help you create cutlists and layouts. Sketchup plugin Cutlist 4.1 does just that. CutList 4.1 sketchup plugin helps you determine how much of each material you need to produce your design, taking into account nominal sized lumber with allowances for finishing to final size. Then it goes one further and lays out all of the pieces on boards or sheet good sizes of your choosing. Then you should be all set to head for the lumber yard to get all of the materials that you will need with no return trips.

CutList 4.1 was beta tested by our very own Lumberjocks and is now ready for download.

It's being released exclusively to Lumberjocks first. You can download v4.1.10 here . This is a completely free plugin. This plugin has been around since about 2005 but continues to be maintained and enhanced. It's got the look and feel of old Woodsmith magazine cutlists and layouts. A very early version v3.3 was reviewed in the Fine Woodworking blog 'Design.Click.Build.' by Dave Richards and a later follow up.

Note that there is now a forum on Lumberjocks for further discussion.

Cutlist 4.1 has been tested with both Skletchup 7, Sketchup 8, SU2013 and SU2014 on both Macs and on Windows PCs.

Installing. There are now 3 ways to install this.

Method 1 (easiest) Get and install it from Sketchup Extension Warehouse
  • Start up Sketchup
  • from Sketchup choose: Window->Extension Warehouse
  • Search for and select 'CutList'
  • click on install ( big red bar on top right)

Method 2 (easy) Download and install it using the Sketchup extension installer
A relative foolproof way to install is now available with the latest versions (from v4.1.6 and up).
  • Download it from link above
  • Start up Sketchup
  • from Sketchup choose: Window->Preferences
  • click on 'Extensions'
  • click on 'Install Extension', hen navigate to and select the .rbz file you just downloaded

Method 3 (if all else fails) This is a two step process and more error prone

  • The file is a .rbz (a zipped ruby source) file. Extract the entire contents into your sketchup plugin directory not just the startup ruby script (srcutlist.rb). There is also a folder called srcutlistui which contains everything else it needs to work properly. The exact locations of the directories required for Sketchup plugins for Windows or Mac are found documented further down in the blog.

Running on a Mac. This is functional. Only the html output window for the layout does not work because of issues with the Safari browser, however, there is a workaround using the SVG export.

Someone in the forum asked a great question which I will repeat here:

Q. What is the point of the cutting diagram?

A. Why indeed would you want a cutting diagram? There are a few reasons:
  1. Regardless of whether or not you have a cutting diagram, eventually you are going to have to cut some wood to get a project built. How many boards do you need to buy? If you go by the board feet measured ( or calculated by something like the cutlist plugin) you're going to find that it falls short. Why? because when you to to cut the pieces out of the board, you'll find that you will inevitable have waste. By having the cutting diagram, you can see how much waste there is going to be and you know how much to get when you to the lumber yard.
  2. You've got a lot of parts to cut and you want your parts to be as accurate as possible before you even do anything else to the pieces. Ideally you want one setup for each size of part, so that you can cut each of the parts which are the same size at the same time. The cutting diagram lets you visualize how parts may be laid out to minimize on the cuts and the number of setups.
  3. Ok, you've decided to build your project out of sustainably harvested plantation teak. It's selling for $50/square foot(!) for 3/4". You might be interested in using those $200 boards as efficiently as possible. A cutting diagram may also be used to minimize waste. Even if you have waste if you could have a larger part left over which you could reuse for another project vs having a lot of offcuts, you've saved yourself some money and you are using the planet's resources efficiently and responsibly.

So, to sum up, it gives you more accurate project requirements, it minimizes setup time and shop time spent cutting the boards while increasing accuracy and finally it helps to use the resources as efficiently as possible.

Finally here are some screen shots in case you still can't quite figure out what it does or why you would want it or can't imagine what it looks like.

Starting up cutlist. Highlight your project and select CutList from the plugin menu. Make sure all of the parts in your project are named and are either a component or a group. ( Nested components or groups are handled ok as well)

Image


The screen that comes up allows you to select your cutlist options from the type of output you want, what you want to have included in your parts list, which parts are solid wood parts, which are sheet goods parts and which are hardware

Image


and the next page allows you to select the layout options. There is a general options section, a tab for board options and a tab for sheet options.

Image


Here is a sample of cutlist output. This is the cutting list in html format. This page can be printed.

Image


If you scroll down, then there is a summary of the board feet and the materials and sheet parts and hardware are broken down to their own lists with their own summaries

Image


If you selected the layout output, then another window will open and place all of the selected parts on boards of your choosing in a layout which minimizes waste.

Image


Sheet parts layout is placed on the sheet sizes you specified.

Image


There's lots more. There is built in help on each option. Just click on the blue ? next to the option.

Feel free to pass along any comments, questions, enhancement requests or bug reports. I'm committed to maintaining the plugin and make it as useful as possible.
this program is amazing, and it works with metric! at least for the panels, well the standard panels that is.
is there a way to input custom board and panel sizes? none of the common board sizes i use are in the list (170×60 mm, 130×25mm etc… plus the length of the boards is quite limited, the shortest i use is 3m, the longest 4.80m
and when i use oak then none of the boards have the same width, but there i may be asking too much to input every single board…
anyway big thanks for making this program!
 
Discussion starter · #251 ·
Cutlist and Layout from Sketchup

If you're a fan of Sketchup for creating woodworking models, then the next obvious step is to use Sketchup to help you create cutlists and layouts. Sketchup plugin Cutlist 4.1 does just that. CutList 4.1 sketchup plugin helps you determine how much of each material you need to produce your design, taking into account nominal sized lumber with allowances for finishing to final size. Then it goes one further and lays out all of the pieces on boards or sheet good sizes of your choosing. Then you should be all set to head for the lumber yard to get all of the materials that you will need with no return trips.

CutList 4.1 was beta tested by our very own Lumberjocks and is now ready for download.

It's being released exclusively to Lumberjocks first. You can download v4.1.10 here . This is a completely free plugin. This plugin has been around since about 2005 but continues to be maintained and enhanced. It's got the look and feel of old Woodsmith magazine cutlists and layouts. A very early version v3.3 was reviewed in the Fine Woodworking blog 'Design.Click.Build.' by Dave Richards and a later follow up.

Note that there is now a forum on Lumberjocks for further discussion.

Cutlist 4.1 has been tested with both Skletchup 7, Sketchup 8, SU2013 and SU2014 on both Macs and on Windows PCs.

Installing. There are now 3 ways to install this.

Method 1 (easiest) Get and install it from Sketchup Extension Warehouse
  • Start up Sketchup
  • from Sketchup choose: Window->Extension Warehouse
  • Search for and select 'CutList'
  • click on install ( big red bar on top right)

Method 2 (easy) Download and install it using the Sketchup extension installer
A relative foolproof way to install is now available with the latest versions (from v4.1.6 and up).
  • Download it from link above
  • Start up Sketchup
  • from Sketchup choose: Window->Preferences
  • click on 'Extensions'
  • click on 'Install Extension', hen navigate to and select the .rbz file you just downloaded

Method 3 (if all else fails) This is a two step process and more error prone

  • The file is a .rbz (a zipped ruby source) file. Extract the entire contents into your sketchup plugin directory not just the startup ruby script (srcutlist.rb). There is also a folder called srcutlistui which contains everything else it needs to work properly. The exact locations of the directories required for Sketchup plugins for Windows or Mac are found documented further down in the blog.

Running on a Mac. This is functional. Only the html output window for the layout does not work because of issues with the Safari browser, however, there is a workaround using the SVG export.

Someone in the forum asked a great question which I will repeat here:

Q. What is the point of the cutting diagram?

A. Why indeed would you want a cutting diagram? There are a few reasons:
  1. Regardless of whether or not you have a cutting diagram, eventually you are going to have to cut some wood to get a project built. How many boards do you need to buy? If you go by the board feet measured ( or calculated by something like the cutlist plugin) you're going to find that it falls short. Why? because when you to to cut the pieces out of the board, you'll find that you will inevitable have waste. By having the cutting diagram, you can see how much waste there is going to be and you know how much to get when you to the lumber yard.
  2. You've got a lot of parts to cut and you want your parts to be as accurate as possible before you even do anything else to the pieces. Ideally you want one setup for each size of part, so that you can cut each of the parts which are the same size at the same time. The cutting diagram lets you visualize how parts may be laid out to minimize on the cuts and the number of setups.
  3. Ok, you've decided to build your project out of sustainably harvested plantation teak. It's selling for $50/square foot(!) for 3/4". You might be interested in using those $200 boards as efficiently as possible. A cutting diagram may also be used to minimize waste. Even if you have waste if you could have a larger part left over which you could reuse for another project vs having a lot of offcuts, you've saved yourself some money and you are using the planet's resources efficiently and responsibly.

So, to sum up, it gives you more accurate project requirements, it minimizes setup time and shop time spent cutting the boards while increasing accuracy and finally it helps to use the resources as efficiently as possible.

Finally here are some screen shots in case you still can't quite figure out what it does or why you would want it or can't imagine what it looks like.

Starting up cutlist. Highlight your project and select CutList from the plugin menu. Make sure all of the parts in your project are named and are either a component or a group. ( Nested components or groups are handled ok as well)

Image


The screen that comes up allows you to select your cutlist options from the type of output you want, what you want to have included in your parts list, which parts are solid wood parts, which are sheet goods parts and which are hardware

Image


and the next page allows you to select the layout options. There is a general options section, a tab for board options and a tab for sheet options.

Image


Here is a sample of cutlist output. This is the cutting list in html format. This page can be printed.

Image


If you scroll down, then there is a summary of the board feet and the materials and sheet parts and hardware are broken down to their own lists with their own summaries

Image


If you selected the layout output, then another window will open and place all of the selected parts on boards of your choosing in a layout which minimizes waste.

Image


Sheet parts layout is placed on the sheet sizes you specified.

Image


There's lots more. There is built in help on each option. Just click on the blue ? next to the option.

Feel free to pass along any comments, questions, enhancement requests or bug reports. I'm committed to maintaining the plugin and make it as useful as possible.
Thanks for your comments idl. I've never used eCabinet though I see the price is right. I'm not associated with any manufacturer or even Google for that matter.

Greedo - the request is in the pipeline but not there yet
 
Discussion starter · #252 ·
Cutlist and Layout from Sketchup

If you're a fan of Sketchup for creating woodworking models, then the next obvious step is to use Sketchup to help you create cutlists and layouts. Sketchup plugin Cutlist 4.1 does just that. CutList 4.1 sketchup plugin helps you determine how much of each material you need to produce your design, taking into account nominal sized lumber with allowances for finishing to final size. Then it goes one further and lays out all of the pieces on boards or sheet good sizes of your choosing. Then you should be all set to head for the lumber yard to get all of the materials that you will need with no return trips.

CutList 4.1 was beta tested by our very own Lumberjocks and is now ready for download.

It's being released exclusively to Lumberjocks first. You can download v4.1.10 here . This is a completely free plugin. This plugin has been around since about 2005 but continues to be maintained and enhanced. It's got the look and feel of old Woodsmith magazine cutlists and layouts. A very early version v3.3 was reviewed in the Fine Woodworking blog 'Design.Click.Build.' by Dave Richards and a later follow up.

Note that there is now a forum on Lumberjocks for further discussion.

Cutlist 4.1 has been tested with both Skletchup 7, Sketchup 8, SU2013 and SU2014 on both Macs and on Windows PCs.

Installing. There are now 3 ways to install this.

Method 1 (easiest) Get and install it from Sketchup Extension Warehouse
  • Start up Sketchup
  • from Sketchup choose: Window->Extension Warehouse
  • Search for and select 'CutList'
  • click on install ( big red bar on top right)

Method 2 (easy) Download and install it using the Sketchup extension installer
A relative foolproof way to install is now available with the latest versions (from v4.1.6 and up).
  • Download it from link above
  • Start up Sketchup
  • from Sketchup choose: Window->Preferences
  • click on 'Extensions'
  • click on 'Install Extension', hen navigate to and select the .rbz file you just downloaded

Method 3 (if all else fails) This is a two step process and more error prone

  • The file is a .rbz (a zipped ruby source) file. Extract the entire contents into your sketchup plugin directory not just the startup ruby script (srcutlist.rb). There is also a folder called srcutlistui which contains everything else it needs to work properly. The exact locations of the directories required for Sketchup plugins for Windows or Mac are found documented further down in the blog.

Running on a Mac. This is functional. Only the html output window for the layout does not work because of issues with the Safari browser, however, there is a workaround using the SVG export.

Someone in the forum asked a great question which I will repeat here:

Q. What is the point of the cutting diagram?

A. Why indeed would you want a cutting diagram? There are a few reasons:
  1. Regardless of whether or not you have a cutting diagram, eventually you are going to have to cut some wood to get a project built. How many boards do you need to buy? If you go by the board feet measured ( or calculated by something like the cutlist plugin) you're going to find that it falls short. Why? because when you to to cut the pieces out of the board, you'll find that you will inevitable have waste. By having the cutting diagram, you can see how much waste there is going to be and you know how much to get when you to the lumber yard.
  2. You've got a lot of parts to cut and you want your parts to be as accurate as possible before you even do anything else to the pieces. Ideally you want one setup for each size of part, so that you can cut each of the parts which are the same size at the same time. The cutting diagram lets you visualize how parts may be laid out to minimize on the cuts and the number of setups.
  3. Ok, you've decided to build your project out of sustainably harvested plantation teak. It's selling for $50/square foot(!) for 3/4". You might be interested in using those $200 boards as efficiently as possible. A cutting diagram may also be used to minimize waste. Even if you have waste if you could have a larger part left over which you could reuse for another project vs having a lot of offcuts, you've saved yourself some money and you are using the planet's resources efficiently and responsibly.

So, to sum up, it gives you more accurate project requirements, it minimizes setup time and shop time spent cutting the boards while increasing accuracy and finally it helps to use the resources as efficiently as possible.

Finally here are some screen shots in case you still can't quite figure out what it does or why you would want it or can't imagine what it looks like.

Starting up cutlist. Highlight your project and select CutList from the plugin menu. Make sure all of the parts in your project are named and are either a component or a group. ( Nested components or groups are handled ok as well)

Image


The screen that comes up allows you to select your cutlist options from the type of output you want, what you want to have included in your parts list, which parts are solid wood parts, which are sheet goods parts and which are hardware

Image


and the next page allows you to select the layout options. There is a general options section, a tab for board options and a tab for sheet options.

Image


Here is a sample of cutlist output. This is the cutting list in html format. This page can be printed.

Image


If you scroll down, then there is a summary of the board feet and the materials and sheet parts and hardware are broken down to their own lists with their own summaries

Image


If you selected the layout output, then another window will open and place all of the selected parts on boards of your choosing in a layout which minimizes waste.

Image


Sheet parts layout is placed on the sheet sizes you specified.

Image


There's lots more. There is built in help on each option. Just click on the blue ? next to the option.

Feel free to pass along any comments, questions, enhancement requests or bug reports. I'm committed to maintaining the plugin and make it as useful as possible.
Cutlist 4.1.1 has now been released. Upgrade from the 4.0.x series.
Download new version from here

If you had the 4.1.0.6pre, there is no change, otherwise lots of good fixes and some enhancements, including better printing, faster output, layout with sawkerfs and cutlist by subassembly.
 
Cutlist and Layout from Sketchup

If you're a fan of Sketchup for creating woodworking models, then the next obvious step is to use Sketchup to help you create cutlists and layouts. Sketchup plugin Cutlist 4.1 does just that. CutList 4.1 sketchup plugin helps you determine how much of each material you need to produce your design, taking into account nominal sized lumber with allowances for finishing to final size. Then it goes one further and lays out all of the pieces on boards or sheet good sizes of your choosing. Then you should be all set to head for the lumber yard to get all of the materials that you will need with no return trips.

CutList 4.1 was beta tested by our very own Lumberjocks and is now ready for download.

It's being released exclusively to Lumberjocks first. You can download v4.1.10 here . This is a completely free plugin. This plugin has been around since about 2005 but continues to be maintained and enhanced. It's got the look and feel of old Woodsmith magazine cutlists and layouts. A very early version v3.3 was reviewed in the Fine Woodworking blog 'Design.Click.Build.' by Dave Richards and a later follow up.

Note that there is now a forum on Lumberjocks for further discussion.

Cutlist 4.1 has been tested with both Skletchup 7, Sketchup 8, SU2013 and SU2014 on both Macs and on Windows PCs.

Installing. There are now 3 ways to install this.

Method 1 (easiest) Get and install it from Sketchup Extension Warehouse
  • Start up Sketchup
  • from Sketchup choose: Window->Extension Warehouse
  • Search for and select 'CutList'
  • click on install ( big red bar on top right)

Method 2 (easy) Download and install it using the Sketchup extension installer
A relative foolproof way to install is now available with the latest versions (from v4.1.6 and up).
  • Download it from link above
  • Start up Sketchup
  • from Sketchup choose: Window->Preferences
  • click on 'Extensions'
  • click on 'Install Extension', hen navigate to and select the .rbz file you just downloaded

Method 3 (if all else fails) This is a two step process and more error prone

  • The file is a .rbz (a zipped ruby source) file. Extract the entire contents into your sketchup plugin directory not just the startup ruby script (srcutlist.rb). There is also a folder called srcutlistui which contains everything else it needs to work properly. The exact locations of the directories required for Sketchup plugins for Windows or Mac are found documented further down in the blog.

Running on a Mac. This is functional. Only the html output window for the layout does not work because of issues with the Safari browser, however, there is a workaround using the SVG export.

Someone in the forum asked a great question which I will repeat here:

Q. What is the point of the cutting diagram?

A. Why indeed would you want a cutting diagram? There are a few reasons:
  1. Regardless of whether or not you have a cutting diagram, eventually you are going to have to cut some wood to get a project built. How many boards do you need to buy? If you go by the board feet measured ( or calculated by something like the cutlist plugin) you're going to find that it falls short. Why? because when you to to cut the pieces out of the board, you'll find that you will inevitable have waste. By having the cutting diagram, you can see how much waste there is going to be and you know how much to get when you to the lumber yard.
  2. You've got a lot of parts to cut and you want your parts to be as accurate as possible before you even do anything else to the pieces. Ideally you want one setup for each size of part, so that you can cut each of the parts which are the same size at the same time. The cutting diagram lets you visualize how parts may be laid out to minimize on the cuts and the number of setups.
  3. Ok, you've decided to build your project out of sustainably harvested plantation teak. It's selling for $50/square foot(!) for 3/4". You might be interested in using those $200 boards as efficiently as possible. A cutting diagram may also be used to minimize waste. Even if you have waste if you could have a larger part left over which you could reuse for another project vs having a lot of offcuts, you've saved yourself some money and you are using the planet's resources efficiently and responsibly.

So, to sum up, it gives you more accurate project requirements, it minimizes setup time and shop time spent cutting the boards while increasing accuracy and finally it helps to use the resources as efficiently as possible.

Finally here are some screen shots in case you still can't quite figure out what it does or why you would want it or can't imagine what it looks like.

Starting up cutlist. Highlight your project and select CutList from the plugin menu. Make sure all of the parts in your project are named and are either a component or a group. ( Nested components or groups are handled ok as well)

Image


The screen that comes up allows you to select your cutlist options from the type of output you want, what you want to have included in your parts list, which parts are solid wood parts, which are sheet goods parts and which are hardware

Image


and the next page allows you to select the layout options. There is a general options section, a tab for board options and a tab for sheet options.

Image


Here is a sample of cutlist output. This is the cutting list in html format. This page can be printed.

Image


If you scroll down, then there is a summary of the board feet and the materials and sheet parts and hardware are broken down to their own lists with their own summaries

Image


If you selected the layout output, then another window will open and place all of the selected parts on boards of your choosing in a layout which minimizes waste.

Image


Sheet parts layout is placed on the sheet sizes you specified.

Image


There's lots more. There is built in help on each option. Just click on the blue ? next to the option.

Feel free to pass along any comments, questions, enhancement requests or bug reports. I'm committed to maintaining the plugin and make it as useful as possible.
Steve,
I've tried about a dozen times now to get the plugin running on my Mac with SU8. Can't seem to get it right. I put the main folder into the plugins folder, and then unzipped. However, each time I start SU, I get an error message stating that there is no such file as cutlist.rb, no such file as cutlist and materials.rb, and no such file as cutlist/reporter.rb. I know they are there, because they show up in finder. Can someone give me a little more detail about the exact steps to install to my Mac? OS is Snow Leopard, latest version.
Thanks much
 
Cutlist and Layout from Sketchup

If you're a fan of Sketchup for creating woodworking models, then the next obvious step is to use Sketchup to help you create cutlists and layouts. Sketchup plugin Cutlist 4.1 does just that. CutList 4.1 sketchup plugin helps you determine how much of each material you need to produce your design, taking into account nominal sized lumber with allowances for finishing to final size. Then it goes one further and lays out all of the pieces on boards or sheet good sizes of your choosing. Then you should be all set to head for the lumber yard to get all of the materials that you will need with no return trips.

CutList 4.1 was beta tested by our very own Lumberjocks and is now ready for download.

It's being released exclusively to Lumberjocks first. You can download v4.1.10 here . This is a completely free plugin. This plugin has been around since about 2005 but continues to be maintained and enhanced. It's got the look and feel of old Woodsmith magazine cutlists and layouts. A very early version v3.3 was reviewed in the Fine Woodworking blog 'Design.Click.Build.' by Dave Richards and a later follow up.

Note that there is now a forum on Lumberjocks for further discussion.

Cutlist 4.1 has been tested with both Skletchup 7, Sketchup 8, SU2013 and SU2014 on both Macs and on Windows PCs.

Installing. There are now 3 ways to install this.

Method 1 (easiest) Get and install it from Sketchup Extension Warehouse
  • Start up Sketchup
  • from Sketchup choose: Window->Extension Warehouse
  • Search for and select 'CutList'
  • click on install ( big red bar on top right)

Method 2 (easy) Download and install it using the Sketchup extension installer
A relative foolproof way to install is now available with the latest versions (from v4.1.6 and up).
  • Download it from link above
  • Start up Sketchup
  • from Sketchup choose: Window->Preferences
  • click on 'Extensions'
  • click on 'Install Extension', hen navigate to and select the .rbz file you just downloaded

Method 3 (if all else fails) This is a two step process and more error prone

  • The file is a .rbz (a zipped ruby source) file. Extract the entire contents into your sketchup plugin directory not just the startup ruby script (srcutlist.rb). There is also a folder called srcutlistui which contains everything else it needs to work properly. The exact locations of the directories required for Sketchup plugins for Windows or Mac are found documented further down in the blog.

Running on a Mac. This is functional. Only the html output window for the layout does not work because of issues with the Safari browser, however, there is a workaround using the SVG export.

Someone in the forum asked a great question which I will repeat here:

Q. What is the point of the cutting diagram?

A. Why indeed would you want a cutting diagram? There are a few reasons:
  1. Regardless of whether or not you have a cutting diagram, eventually you are going to have to cut some wood to get a project built. How many boards do you need to buy? If you go by the board feet measured ( or calculated by something like the cutlist plugin) you're going to find that it falls short. Why? because when you to to cut the pieces out of the board, you'll find that you will inevitable have waste. By having the cutting diagram, you can see how much waste there is going to be and you know how much to get when you to the lumber yard.
  2. You've got a lot of parts to cut and you want your parts to be as accurate as possible before you even do anything else to the pieces. Ideally you want one setup for each size of part, so that you can cut each of the parts which are the same size at the same time. The cutting diagram lets you visualize how parts may be laid out to minimize on the cuts and the number of setups.
  3. Ok, you've decided to build your project out of sustainably harvested plantation teak. It's selling for $50/square foot(!) for 3/4". You might be interested in using those $200 boards as efficiently as possible. A cutting diagram may also be used to minimize waste. Even if you have waste if you could have a larger part left over which you could reuse for another project vs having a lot of offcuts, you've saved yourself some money and you are using the planet's resources efficiently and responsibly.

So, to sum up, it gives you more accurate project requirements, it minimizes setup time and shop time spent cutting the boards while increasing accuracy and finally it helps to use the resources as efficiently as possible.

Finally here are some screen shots in case you still can't quite figure out what it does or why you would want it or can't imagine what it looks like.

Starting up cutlist. Highlight your project and select CutList from the plugin menu. Make sure all of the parts in your project are named and are either a component or a group. ( Nested components or groups are handled ok as well)

Image


The screen that comes up allows you to select your cutlist options from the type of output you want, what you want to have included in your parts list, which parts are solid wood parts, which are sheet goods parts and which are hardware

Image


and the next page allows you to select the layout options. There is a general options section, a tab for board options and a tab for sheet options.

Image


Here is a sample of cutlist output. This is the cutting list in html format. This page can be printed.

Image


If you scroll down, then there is a summary of the board feet and the materials and sheet parts and hardware are broken down to their own lists with their own summaries

Image


If you selected the layout output, then another window will open and place all of the selected parts on boards of your choosing in a layout which minimizes waste.

Image


Sheet parts layout is placed on the sheet sizes you specified.

Image


There's lots more. There is built in help on each option. Just click on the blue ? next to the option.

Feel free to pass along any comments, questions, enhancement requests or bug reports. I'm committed to maintaining the plugin and make it as useful as possible.
Thanks, Dave. I got rid of everything, downloaded again, and tried again. This time, I got it right, and it works like a charm. I'm designing my new shop with SU, and it did a wonderful job of counting the studs, plates, sills, plywood, etc. I'm thrilled, and will be making a contribution to Steve. Thanks, Steve. As we say in the south, Man, is this slick or what?
 
Cutlist and Layout from Sketchup

If you're a fan of Sketchup for creating woodworking models, then the next obvious step is to use Sketchup to help you create cutlists and layouts. Sketchup plugin Cutlist 4.1 does just that. CutList 4.1 sketchup plugin helps you determine how much of each material you need to produce your design, taking into account nominal sized lumber with allowances for finishing to final size. Then it goes one further and lays out all of the pieces on boards or sheet good sizes of your choosing. Then you should be all set to head for the lumber yard to get all of the materials that you will need with no return trips.

CutList 4.1 was beta tested by our very own Lumberjocks and is now ready for download.

It's being released exclusively to Lumberjocks first. You can download v4.1.10 here . This is a completely free plugin. This plugin has been around since about 2005 but continues to be maintained and enhanced. It's got the look and feel of old Woodsmith magazine cutlists and layouts. A very early version v3.3 was reviewed in the Fine Woodworking blog 'Design.Click.Build.' by Dave Richards and a later follow up.

Note that there is now a forum on Lumberjocks for further discussion.

Cutlist 4.1 has been tested with both Skletchup 7, Sketchup 8, SU2013 and SU2014 on both Macs and on Windows PCs.

Installing. There are now 3 ways to install this.

Method 1 (easiest) Get and install it from Sketchup Extension Warehouse
  • Start up Sketchup
  • from Sketchup choose: Window->Extension Warehouse
  • Search for and select 'CutList'
  • click on install ( big red bar on top right)

Method 2 (easy) Download and install it using the Sketchup extension installer
A relative foolproof way to install is now available with the latest versions (from v4.1.6 and up).
  • Download it from link above
  • Start up Sketchup
  • from Sketchup choose: Window->Preferences
  • click on 'Extensions'
  • click on 'Install Extension', hen navigate to and select the .rbz file you just downloaded

Method 3 (if all else fails) This is a two step process and more error prone

  • The file is a .rbz (a zipped ruby source) file. Extract the entire contents into your sketchup plugin directory not just the startup ruby script (srcutlist.rb). There is also a folder called srcutlistui which contains everything else it needs to work properly. The exact locations of the directories required for Sketchup plugins for Windows or Mac are found documented further down in the blog.

Running on a Mac. This is functional. Only the html output window for the layout does not work because of issues with the Safari browser, however, there is a workaround using the SVG export.

Someone in the forum asked a great question which I will repeat here:

Q. What is the point of the cutting diagram?

A. Why indeed would you want a cutting diagram? There are a few reasons:
  1. Regardless of whether or not you have a cutting diagram, eventually you are going to have to cut some wood to get a project built. How many boards do you need to buy? If you go by the board feet measured ( or calculated by something like the cutlist plugin) you're going to find that it falls short. Why? because when you to to cut the pieces out of the board, you'll find that you will inevitable have waste. By having the cutting diagram, you can see how much waste there is going to be and you know how much to get when you to the lumber yard.
  2. You've got a lot of parts to cut and you want your parts to be as accurate as possible before you even do anything else to the pieces. Ideally you want one setup for each size of part, so that you can cut each of the parts which are the same size at the same time. The cutting diagram lets you visualize how parts may be laid out to minimize on the cuts and the number of setups.
  3. Ok, you've decided to build your project out of sustainably harvested plantation teak. It's selling for $50/square foot(!) for 3/4". You might be interested in using those $200 boards as efficiently as possible. A cutting diagram may also be used to minimize waste. Even if you have waste if you could have a larger part left over which you could reuse for another project vs having a lot of offcuts, you've saved yourself some money and you are using the planet's resources efficiently and responsibly.

So, to sum up, it gives you more accurate project requirements, it minimizes setup time and shop time spent cutting the boards while increasing accuracy and finally it helps to use the resources as efficiently as possible.

Finally here are some screen shots in case you still can't quite figure out what it does or why you would want it or can't imagine what it looks like.

Starting up cutlist. Highlight your project and select CutList from the plugin menu. Make sure all of the parts in your project are named and are either a component or a group. ( Nested components or groups are handled ok as well)

Image


The screen that comes up allows you to select your cutlist options from the type of output you want, what you want to have included in your parts list, which parts are solid wood parts, which are sheet goods parts and which are hardware

Image


and the next page allows you to select the layout options. There is a general options section, a tab for board options and a tab for sheet options.

Image


Here is a sample of cutlist output. This is the cutting list in html format. This page can be printed.

Image


If you scroll down, then there is a summary of the board feet and the materials and sheet parts and hardware are broken down to their own lists with their own summaries

Image


If you selected the layout output, then another window will open and place all of the selected parts on boards of your choosing in a layout which minimizes waste.

Image


Sheet parts layout is placed on the sheet sizes you specified.

Image


There's lots more. There is built in help on each option. Just click on the blue ? next to the option.

Feel free to pass along any comments, questions, enhancement requests or bug reports. I'm committed to maintaining the plugin and make it as useful as possible.
great job
 
Cutlist and Layout from Sketchup

If you're a fan of Sketchup for creating woodworking models, then the next obvious step is to use Sketchup to help you create cutlists and layouts. Sketchup plugin Cutlist 4.1 does just that. CutList 4.1 sketchup plugin helps you determine how much of each material you need to produce your design, taking into account nominal sized lumber with allowances for finishing to final size. Then it goes one further and lays out all of the pieces on boards or sheet good sizes of your choosing. Then you should be all set to head for the lumber yard to get all of the materials that you will need with no return trips.

CutList 4.1 was beta tested by our very own Lumberjocks and is now ready for download.

It's being released exclusively to Lumberjocks first. You can download v4.1.10 here . This is a completely free plugin. This plugin has been around since about 2005 but continues to be maintained and enhanced. It's got the look and feel of old Woodsmith magazine cutlists and layouts. A very early version v3.3 was reviewed in the Fine Woodworking blog 'Design.Click.Build.' by Dave Richards and a later follow up.

Note that there is now a forum on Lumberjocks for further discussion.

Cutlist 4.1 has been tested with both Skletchup 7, Sketchup 8, SU2013 and SU2014 on both Macs and on Windows PCs.

Installing. There are now 3 ways to install this.

Method 1 (easiest) Get and install it from Sketchup Extension Warehouse
  • Start up Sketchup
  • from Sketchup choose: Window->Extension Warehouse
  • Search for and select 'CutList'
  • click on install ( big red bar on top right)

Method 2 (easy) Download and install it using the Sketchup extension installer
A relative foolproof way to install is now available with the latest versions (from v4.1.6 and up).
  • Download it from link above
  • Start up Sketchup
  • from Sketchup choose: Window->Preferences
  • click on 'Extensions'
  • click on 'Install Extension', hen navigate to and select the .rbz file you just downloaded

Method 3 (if all else fails) This is a two step process and more error prone

  • The file is a .rbz (a zipped ruby source) file. Extract the entire contents into your sketchup plugin directory not just the startup ruby script (srcutlist.rb). There is also a folder called srcutlistui which contains everything else it needs to work properly. The exact locations of the directories required for Sketchup plugins for Windows or Mac are found documented further down in the blog.

Running on a Mac. This is functional. Only the html output window for the layout does not work because of issues with the Safari browser, however, there is a workaround using the SVG export.

Someone in the forum asked a great question which I will repeat here:

Q. What is the point of the cutting diagram?

A. Why indeed would you want a cutting diagram? There are a few reasons:
  1. Regardless of whether or not you have a cutting diagram, eventually you are going to have to cut some wood to get a project built. How many boards do you need to buy? If you go by the board feet measured ( or calculated by something like the cutlist plugin) you're going to find that it falls short. Why? because when you to to cut the pieces out of the board, you'll find that you will inevitable have waste. By having the cutting diagram, you can see how much waste there is going to be and you know how much to get when you to the lumber yard.
  2. You've got a lot of parts to cut and you want your parts to be as accurate as possible before you even do anything else to the pieces. Ideally you want one setup for each size of part, so that you can cut each of the parts which are the same size at the same time. The cutting diagram lets you visualize how parts may be laid out to minimize on the cuts and the number of setups.
  3. Ok, you've decided to build your project out of sustainably harvested plantation teak. It's selling for $50/square foot(!) for 3/4". You might be interested in using those $200 boards as efficiently as possible. A cutting diagram may also be used to minimize waste. Even if you have waste if you could have a larger part left over which you could reuse for another project vs having a lot of offcuts, you've saved yourself some money and you are using the planet's resources efficiently and responsibly.

So, to sum up, it gives you more accurate project requirements, it minimizes setup time and shop time spent cutting the boards while increasing accuracy and finally it helps to use the resources as efficiently as possible.

Finally here are some screen shots in case you still can't quite figure out what it does or why you would want it or can't imagine what it looks like.

Starting up cutlist. Highlight your project and select CutList from the plugin menu. Make sure all of the parts in your project are named and are either a component or a group. ( Nested components or groups are handled ok as well)

Image


The screen that comes up allows you to select your cutlist options from the type of output you want, what you want to have included in your parts list, which parts are solid wood parts, which are sheet goods parts and which are hardware

Image


and the next page allows you to select the layout options. There is a general options section, a tab for board options and a tab for sheet options.

Image


Here is a sample of cutlist output. This is the cutting list in html format. This page can be printed.

Image


If you scroll down, then there is a summary of the board feet and the materials and sheet parts and hardware are broken down to their own lists with their own summaries

Image


If you selected the layout output, then another window will open and place all of the selected parts on boards of your choosing in a layout which minimizes waste.

Image


Sheet parts layout is placed on the sheet sizes you specified.

Image


There's lots more. There is built in help on each option. Just click on the blue ? next to the option.

Feel free to pass along any comments, questions, enhancement requests or bug reports. I'm committed to maintaining the plugin and make it as useful as possible.
OK,, I might be a little dumb, but I cannot find the location to import the .rb and cutlist folder onto my iMac.

In the blog you state "The exact locations of the directories required for Sketchup plugins for Windows or Mac are found documented further down in the blog " I also cannot find this instruction.

The only location I can find - is the Sketchup folder, containing the sketchup application, this does not work and I am sure it is not as simple as this.

Any help would be appreciated
 
Discussion starter · #257 ·
Cutlist and Layout from Sketchup

If you're a fan of Sketchup for creating woodworking models, then the next obvious step is to use Sketchup to help you create cutlists and layouts. Sketchup plugin Cutlist 4.1 does just that. CutList 4.1 sketchup plugin helps you determine how much of each material you need to produce your design, taking into account nominal sized lumber with allowances for finishing to final size. Then it goes one further and lays out all of the pieces on boards or sheet good sizes of your choosing. Then you should be all set to head for the lumber yard to get all of the materials that you will need with no return trips.

CutList 4.1 was beta tested by our very own Lumberjocks and is now ready for download.

It's being released exclusively to Lumberjocks first. You can download v4.1.10 here . This is a completely free plugin. This plugin has been around since about 2005 but continues to be maintained and enhanced. It's got the look and feel of old Woodsmith magazine cutlists and layouts. A very early version v3.3 was reviewed in the Fine Woodworking blog 'Design.Click.Build.' by Dave Richards and a later follow up.

Note that there is now a forum on Lumberjocks for further discussion.

Cutlist 4.1 has been tested with both Skletchup 7, Sketchup 8, SU2013 and SU2014 on both Macs and on Windows PCs.

Installing. There are now 3 ways to install this.

Method 1 (easiest) Get and install it from Sketchup Extension Warehouse
  • Start up Sketchup
  • from Sketchup choose: Window->Extension Warehouse
  • Search for and select 'CutList'
  • click on install ( big red bar on top right)

Method 2 (easy) Download and install it using the Sketchup extension installer
A relative foolproof way to install is now available with the latest versions (from v4.1.6 and up).
  • Download it from link above
  • Start up Sketchup
  • from Sketchup choose: Window->Preferences
  • click on 'Extensions'
  • click on 'Install Extension', hen navigate to and select the .rbz file you just downloaded

Method 3 (if all else fails) This is a two step process and more error prone

  • The file is a .rbz (a zipped ruby source) file. Extract the entire contents into your sketchup plugin directory not just the startup ruby script (srcutlist.rb). There is also a folder called srcutlistui which contains everything else it needs to work properly. The exact locations of the directories required for Sketchup plugins for Windows or Mac are found documented further down in the blog.

Running on a Mac. This is functional. Only the html output window for the layout does not work because of issues with the Safari browser, however, there is a workaround using the SVG export.

Someone in the forum asked a great question which I will repeat here:

Q. What is the point of the cutting diagram?

A. Why indeed would you want a cutting diagram? There are a few reasons:
  1. Regardless of whether or not you have a cutting diagram, eventually you are going to have to cut some wood to get a project built. How many boards do you need to buy? If you go by the board feet measured ( or calculated by something like the cutlist plugin) you're going to find that it falls short. Why? because when you to to cut the pieces out of the board, you'll find that you will inevitable have waste. By having the cutting diagram, you can see how much waste there is going to be and you know how much to get when you to the lumber yard.
  2. You've got a lot of parts to cut and you want your parts to be as accurate as possible before you even do anything else to the pieces. Ideally you want one setup for each size of part, so that you can cut each of the parts which are the same size at the same time. The cutting diagram lets you visualize how parts may be laid out to minimize on the cuts and the number of setups.
  3. Ok, you've decided to build your project out of sustainably harvested plantation teak. It's selling for $50/square foot(!) for 3/4". You might be interested in using those $200 boards as efficiently as possible. A cutting diagram may also be used to minimize waste. Even if you have waste if you could have a larger part left over which you could reuse for another project vs having a lot of offcuts, you've saved yourself some money and you are using the planet's resources efficiently and responsibly.

So, to sum up, it gives you more accurate project requirements, it minimizes setup time and shop time spent cutting the boards while increasing accuracy and finally it helps to use the resources as efficiently as possible.

Finally here are some screen shots in case you still can't quite figure out what it does or why you would want it or can't imagine what it looks like.

Starting up cutlist. Highlight your project and select CutList from the plugin menu. Make sure all of the parts in your project are named and are either a component or a group. ( Nested components or groups are handled ok as well)

Image


The screen that comes up allows you to select your cutlist options from the type of output you want, what you want to have included in your parts list, which parts are solid wood parts, which are sheet goods parts and which are hardware

Image


and the next page allows you to select the layout options. There is a general options section, a tab for board options and a tab for sheet options.

Image


Here is a sample of cutlist output. This is the cutting list in html format. This page can be printed.

Image


If you scroll down, then there is a summary of the board feet and the materials and sheet parts and hardware are broken down to their own lists with their own summaries

Image


If you selected the layout output, then another window will open and place all of the selected parts on boards of your choosing in a layout which minimizes waste.

Image


Sheet parts layout is placed on the sheet sizes you specified.

Image


There's lots more. There is built in help on each option. Just click on the blue ? next to the option.

Feel free to pass along any comments, questions, enhancement requests or bug reports. I'm committed to maintaining the plugin and make it as useful as possible.
Hi Tony,

It was back there on post #39 of the blog. I've updated it below for sketchup 8 , though the general idea is always the same - plugins are installed in to the plugins directory of the current version of the Sketchup installation files ( this is true for any plugin you install).

The default location of the Plugins folder in Windows is:

c:\program files\google\google sketchup 8\plugins\

and for a Mac:

Macintosh HD/Library/Application Support/Google SketchUp 8/SketchUp/

The original reference is here in an article how to install a plugin
 
Cutlist and Layout from Sketchup

If you're a fan of Sketchup for creating woodworking models, then the next obvious step is to use Sketchup to help you create cutlists and layouts. Sketchup plugin Cutlist 4.1 does just that. CutList 4.1 sketchup plugin helps you determine how much of each material you need to produce your design, taking into account nominal sized lumber with allowances for finishing to final size. Then it goes one further and lays out all of the pieces on boards or sheet good sizes of your choosing. Then you should be all set to head for the lumber yard to get all of the materials that you will need with no return trips.

CutList 4.1 was beta tested by our very own Lumberjocks and is now ready for download.

It's being released exclusively to Lumberjocks first. You can download v4.1.10 here . This is a completely free plugin. This plugin has been around since about 2005 but continues to be maintained and enhanced. It's got the look and feel of old Woodsmith magazine cutlists and layouts. A very early version v3.3 was reviewed in the Fine Woodworking blog 'Design.Click.Build.' by Dave Richards and a later follow up.

Note that there is now a forum on Lumberjocks for further discussion.

Cutlist 4.1 has been tested with both Skletchup 7, Sketchup 8, SU2013 and SU2014 on both Macs and on Windows PCs.

Installing. There are now 3 ways to install this.

Method 1 (easiest) Get and install it from Sketchup Extension Warehouse
  • Start up Sketchup
  • from Sketchup choose: Window->Extension Warehouse
  • Search for and select 'CutList'
  • click on install ( big red bar on top right)

Method 2 (easy) Download and install it using the Sketchup extension installer
A relative foolproof way to install is now available with the latest versions (from v4.1.6 and up).
  • Download it from link above
  • Start up Sketchup
  • from Sketchup choose: Window->Preferences
  • click on 'Extensions'
  • click on 'Install Extension', hen navigate to and select the .rbz file you just downloaded

Method 3 (if all else fails) This is a two step process and more error prone

  • The file is a .rbz (a zipped ruby source) file. Extract the entire contents into your sketchup plugin directory not just the startup ruby script (srcutlist.rb). There is also a folder called srcutlistui which contains everything else it needs to work properly. The exact locations of the directories required for Sketchup plugins for Windows or Mac are found documented further down in the blog.

Running on a Mac. This is functional. Only the html output window for the layout does not work because of issues with the Safari browser, however, there is a workaround using the SVG export.

Someone in the forum asked a great question which I will repeat here:

Q. What is the point of the cutting diagram?

A. Why indeed would you want a cutting diagram? There are a few reasons:
  1. Regardless of whether or not you have a cutting diagram, eventually you are going to have to cut some wood to get a project built. How many boards do you need to buy? If you go by the board feet measured ( or calculated by something like the cutlist plugin) you're going to find that it falls short. Why? because when you to to cut the pieces out of the board, you'll find that you will inevitable have waste. By having the cutting diagram, you can see how much waste there is going to be and you know how much to get when you to the lumber yard.
  2. You've got a lot of parts to cut and you want your parts to be as accurate as possible before you even do anything else to the pieces. Ideally you want one setup for each size of part, so that you can cut each of the parts which are the same size at the same time. The cutting diagram lets you visualize how parts may be laid out to minimize on the cuts and the number of setups.
  3. Ok, you've decided to build your project out of sustainably harvested plantation teak. It's selling for $50/square foot(!) for 3/4". You might be interested in using those $200 boards as efficiently as possible. A cutting diagram may also be used to minimize waste. Even if you have waste if you could have a larger part left over which you could reuse for another project vs having a lot of offcuts, you've saved yourself some money and you are using the planet's resources efficiently and responsibly.

So, to sum up, it gives you more accurate project requirements, it minimizes setup time and shop time spent cutting the boards while increasing accuracy and finally it helps to use the resources as efficiently as possible.

Finally here are some screen shots in case you still can't quite figure out what it does or why you would want it or can't imagine what it looks like.

Starting up cutlist. Highlight your project and select CutList from the plugin menu. Make sure all of the parts in your project are named and are either a component or a group. ( Nested components or groups are handled ok as well)

Image


The screen that comes up allows you to select your cutlist options from the type of output you want, what you want to have included in your parts list, which parts are solid wood parts, which are sheet goods parts and which are hardware

Image


and the next page allows you to select the layout options. There is a general options section, a tab for board options and a tab for sheet options.

Image


Here is a sample of cutlist output. This is the cutting list in html format. This page can be printed.

Image


If you scroll down, then there is a summary of the board feet and the materials and sheet parts and hardware are broken down to their own lists with their own summaries

Image


If you selected the layout output, then another window will open and place all of the selected parts on boards of your choosing in a layout which minimizes waste.

Image


Sheet parts layout is placed on the sheet sizes you specified.

Image


There's lots more. There is built in help on each option. Just click on the blue ? next to the option.

Feel free to pass along any comments, questions, enhancement requests or bug reports. I'm committed to maintaining the plugin and make it as useful as possible.
This is a very timely post, as I just updated to Cutlist 4.1 and had completely forgotten where to put the update. I fumbled around and got it to work, but now… I have two Cutlists in my Plugins menu! Any idea how to get rid of that?

And, Steve, I can't say it enough times, Cutlist is a lifesaver. Thanks for all your hard work!
 
Cutlist and Layout from Sketchup

If you're a fan of Sketchup for creating woodworking models, then the next obvious step is to use Sketchup to help you create cutlists and layouts. Sketchup plugin Cutlist 4.1 does just that. CutList 4.1 sketchup plugin helps you determine how much of each material you need to produce your design, taking into account nominal sized lumber with allowances for finishing to final size. Then it goes one further and lays out all of the pieces on boards or sheet good sizes of your choosing. Then you should be all set to head for the lumber yard to get all of the materials that you will need with no return trips.

CutList 4.1 was beta tested by our very own Lumberjocks and is now ready for download.

It's being released exclusively to Lumberjocks first. You can download v4.1.10 here . This is a completely free plugin. This plugin has been around since about 2005 but continues to be maintained and enhanced. It's got the look and feel of old Woodsmith magazine cutlists and layouts. A very early version v3.3 was reviewed in the Fine Woodworking blog 'Design.Click.Build.' by Dave Richards and a later follow up.

Note that there is now a forum on Lumberjocks for further discussion.

Cutlist 4.1 has been tested with both Skletchup 7, Sketchup 8, SU2013 and SU2014 on both Macs and on Windows PCs.

Installing. There are now 3 ways to install this.

Method 1 (easiest) Get and install it from Sketchup Extension Warehouse
  • Start up Sketchup
  • from Sketchup choose: Window->Extension Warehouse
  • Search for and select 'CutList'
  • click on install ( big red bar on top right)

Method 2 (easy) Download and install it using the Sketchup extension installer
A relative foolproof way to install is now available with the latest versions (from v4.1.6 and up).
  • Download it from link above
  • Start up Sketchup
  • from Sketchup choose: Window->Preferences
  • click on 'Extensions'
  • click on 'Install Extension', hen navigate to and select the .rbz file you just downloaded

Method 3 (if all else fails) This is a two step process and more error prone

  • The file is a .rbz (a zipped ruby source) file. Extract the entire contents into your sketchup plugin directory not just the startup ruby script (srcutlist.rb). There is also a folder called srcutlistui which contains everything else it needs to work properly. The exact locations of the directories required for Sketchup plugins for Windows or Mac are found documented further down in the blog.

Running on a Mac. This is functional. Only the html output window for the layout does not work because of issues with the Safari browser, however, there is a workaround using the SVG export.

Someone in the forum asked a great question which I will repeat here:

Q. What is the point of the cutting diagram?

A. Why indeed would you want a cutting diagram? There are a few reasons:
  1. Regardless of whether or not you have a cutting diagram, eventually you are going to have to cut some wood to get a project built. How many boards do you need to buy? If you go by the board feet measured ( or calculated by something like the cutlist plugin) you're going to find that it falls short. Why? because when you to to cut the pieces out of the board, you'll find that you will inevitable have waste. By having the cutting diagram, you can see how much waste there is going to be and you know how much to get when you to the lumber yard.
  2. You've got a lot of parts to cut and you want your parts to be as accurate as possible before you even do anything else to the pieces. Ideally you want one setup for each size of part, so that you can cut each of the parts which are the same size at the same time. The cutting diagram lets you visualize how parts may be laid out to minimize on the cuts and the number of setups.
  3. Ok, you've decided to build your project out of sustainably harvested plantation teak. It's selling for $50/square foot(!) for 3/4". You might be interested in using those $200 boards as efficiently as possible. A cutting diagram may also be used to minimize waste. Even if you have waste if you could have a larger part left over which you could reuse for another project vs having a lot of offcuts, you've saved yourself some money and you are using the planet's resources efficiently and responsibly.

So, to sum up, it gives you more accurate project requirements, it minimizes setup time and shop time spent cutting the boards while increasing accuracy and finally it helps to use the resources as efficiently as possible.

Finally here are some screen shots in case you still can't quite figure out what it does or why you would want it or can't imagine what it looks like.

Starting up cutlist. Highlight your project and select CutList from the plugin menu. Make sure all of the parts in your project are named and are either a component or a group. ( Nested components or groups are handled ok as well)

Image


The screen that comes up allows you to select your cutlist options from the type of output you want, what you want to have included in your parts list, which parts are solid wood parts, which are sheet goods parts and which are hardware

Image


and the next page allows you to select the layout options. There is a general options section, a tab for board options and a tab for sheet options.

Image


Here is a sample of cutlist output. This is the cutting list in html format. This page can be printed.

Image


If you scroll down, then there is a summary of the board feet and the materials and sheet parts and hardware are broken down to their own lists with their own summaries

Image


If you selected the layout output, then another window will open and place all of the selected parts on boards of your choosing in a layout which minimizes waste.

Image


Sheet parts layout is placed on the sheet sizes you specified.

Image


There's lots more. There is built in help on each option. Just click on the blue ? next to the option.

Feel free to pass along any comments, questions, enhancement requests or bug reports. I'm committed to maintaining the plugin and make it as useful as possible.
Thanks Steve - Installed and working in just a few seconds.
 
Discussion starter · #260 ·
Cutlist and Layout from Sketchup

If you're a fan of Sketchup for creating woodworking models, then the next obvious step is to use Sketchup to help you create cutlists and layouts. Sketchup plugin Cutlist 4.1 does just that. CutList 4.1 sketchup plugin helps you determine how much of each material you need to produce your design, taking into account nominal sized lumber with allowances for finishing to final size. Then it goes one further and lays out all of the pieces on boards or sheet good sizes of your choosing. Then you should be all set to head for the lumber yard to get all of the materials that you will need with no return trips.

CutList 4.1 was beta tested by our very own Lumberjocks and is now ready for download.

It's being released exclusively to Lumberjocks first. You can download v4.1.10 here . This is a completely free plugin. This plugin has been around since about 2005 but continues to be maintained and enhanced. It's got the look and feel of old Woodsmith magazine cutlists and layouts. A very early version v3.3 was reviewed in the Fine Woodworking blog 'Design.Click.Build.' by Dave Richards and a later follow up.

Note that there is now a forum on Lumberjocks for further discussion.

Cutlist 4.1 has been tested with both Skletchup 7, Sketchup 8, SU2013 and SU2014 on both Macs and on Windows PCs.

Installing. There are now 3 ways to install this.

Method 1 (easiest) Get and install it from Sketchup Extension Warehouse
  • Start up Sketchup
  • from Sketchup choose: Window->Extension Warehouse
  • Search for and select 'CutList'
  • click on install ( big red bar on top right)

Method 2 (easy) Download and install it using the Sketchup extension installer
A relative foolproof way to install is now available with the latest versions (from v4.1.6 and up).
  • Download it from link above
  • Start up Sketchup
  • from Sketchup choose: Window->Preferences
  • click on 'Extensions'
  • click on 'Install Extension', hen navigate to and select the .rbz file you just downloaded

Method 3 (if all else fails) This is a two step process and more error prone

  • The file is a .rbz (a zipped ruby source) file. Extract the entire contents into your sketchup plugin directory not just the startup ruby script (srcutlist.rb). There is also a folder called srcutlistui which contains everything else it needs to work properly. The exact locations of the directories required for Sketchup plugins for Windows or Mac are found documented further down in the blog.

Running on a Mac. This is functional. Only the html output window for the layout does not work because of issues with the Safari browser, however, there is a workaround using the SVG export.

Someone in the forum asked a great question which I will repeat here:

Q. What is the point of the cutting diagram?

A. Why indeed would you want a cutting diagram? There are a few reasons:
  1. Regardless of whether or not you have a cutting diagram, eventually you are going to have to cut some wood to get a project built. How many boards do you need to buy? If you go by the board feet measured ( or calculated by something like the cutlist plugin) you're going to find that it falls short. Why? because when you to to cut the pieces out of the board, you'll find that you will inevitable have waste. By having the cutting diagram, you can see how much waste there is going to be and you know how much to get when you to the lumber yard.
  2. You've got a lot of parts to cut and you want your parts to be as accurate as possible before you even do anything else to the pieces. Ideally you want one setup for each size of part, so that you can cut each of the parts which are the same size at the same time. The cutting diagram lets you visualize how parts may be laid out to minimize on the cuts and the number of setups.
  3. Ok, you've decided to build your project out of sustainably harvested plantation teak. It's selling for $50/square foot(!) for 3/4". You might be interested in using those $200 boards as efficiently as possible. A cutting diagram may also be used to minimize waste. Even if you have waste if you could have a larger part left over which you could reuse for another project vs having a lot of offcuts, you've saved yourself some money and you are using the planet's resources efficiently and responsibly.

So, to sum up, it gives you more accurate project requirements, it minimizes setup time and shop time spent cutting the boards while increasing accuracy and finally it helps to use the resources as efficiently as possible.

Finally here are some screen shots in case you still can't quite figure out what it does or why you would want it or can't imagine what it looks like.

Starting up cutlist. Highlight your project and select CutList from the plugin menu. Make sure all of the parts in your project are named and are either a component or a group. ( Nested components or groups are handled ok as well)

Image


The screen that comes up allows you to select your cutlist options from the type of output you want, what you want to have included in your parts list, which parts are solid wood parts, which are sheet goods parts and which are hardware

Image


and the next page allows you to select the layout options. There is a general options section, a tab for board options and a tab for sheet options.

Image


Here is a sample of cutlist output. This is the cutting list in html format. This page can be printed.

Image


If you scroll down, then there is a summary of the board feet and the materials and sheet parts and hardware are broken down to their own lists with their own summaries

Image


If you selected the layout output, then another window will open and place all of the selected parts on boards of your choosing in a layout which minimizes waste.

Image


Sheet parts layout is placed on the sheet sizes you specified.

Image


There's lots more. There is built in help on each option. Just click on the blue ? next to the option.

Feel free to pass along any comments, questions, enhancement requests or bug reports. I'm committed to maintaining the plugin and make it as useful as possible.
Tony - glad to hear that it is working!

tooold - You need to make sure you've deleted the older copy. Between the 4.0.x series and 4.1, the plugin was restructured, renamed etc. Make sure CutListAndMaterials.rb is removed and make sure the 'cutlistui' folder is removed.

A reader reading Dave Richard's blog over on Design.Click.Build compiled a nice detailed set of instructions for the upgrade ( for my part, I promise to make this easier in the future with some sort of automatic installer)

instructions for upgrading to 4.1 Look for a post from fidelfs.
 
241 - 260 of 320 Posts