Overview
Needing an Intervention?
I like to plan and build things from wood…the more complicated, the better! I especially enjoy building small boats. Previous boat builds included a tandem sea kayak, single racing kayak, single recreation kayak, mini ski boat, single performance/play kayak, skin-on-frame rowing shell, and three duck hunting layout boats. I even built a teardrop camper in 2016.
I recently finished part of my basement and lost some of my small boat storage. That leaves me with space for two kayaks on the ceiling, my rowing shell and triple kayak on the wall, and my Grumman Sportboat in the third stall of the garage. My wife's single kayak occupies one space on the ceiling and that leaves me with one spot for a rereational kayak.
Can One Boat Do it All?
Having moved back to MN six years ago, I've settled into a number of outdoor activities that I enjoy a lot. These include fishing for northern pike, hunting ducks, kayaking on Lake Superior, and sailing.
![Image]()
I netted this 32" northern pike for my wife when we were kayak fishing. She didn't have her own net as she had yet to experience the thrill of landing a toothy pike from a kayak and wasn't "all in." She has one now!
![Image]()
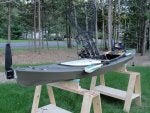
I caught this 38" northern pike while fishing from my Grumman Sportboat.
![Image]()
I've spent a lot of time searching for a boat that could safely and comfortably do all of these activities and I think the Chesapeake Light Craft Wood Duck Double kayak would work quite well. I sold my duck hunting layout boat and a solo canoe with a nice duck blind a few weeks ago. I'll sell my Current Designs Solara 135 fishing kayak after I complete the build of the new kayak. The kit will arrive in the next few days. I hope to complete the build in about a month…that could be wishful thinking since I'm also in the final stages of finishing my basement!!!
Next
Why the Wood Duck Double will make a good Lake Superior kayak.
Needing an Intervention?
I like to plan and build things from wood…the more complicated, the better! I especially enjoy building small boats. Previous boat builds included a tandem sea kayak, single racing kayak, single recreation kayak, mini ski boat, single performance/play kayak, skin-on-frame rowing shell, and three duck hunting layout boats. I even built a teardrop camper in 2016.
I recently finished part of my basement and lost some of my small boat storage. That leaves me with space for two kayaks on the ceiling, my rowing shell and triple kayak on the wall, and my Grumman Sportboat in the third stall of the garage. My wife's single kayak occupies one space on the ceiling and that leaves me with one spot for a rereational kayak.
Can One Boat Do it All?
Having moved back to MN six years ago, I've settled into a number of outdoor activities that I enjoy a lot. These include fishing for northern pike, hunting ducks, kayaking on Lake Superior, and sailing.
I netted this 32" northern pike for my wife when we were kayak fishing. She didn't have her own net as she had yet to experience the thrill of landing a toothy pike from a kayak and wasn't "all in." She has one now!
I caught this 38" northern pike while fishing from my Grumman Sportboat.
I've spent a lot of time searching for a boat that could safely and comfortably do all of these activities and I think the Chesapeake Light Craft Wood Duck Double kayak would work quite well. I sold my duck hunting layout boat and a solo canoe with a nice duck blind a few weeks ago. I'll sell my Current Designs Solara 135 fishing kayak after I complete the build of the new kayak. The kit will arrive in the next few days. I hope to complete the build in about a month…that could be wishful thinking since I'm also in the final stages of finishing my basement!!!
Next
Why the Wood Duck Double will make a good Lake Superior kayak.