First you gotta do some thinking...and find iron
During the recent posting by Bertha on the hand planes of our dreams, the issue of wooden shoulder planes came up. I had some requests and PM's to blog on the making of a wooden shoulder plane so I will give it my best shot. Be warned, I work in the metric system so measurements are in millimeters. For those who use King George's thumb to measure, dividing by 25.4 will at least give decimal inches. I'll gladly answer any question but have patience: No computer will survive in my dusty workshop and I spend all my days there. It means that my computer habits are such that I only sit in front of this screen at night. Throw in the time difference and my response times get pretty slow, about once every 24 hours…..but respond I will. Promise.
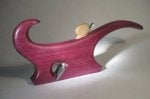
Just so you know where we are going, this is what we want to end up with:
![Image]()
As you can see, this is not a very big plane, only around 115 mm (4,5") long. I've been into building smaller and smaller planes lately…
Some planning and scavenging for a plane iron.
The first thing to do is to decide on the width of the plane, or maybe the width of the plane iron will decide for us…. Since the width of the plane iron or blade will determine the width of the wooden plane body, we need to find ourselves an iron first. There are various ways to do this. If you live in the States, it can be as simple as buying the one that you want. If you don't have much money or you live in Africa like me, that option does not exist and you need to get creative. There are a few ways to skin the cat.
1. Find an old plane iron and cut out of it what you want. If you choose to go this route, use an angle grinder fitted with a slim cutting disc. Keep the iron as cool as possible whilst cutting; do it in steps and submerge the blade often in cold water to prevent it from heating up. Too much heat will alter the properties of the steel.
2. Use an old spade drill bit. Since the round shaft needs to be flat and the same thickness as the spade part, this method requires a lot of grinding. Again, keep the steel as cool as possible during the grinding process.
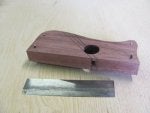
3. Use old HSS jointer or planer knifes. I've been going this route lately with much success. A big advantage with HSS is that it can be cut and ground without concern over altering the materials properties due to excessive heat. Even if it becomes red hot, no worries! Some will say that it is too hard for a plane blade and in a way they are right. You won't be able to hone an extremely fine edge like you can with good tool steel. But believe me, for what we want to do it is good enough. More benefits of the HSS are that it will stay sharp for much longer and the stuff is nice and thick, typically 3mm. Thick is good!
A disadvantage of using old jointer knifes is that they are never very wide; we are after all talking about worn out cutters. I've been making lots of small planes of late so it not a problem for me. If you don't have worn out knifes in your shop, ask at a sharpening service or a large commercial woodworking shop.
The plane body - what wood to use.
Although Beech was traditionally much used for planes, any good hardwood will do just fine. I've used Maple, Paduak, Wenge, Purpleheart and some of our indigenous woods like Ironwood, Pink Ivory and Candlewood. It is best, but not critical, to have the growth rings running vertical in your plane body. This makes for a better wearing plane. You can even get fancy and add a sole of different wood, or something exotic and hardwearing like ebony or ivory. Yes, I know there is a moral issue with ivory and it's impossible to find. Or not? Old pianos had real ivory on their keys. Keep your eyes open for a scrapped piano! I have some ivory pieces obtained that way.You can also use bone but that is a story for another time…
I leave you to go hunting for some metal and some timber….next we get down to building this thing!
During the recent posting by Bertha on the hand planes of our dreams, the issue of wooden shoulder planes came up. I had some requests and PM's to blog on the making of a wooden shoulder plane so I will give it my best shot. Be warned, I work in the metric system so measurements are in millimeters. For those who use King George's thumb to measure, dividing by 25.4 will at least give decimal inches. I'll gladly answer any question but have patience: No computer will survive in my dusty workshop and I spend all my days there. It means that my computer habits are such that I only sit in front of this screen at night. Throw in the time difference and my response times get pretty slow, about once every 24 hours…..but respond I will. Promise.
Just so you know where we are going, this is what we want to end up with:
As you can see, this is not a very big plane, only around 115 mm (4,5") long. I've been into building smaller and smaller planes lately…
Some planning and scavenging for a plane iron.
The first thing to do is to decide on the width of the plane, or maybe the width of the plane iron will decide for us…. Since the width of the plane iron or blade will determine the width of the wooden plane body, we need to find ourselves an iron first. There are various ways to do this. If you live in the States, it can be as simple as buying the one that you want. If you don't have much money or you live in Africa like me, that option does not exist and you need to get creative. There are a few ways to skin the cat.
1. Find an old plane iron and cut out of it what you want. If you choose to go this route, use an angle grinder fitted with a slim cutting disc. Keep the iron as cool as possible whilst cutting; do it in steps and submerge the blade often in cold water to prevent it from heating up. Too much heat will alter the properties of the steel.
2. Use an old spade drill bit. Since the round shaft needs to be flat and the same thickness as the spade part, this method requires a lot of grinding. Again, keep the steel as cool as possible during the grinding process.
3. Use old HSS jointer or planer knifes. I've been going this route lately with much success. A big advantage with HSS is that it can be cut and ground without concern over altering the materials properties due to excessive heat. Even if it becomes red hot, no worries! Some will say that it is too hard for a plane blade and in a way they are right. You won't be able to hone an extremely fine edge like you can with good tool steel. But believe me, for what we want to do it is good enough. More benefits of the HSS are that it will stay sharp for much longer and the stuff is nice and thick, typically 3mm. Thick is good!
A disadvantage of using old jointer knifes is that they are never very wide; we are after all talking about worn out cutters. I've been making lots of small planes of late so it not a problem for me. If you don't have worn out knifes in your shop, ask at a sharpening service or a large commercial woodworking shop.
The plane body - what wood to use.
Although Beech was traditionally much used for planes, any good hardwood will do just fine. I've used Maple, Paduak, Wenge, Purpleheart and some of our indigenous woods like Ironwood, Pink Ivory and Candlewood. It is best, but not critical, to have the growth rings running vertical in your plane body. This makes for a better wearing plane. You can even get fancy and add a sole of different wood, or something exotic and hardwearing like ebony or ivory. Yes, I know there is a moral issue with ivory and it's impossible to find. Or not? Old pianos had real ivory on their keys. Keep your eyes open for a scrapped piano! I have some ivory pieces obtained that way.You can also use bone but that is a story for another time…
I leave you to go hunting for some metal and some timber….next we get down to building this thing!