LumberJocks Woodworking Forum banner

Toe "nailing" with screws, is this basically a pocket hole joint?

24K views 34 replies 12 participants last post by  Wood_Scraps  
#1 · (Edited by Moderator)
Wife wanted me to build a chicken coop this spring/summer. Been knocking it out here and there, and pretty much ready to do the final assembly.

I haven't done much in the space of roofing. Cut the joists with a big tapering jig I put together. And figuring I'll just toe "nail" them with screws. Which seems to be a fairly common practice.

I'm not really looking for an alternative or anything. But in thinking about it, isn't this basically just the equivalent of a pocket hole joint? And, if so, would it be reasonable to use my kreg jig to pre-drill the holes to better hide the screw heads?

Could be a dumb question. I'm ok with that. Just curious whether my logic meter is properly calibrated.
 
#3 ·
Pocket hole is better than toe nailing. I used my pocket hole jig for some framing

- corelz125
Good to know. FWIW, I wasn't planning on nailing. Was going to do screws no matter what. But in testing with some scrap wood, I just didn't like how sloppy it looked. So I started thinking why not just use my Kreg jig.

Went out to the shop and tried it with another scrap piece. Seems like it'll work well. In spite of only having some GRK R4 screws in the correct length.

I suppose on a semi-related note, has anyone used Lionmax pocket hole screws off Amazon?

They're a little cheaper than Kreg and I wouldn't have to make a special trip to the big box store. And look like they could be even made by the same factory.
 
#4 · (Edited by Moderator)
Some of the pocket hole screws have different diameter heads. For example, the Milescraft pocket hole screws head is too large of diameter to fit in the Kregs pocket hole. But Kregs pocket hole screws fit in the Milescraft pocket holes. I like the Milescraft pocket hole screws because they are torx verses square drive.

I could only say, buy a small box and try them out.
 
#7 ·
I've done what you're talking about on a project where it didn't need to be as perfect as a PH or where I couldn't clamp the jig down. I would drill straight down 1/4" or so, then angle the drill when it could 'grab' the wood. Then I would just 'guestimate' the depth. Worked great for a shop cart.
 
#9 ·
Any reason you can't just drive the screws in straight from the other side using longer screws? You can drill counter bores if you want but it isn't necessary unless you want to use shorter screws.

If appearance is important, then a half lap or bridle joint will probably both look better and be stronger too because the joint is not just supported by the screws. With a half lap you can simply drive screws straight through the joint from the front or back and you can even apply some construction adhesive for even more strength. Of course, we are just talking about a chicken coop. :)
 
#10 ·
Some of the pocket hole screws have different diameter heads. For example, the Milescraft pocket hole screws head is too large of diameter to fit in the Kregs pocket hole. But Kregs pocket hole screws fit in the Milescraft pocket holes. I like the Milescraft pocket hole screws because they are torx verses square drive.

I could only say, buy a small box and try them out.

- WoodenDreams
Good to know. I ordered some of the Lionmax ones from Amazon and will report back.
 
#11 ·
Appreciate the responses, and will reply to all of these in a single post to avoid spamming the thread, and since they're all kind of related/similar.

I ve done what you re talking about a lot.

It s basically toe nailing on steroids.

- Robert
Yeah, I thought the toe "screwing" approach was a lot better than toe nailing. Seems like it'd be a much more secure over time.

I ve done what you re talking about on a project where it didn t need to be as perfect as a PH or where I couldn t clamp the jig down. I would drill straight down 1/4" or so, then angle the drill when it could grab the wood. Then I would just guestimate the depth. Worked great for a shop cart.

- Vicki
This is pretty much what I did with the initial test pieces. As I'd not done any toe "screwing" before. I have done similar though in the past when I needed an angled hole or fastener. It's relatively easy to get it started, then angle and finish it out.

You can do a quick and dirty pocket hole using a spade bit. Drill straight and then turn the bit and it will drill in at an angle appropriate for pocket screwing.

- Loren
Thats a good point and makes sense.
 
#12 ·
Any reason you can t just drive the screws in straight from the other side using longer screws? You can drill counter bores if you want but it isn t necessary unless you want to use shorter screws.

If appearance is important, then a half lap or bridle joint will probably both look better and be stronger too because the joint is not just supported by the screws. With a half lap you can simply drive screws straight through the joint from the front or back and you can even apply some construction adhesive for even more strength. Of course, we are just talking about a chicken coop. :)

- Lazyman
I could do that, and considered it. Main reason I ruled it out is that they'd have to be pretty long screws. And since I prefer GRK fasteners, that means it'd get pricey. As some of them would need to be like 10" long. The counterboring would be a good solution though to make use of the "stock" fasteners I keep on-hand.

I also thought about doing joints like you mention. But drew the same conclusion in your last sentence. She already requested basically the Ritz Carlton for these dang chickens. Already did some other joinery in other spots. I'm just ready for this thing to be done. So screws will have to do for the roofing.

This is the first project I've done in a couple months. Reminded me how much I enjoy building, and how little I enjoy finishing. I swear 90% of this project was spent sanding, staining/sealing, and painting.
 
#14 ·
You can do what your talking about. Largely that just takes to much time which is why it wouldn't be used in mass framing construction because time is money. Nothing wrong either way. You can also use hurricane straps too but again that adds to the cost. I love coops but just keep in mind it is a coop. I like stuff to look nice but there's no reason it has to be built as good or better than a house.
 
#15 ·
Screw toenailing, yes it works well, just time consuming. I would be using a pumatic framing nailer, and add blocking between the rafters. That way you can get a positive connection through the rafter into the block on one side
My .02
 
#17 ·
You can do what your talking about. Largely that just takes to much time which is why it wouldn't be used in mass framing construction because time is money. Nothing wrong either way. You can also use hurricane straps too but again that adds to the cost. I love coops but just keep in mind it is a coop. I like stuff to look nice but there's no reason it has to be built as good or better than a house.

- JCamp
It's only got 6 joists. But agree if this were for anything much larger it would be too much of a time sink.

And sure it's only a coop. But if I don't do it right, it'll clash with our palatial estate :)
 
#18 ·
Screw toenailing, yes it works well, just time consuming. I would be using a pumatic framing nailer, and add blocking between the rafters. That way you can get a positive connection through the rafter into the block on one side
My .02

- Eric
It would be a good reason to add another tool to the stable. Have the cordless crown stapler and brad nailer already. A finish nailer would complete the set.
 
#19 · (Edited by Moderator)
It s basically toe nailing on steroids.

- Robert

Yeah, I thought the toe "screwing" approach was a lot better than toe nailing. Seems like it d be a much more secure over time.

- Wood_Scraps
In my experience, like with most things, "it depends". On interior stuff i'll usually toe screw. And i use a kreg jig wherever that is my best option. However If its outside, fencing, etc i willusually toe nail with ringed deck nails. Heres why: screws are hardened, nails aren't, wood moves. Wood movement vs screws is the unstoppable force vs the immovable object. There is 2 options, the screw snaps or it rips the threads out of the hole like an aggressive round rasp. Especially after wet weather when the wood is nice and soft. Now you have a hole too big for the screw. You can drive in more screws which looks aweful, or replace with larger screws but can only do so many times.

Nails o the other hand can and do bend and loosen a bit. Next season you tap it in and you are good to go for another year or two.
 
#20 ·
It s basically toe nailing on steroids.

- Robert

Yeah, I thought the toe "screwing" approach was a lot better than toe nailing. Seems like it d be a much more secure over time.

- Wood_Scraps

In my experience, like with most things, "it depends". On interior stuff i'll usually toe screw. And i use a kreg jig wherever that is my best option. However If its outside, fencing, etc i willusually toe nail with ringed deck nails. Heres why: screws are hardened, nails aren't, wood moves. Wood movement vs screws is the unstoppable force vs the immovable object. There is 2 options, the screw snaps or it rips the threads out of the hole like an aggressive round rasp. Especially after wet weather when the wood is nice and soft. Now you have a hole too big for the screw. You can drive in more screws which looks aweful, or replace with larger screws but can only do so many times.

Nails o the other hand can and do bend and loosen a bit. Next season you tap it in and you are good to go for another year or two.

- SMP
True, but is that really applicable to what he's talking about? I don't think so….......

You can also screw up through the bottom plate into the rafter. You need 6" screws to do it. Not worth the $'s.

Or use hurricane clips.

If there's a birds mouth screw in from the top with a log screw countersunk.

Oh forget it, its a chicken coop!!!
 
#23 ·
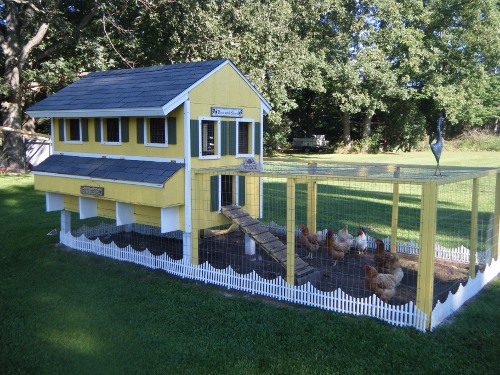
If you going to build a chicken coop, you might as well do it right ;-)

Image


- Lazyman
Our build is along those lines, but larger. However I'm doing corrugated roofing. No way I'd break out the shingles for a coop.

I'd say the fanciest thing is more for our benefit. A lot of coops only allow for minor access to clean out the main coop area that houses the nesting boxes and roosting bars. So I decided to build the thing so the whole 4'X4' front face of the enclosure is attached to gas struts. That way, when we want to clean it out, we've got easy and full access to everything.
 
#24 · (Edited by Moderator)
The folks at Carolina Coops do a great job if you need some more inspiration. They've built coops that would make nice homes. Lol
My dad tells the story that when his uncle wanted to get married he cleared out the chickens from his parents (my fathers grandparents) coop and set up a house in it. Got hitched and they lived there for a bit. I have my doubts it was as nice as many of the coops today
 
#25 ·
The folks at Carolina Coops do a great job if you need some more inspiration. They've built coops that would make nice homes. Lol
My dad tells the story that when his uncle wanted to get married he cleared out the chickens from his parents (my fathers grandparents) coop and set up a house in it. Got hitched and they lived there for a bit. I have my doubts it was as nice as many of the coops today

- JCamp
Dang. Those are pretty nice. The one I'm building is similar-is to their "American Coop" that goes for like 5 grand. Maybe I should start building these things on the side.