Part 2 - Full Non Video Tutorial with screen shots.
Hi everyone,
Not sure if you seen my previous message about the video. The quality was just so bad, I couldn't post it. The resolution was set too low. What I have below, is a tutorial on how to create your patterns. I made the tutorial as simple as possible by showing you what to push and click. I didn't spend any time in explaining the program or any real features. My goal was to give you something that you can follow by simply following the instructions. This tutorial should aide you in creating your own portrait patterns. All you have to do is play with the settings a little and you will get the results you need. Hopefully you find this helpful. I put this together in a hurry tonight as I know some of you are wanting to see how this is done. Hopefully it's not too crude and you are able to follow along. If you have trouble following along or get lost in the instructions, leave a message. I will be sure to follow up and help you through anything you are stuck on.
An important note when doing patterns - Not all photo's are suitable for patterns. Some photo's just don't have the lighting that a good scroll saw portrait pattern needs. If you do try a pattern of your own and you have trouble with it, feel free to send me a copy of the photo and I will see if there is anyway I can help.
There are videos on Youtube - uploaded by SDGOOD as well as SCROLLSAWGOODIES that explains the process of making portraits as well. Scroll Saw Goodies will show an actual photo getting done in Gimp.
Let's begin.
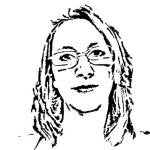
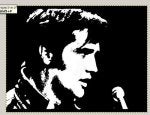
So here we have our picture. This is a royalty free photo of Elvis. I choose Elvis as many request for patterns is of Elvis. Here is the photo.
Next we bring the photo into GIMP.
Find the picture you wish to edit, I have Elvis1.jpg on my desktop. Next you want to RIGHT CLICK your image and Choose "Edit with GIMP"
Voila
Gimp opens and your photo is center screen.
Believe it or not. With just a few tricks, we will have Elvis ready to print. First, we need to change the photo to black and white. To do this:
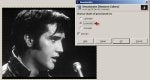
1. Click colors from the menu bar. See below photo.
2. Click Desaturate
Your picture will turn black and white; Also, you will be given 3 options to choose. Lightness, Luminosity, or, Average. These options give you different black and white shades. I am choosing Luminosity.
Now with our photo Desaturated, we are ready to move on to the next step - Curves. Curves will show the pattern taking shape. With Curves we are looking to bring out the Black and White of the photo.
3. Click colors again from the menu bar.
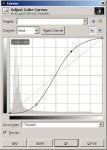
4. Now click Curves
The curves editing box will appear.
click and drag on the diagonal line to make an S shape. Try these locations to push.
They should end up looking something like this
Notice, while you drag the diagonal line around into an S you will see your image changing.
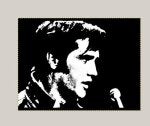
The pattern is taking shape.
Next lets move on to a filter.
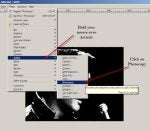
5. Locate the Filter Menu on the Menu Bar.
Lets look down the Filters menu and find Artistic. Hold your mouse on Artistic and you will see another sub menu open. In this sub menu, select Photocopy
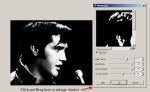
The photocopy box will open. You will notice, the photocopy box does not show your full picture. What you need to do if you wish is enlarge the photocopy window by clicking and dragging it bigger.
As you can see now, the pattern is just about ready to print.
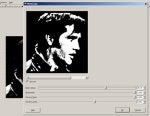
drag the sliders around and play with each to get the result you want. If you wish to get the exact result I have. The values for Mark Radius 37.91 Sharpness 1.000 Percent Black 1.000 Percent White 0.581.
Mark Radius shows more detail with a lower value. If you set it higher, you will loose the detail. Just play with the slider and see. Sharpness, I find should always be as hight as possible. Percent black, as well, hight as possible. Percent White can be tricky. Sometimes you want to add in extra details that you would loose if this setting was set to 1.000 play around with it to get what you need.
Click OK and we will move on.
So close to the finish. Now to tidy up the image.
We are on the home stretch. What we are going to do now is remove the things we don't want, such as the blotchy black areas around the jaw bone.
To do this we need to select a brush and choose white as the color.
Click around the image with white to clean it up. Adjust the size of your brush as needed. I find a brush size of 10 to be good.
Once you get the white cleaned up. Lets clean up the black.
Now with all the black cleaned up, we can go on to islands and peninsulas
When creating your patten, you need to remember, White always has to touch itself or your outside border. If you leave white trapped in black, when you go to cut your pattern, you will loose this piece as it will fall out. All white trapped in black is considered as floating. We want to keep it from floating by connecting all white pieces to other white pieces or the border.
The un-trapping is done simply by using your white brush and connecting the trapped areas.
Here is the image with no white trapped.
Next, lets add a white border and enlarge for print.
To add the white border, simply draw a box
Next. Let's invert the selection.
Inverting the selection will allow us to paint in the border without touching the picture itself.
As you can see below, my brush is much bigger than the border but because we have just this area selected, the white will only go within the border.
Here we are fully finished. Just need to resize.
The image we used is just about 6" x 5". Typically people would like this in an 8.5×11. If we enlarge this photo to 8.5 the length will only go to 7.5 due to the current size we are scaling it from. To fix this, you could make the canvas size 8.5×11 and fill the remaining space with the black and elongate your border to fit your frame. For now, we will just focus on enlarging to 8.5×7.5
To enlarge the image, click the Image menu button, then go down to Scale Image
With the Scale Image window open, you first want to change your measurement setting from Pixel to Inches. Next type in the size you wish, set your resolution to 150.00 once you get your values in, click scale
You will notice your picture gets allot bigger on your screen.
All you have left to do at this point is to export your picture and save it to your desktop.
Choose FILE then EXPORT - In the dialogue box that opens, name and save your file. Once the file is saved, go to it's location, open it and click print. There you go. All done.
Hopefully you find this tutorial helpful.