Making An Alternate Block Pattern
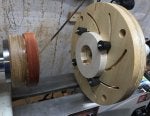
I start with making a glue block. I've always used glue blocks for my bowls mainly because I have never figured out how to make a mortise in a base to start with. I'm making this bowl with a Hard Maple body and Padauk trim and design ring.
![Image]()
![Image]()
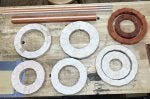
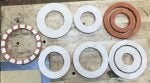
Once the glue has dried I give the base a quick rounding up and truing up the face. Since the glue has to set overnight to dry I can start making the rings for this bowl. This one takes 9 rings of 16 segments each. The solid base is 11 and the rings will be glued up in descending order, 11, 10 9 8 7 6 (trim rings made by cutting ring 6 in half, the other half becomes ring 4) 3 2 1 Here are the rings and design ring sticks:
![Image]()
and here they are after running them through the drum sander to flatten them.
![Image]()
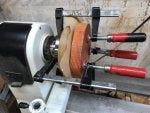
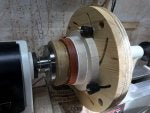
I also rounded them up as a experiment using my homemade Longworth chuck to locate the rings on the glue up stack. So now I can start stacking up rings.
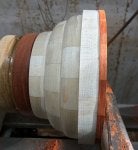
Here are rings 10 9 and 8 glued on to base 11.
![Image]()
![Image]()
![Image]()
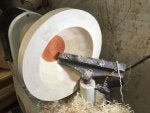
After these rings have sat overnight, turn the inside of them and smarten up the bottom. Do this while you can still reach them. After I did that, I added ring 7.
![Image]()
![Image]()
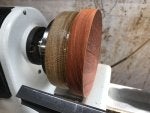
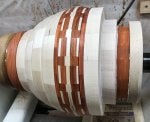
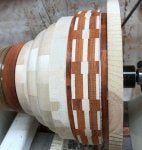
Next is the wide ring 6 made of Padauk. This ring gets parted in half to form the trim rings 6 and 4.
![Image]()
![Image]()
![Image]()
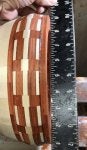
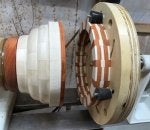
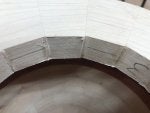
Here is shown ring 6 cut in half. Next is the design ring of alternate blocks.
![Image]()
I give rings about an hour before adding more, so after an hour I added the second trim ring #4 (which is the other half of ring 6)
![Image]()
I'll let this set overnight and tomorrow start adding the last 3 rings, 3 2 and 1.
OK, the first thing I did today was smarten up the inside rings and get them shaped up. Then I flattened and made ring 4 the same thickness of ring 6.
![Image]()
Next step is gluing on ring 3
![Image]()
I'll let this set for an hour and take a look at how the general shape is coming along. I may be able to glue ring 2 on or I may have to let it set overnight so I can turn the inside bottom edge of ring 3.
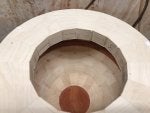
OK, I thought it best to turn the chamfer before I glued ring 2 on. So here is the before and after of that….
![Image]()
![Image]()
![Image]()
Ring 2 glued on. I'll wait an hour and glue the lip (ring 1 ) on.
![Image]()
+
Here is the lip glued on, now it sits overnight and I'll start turning it tomorrow.
![Image]()
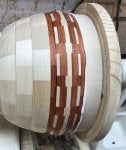
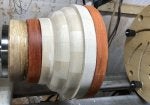
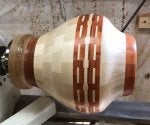
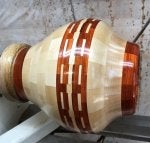
Here it is after sanding and preliminary turning.
![Image]()
And after the first coat of ***************.
![Image]()
I'll put a picture in the project section after parting it off of the glue block and finalizing the finish
I start with making a glue block. I've always used glue blocks for my bowls mainly because I have never figured out how to make a mortise in a base to start with. I'm making this bowl with a Hard Maple body and Padauk trim and design ring.
Once the glue has dried I give the base a quick rounding up and truing up the face. Since the glue has to set overnight to dry I can start making the rings for this bowl. This one takes 9 rings of 16 segments each. The solid base is 11 and the rings will be glued up in descending order, 11, 10 9 8 7 6 (trim rings made by cutting ring 6 in half, the other half becomes ring 4) 3 2 1 Here are the rings and design ring sticks:
and here they are after running them through the drum sander to flatten them.
I also rounded them up as a experiment using my homemade Longworth chuck to locate the rings on the glue up stack. So now I can start stacking up rings.
Here are rings 10 9 and 8 glued on to base 11.
After these rings have sat overnight, turn the inside of them and smarten up the bottom. Do this while you can still reach them. After I did that, I added ring 7.
Next is the wide ring 6 made of Padauk. This ring gets parted in half to form the trim rings 6 and 4.
Here is shown ring 6 cut in half. Next is the design ring of alternate blocks.
I give rings about an hour before adding more, so after an hour I added the second trim ring #4 (which is the other half of ring 6)
I'll let this set overnight and tomorrow start adding the last 3 rings, 3 2 and 1.
OK, the first thing I did today was smarten up the inside rings and get them shaped up. Then I flattened and made ring 4 the same thickness of ring 6.
Next step is gluing on ring 3
I'll let this set for an hour and take a look at how the general shape is coming along. I may be able to glue ring 2 on or I may have to let it set overnight so I can turn the inside bottom edge of ring 3.
OK, I thought it best to turn the chamfer before I glued ring 2 on. So here is the before and after of that….
Ring 2 glued on. I'll wait an hour and glue the lip (ring 1 ) on.
Here is the lip glued on, now it sits overnight and I'll start turning it tomorrow.
Here it is after sanding and preliminary turning.
And after the first coat of ***************.
I'll put a picture in the project section after parting it off of the glue block and finalizing the finish