LumberJocks Woodworking Forum banner

Making plough plane cutters from bar stock

20K views 31 replies 19 participants last post by  TheFridge  
#1 · (Edited by Moderator)
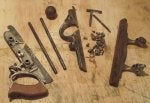
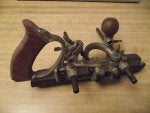
I recently bought an old Stanley #45 plough plane, and it was missing some cutters and the short rods. I could pick them up from eBay, but thought this would be a good opportunity to try to make some new cutters from bar stock.

So, off to McMaster-Carr for some O1.
Image


I also ordered some 25/64" tool steel rod for the short rods.

I've never heat treated anything before, so this should be fun.
 
#2 ·
You definitely grabbed my attention. I recently got an old #45 into somewhat working condition, but I only have the 1/4" blade that came with it. I'm sure it's more practical to cut dadoes on the table saw, but it would be fun to make a few standard size blade for this plane.

Image


Image
 

Attachments

#3 ·
I'm interested to see how this goes.
Please post your progress as my #55 is missing a few cutters as well.
I've used this plane a few times for beading and its really cool once you get the hang of it.
I love how the shavings roll out of the tool. Satisfying and it justifies owning it…

Chris
 
#11 ·
Gshepherd, no worries, and keep the questions coming. I probably won't have all the answers, 'cuz I'm a rookie on this stuff.

The steel is 1/8" thick O1 tool steel from McMaster-Carr. It matches the thickness of the old cutter exactly. It is not heat-treated yet (you can be sure I'll document this process here), so it's easier to work. I'll rough shape the cutters and notch them, then heat treat them. Unless there's a reason I shouldn't do it in that order….

paratrooper34: I'll probably make some reeding/beading cutters after I've made some simple dado cutters first, once I know what I'm doing.
 
#12 ·
To the WorkSharp 3000!
Image

I ground a 30 degree primary and 25 degree secondary on the 1/2" blade, and a 35/30 on the 1/4". No need to get too fine with the grind, this is just to make it easy to grind the angle now. Final grinding will take place after heat-treatment.

Then mark where the notches should be.
Image


Astute readers will see where I am about to screw up. I notched it to depth with a hacksaw, and then expanded the slot. A little trial and error led me to this bit in my Dremel:
Image

followed by some filing with a small flat file with smooth sides to keep the slot from deepening.
Image


My screw up was marking the notch on the wrong side of the blade on the first one I filed. No biggie, just grind another one on the other side. The second I made the tolerance a lot tighter, so there isn't as much slop in the depth adjustment knob.
Image


The test fit works.
Image
 
#13 ·
So instead of figuring out a DIY forge I'd have to assemble, I talked to a friend of mine who is a metal artist and instructor at the local art school. He brought a toaster oven, I brought some peanut oil, and we got down to business. Heat treating tool steel! Yes.

Wait, we can't find a metal container for the peanut oil, for quenching. No problem. Mike just sorted through the scrap pile and MIG welded up a container in 3 minutes. Solid.
Image


And here's the forge (sorry about the blur):
Image
 
#15 · (Edited by Moderator)
Here's a better picture of the forge, after we turned it off.
Image


I didn't get any pictures of me heating the blade, or quenching. The forge was HOT! It only took about 30 seconds for the blades to get bright orange. Then I quickly quenched them in the peanut oil, putting them in straight vertically, and dunking them a few times before swirling it around. I then put the blade in the preheated toaster oven for tempering.
Image


Mike was a little worried that we over-quenched the first blade. I'm curious what the experts think about this. I left the first blade in the oil for almost a minute.

Mike set the timer on the oven, and we went to get a beer and some lunch around the corner. Making your own tools is great! So relaxing. We got back a little over an hour later. The blades were still hot, but handle-able. I cleaned off the oil and took a look.
Image


Not bad. Back at home I went back to the WorkSharp to regrind the edge and flatten the back.
Image


So there you have it. Provided you have access to a forge, total time to go from a shaped untreated blade to a hardened, honed cutter is 90 minutes. And that includes fabricating an oil container and a leisurely lunch with beer.
 
#16 ·
Just for the record, you probably don't have to heat treat the whole blade. I've heat treated just the 1 inch or so up from the cutting edge using a plumber's torch. Mapp gas is hotter and faster, but you can get the heat you need eventually on an inch or so of small blade like this. Suggest not heating from the sharpened edge, but approach the edge from higher on the blade so you can control the heat in the thin part of the blade. You can "burn" the steel and it becomes worthless.
Shampeon, you were wise not to sharpen the blade before treating to prevent the burning. I was afraid you might have gotten it too sharp, but it seems to have turned out OK.
You will have fun shaping other profiles. The Dremel with diamond burrs becomes your good friend. I've found the interior corners of a profile to be the most difficult. Will be interested to see what you come up with.
DanK
 
#18 ·
Thanks, Dan. I actually only heated the first 1.5" or so. You can see discoloration in the above pics.

I was surprised at how easy it was, with the forge. Next round, I'll bring a magnet to check for the conversion to austenite, but the bright orange stage (1475 F) was fairly obvious, and the color was pretty even all through the tip of the blade.
 
#20 ·
I usually heat from the end away from the cutting edge.
Watch for a straw to light blue color to creep up to the cutting edge.
Quench cutter edge down. Temper in oven or toaster oven.

Making sharp stuff sure is fun. Next on to the marking knives.

There's probably a blacksmith/ metal artist club in you area.