LumberJocks Woodworking Forum banner

handsawgeek's Lathe Stand: A Hand Tool Build For a Tailed Appliance

26K views 34 replies 10 participants last post by  retired_guru  
#1 ·
Introduction

My wife likes to make vases out of aspen wood on the lathe.

I use the lathe once in awhile to knock out an occasional spindle thingie for a project or a tool handle.

At the moment, the lathe lives on the main workbench in the garage half of my woodworking shops.

It is there because it spews out a lot of wood shavings and dust: too much to allow it to reside in the basement annex. Bad lathe!

The main workbench on which the lathe is mounted is also built onto the garage wall. This means that whenever the lathe is in operation, the wall rattles. The same wall divides the garage with the foyer and hallway inside the house.

On those occasions where a workpiece on the lathe is out of round, or a dull tool causes excess chatter, the wall rattles mercilessly. So much so, that it has been known to dislodge pictures hanging on the hallway side.

Not a good engineering idea to mount the lathe in this manner. Bad handsawgeek !

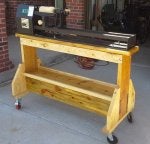
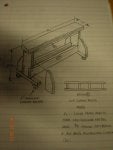
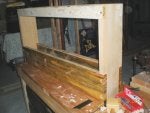
So, now I have offered to build a freestanding lathe pedestal to solve this problem. This pedestal is going to be built Neander-style.

I invite you all to enjoy the ride with me. Stay tuned.

Image

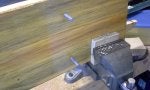
A chunk o' aspen all chucked up and ready to rattle the daylights out of the house !
 

Attachments

#2 ·
The Jaunt Begins

I'm not going to call this project a 'journey'.

It's more of a walk around the block, really.

Since it is a piece of shop furniture cobbled together out of scrap wood, there is no need to go into lots of detail, so I will only stick to the main points…

Today is 'materials gathering day'.

First, a trip to the wood pile to pick whatever servicable specimens can be found.

This project will be made out of North American Scroungewood. This should do it.

Image


Next, a hastily scrawled working plan….

Image


A trip to the BORG to procure the necessary hardware…

And, of course, assembly of the power source for the involved tooling….

Image


Time to get Crackin'....

Stay tuned!
 

Attachments

#3 ·
READY…FIRE…AIM !!

I am a musician.

I play electric and acoustic violins, guitars, and mandolins.

Not as a professional. I rather view myself as a professional amateur, performing quite frequently in public, but rarely for pay.

As any musician is fully aware, live music performance is fertile ground for making mistakes. Wrong notes, missed notes, out-of-tune notes, mis-cues, wrong keys, forgotten passages, wrong tempos, the list goes on. And that's not to mention difficulties caused by those pesky equipment issues.

Ask any pro recording artist. They've been there, done that.

Seasoned musicians are very adept at not letting on that they've made a gaff. They don't let it bother them and just continue on. 99% of the time the audience doesn't even notice.

The beauty(?) of making a musical mistake is, once the air molecules that vibrate that mistake throughout the auditorium stop, that particular note is lost forever (Unless, of course, someone is recording the performance). The musician never has to worry about that particular blunder again.

Not so with woodworking.

A mistake in a woodworking project, no matter how well concealed, hidden, or repaired, stays with the piece for as long as it exists. Most casual observers will never notice it. Other seasoned woodworkers may or may not notice it, but will tend to chalk it off as 'character'. Take a real close examination sometime of any piece of fine hand-made antique furniture and you'll see what I mean.

But, you can be dern sure that the craftsman that made the piece knows that mistake is there.

He knows all the details about it - the process and tool that put it there. He probably remembers his reaction when the error was made or discovered. He remembers the expletives he may have uttered. He may remember the tool or project piece that sailed across the shop.

Even though he may have corrected the error very nicely, he knows it's still there, every time he looks at the piece.

And it gnaws at him.

So it is that the handsawgeek made such a mistake - right from the word 'GO', mind you - on the lathe stand.

After cutting the frame sides to length, it was time to saw out the notches for the corner joints on the ends of the pieces. By virtue of some unexplainable brain-fart, I laid out the first notch ninety degrees from what it was supposed to be - and cheerfully made the cuts!

Image


STUPID …….

No expletives were uttered…..

No tool or project piece sailed across the shop…..

Image


Being somewhat lazy, I didn't want to start from scratch on another piece of wood.

Instead, I put on my 'Musician-Who-Just-Made-A- BooBoo' face, and calmly resolved to fix the error later, and proceed to saw out the other three notches on the board (in the correct orientation of course).

I also reminded myself that this was a knockabout piece of shop furniture made out of North American Scroungewood, and not a fine furniture project.

Once the cuts on the two frame side pieces were completed, it was time to repair the initial mess-up.
A spare chunk of North American Scroungewood, some glue, a couple of clamps, and a little more saw work did the trick. And a lesson was learned:

"Pay attention, measure twice, cut once."

Image

Image


The finished end pieces:

Image


By the way, sawdustike is OK.

Now I think I will go upstairs and practice some Bach or something.
 

Attachments

#4 ·
READY…FIRE…AIM !!

I am a musician.

I play electric and acoustic violins, guitars, and mandolins.

Not as a professional. I rather view myself as a professional amateur, performing quite frequently in public, but rarely for pay.

As any musician is fully aware, live music performance is fertile ground for making mistakes. Wrong notes, missed notes, out-of-tune notes, mis-cues, wrong keys, forgotten passages, wrong tempos, the list goes on. And that's not to mention difficulties caused by those pesky equipment issues.

Ask any pro recording artist. They've been there, done that.

Seasoned musicians are very adept at not letting on that they've made a gaff. They don't let it bother them and just continue on. 99% of the time the audience doesn't even notice.

The beauty(?) of making a musical mistake is, once the air molecules that vibrate that mistake throughout the auditorium stop, that particular note is lost forever (Unless, of course, someone is recording the performance). The musician never has to worry about that particular blunder again.

Not so with woodworking.

A mistake in a woodworking project, no matter how well concealed, hidden, or repaired, stays with the piece for as long as it exists. Most casual observers will never notice it. Other seasoned woodworkers may or may not notice it, but will tend to chalk it off as 'character'. Take a real close examination sometime of any piece of fine hand-made antique furniture and you'll see what I mean.

But, you can be dern sure that the craftsman that made the piece knows that mistake is there.

He knows all the details about it - the process and tool that put it there. He probably remembers his reaction when the error was made or discovered. He remembers the expletives he may have uttered. He may remember the tool or project piece that sailed across the shop.

Even though he may have corrected the error very nicely, he knows it's still there, every time he looks at the piece.

And it gnaws at him.

So it is that the handsawgeek made such a mistake - right from the word 'GO', mind you - on the lathe stand.

After cutting the frame sides to length, it was time to saw out the notches for the corner joints on the ends of the pieces. By virtue of some unexplainable brain-fart, I laid out the first notch ninety degrees from what it was supposed to be - and cheerfully made the cuts!

Image


STUPID …….

No expletives were uttered…..

No tool or project piece sailed across the shop…..

Image


Being somewhat lazy, I didn't want to start from scratch on another piece of wood.

Instead, I put on my 'Musician-Who-Just-Made-A- BooBoo' face, and calmly resolved to fix the error later, and proceed to saw out the other three notches on the board (in the correct orientation of course).

I also reminded myself that this was a knockabout piece of shop furniture made out of North American Scroungewood, and not a fine furniture project.

Once the cuts on the two frame side pieces were completed, it was time to repair the initial mess-up.
A spare chunk of North American Scroungewood, some glue, a couple of clamps, and a little more saw work did the trick. And a lesson was learned:

"Pay attention, measure twice, cut once."

Image

Image


The finished end pieces:

Image


By the way, sawdustike is OK.

Now I think I will go upstairs and practice some Bach or something.
Being a musician myself I have always leaned on the other necessary skill you must develop when playing live… The ability to recover rather than react when something goes wrong and be able to improvise when needed on the spot. Those 2 skills crossover directly into woodworking. It's not the mistakes you make that matter it's what you make of the mistakes that matters.

Nice recovery and just relax… wood really does grow on trees ;-)
 

Attachments

#12 ·
"Armstrong" Tools

All of the boards that make up the primary frame of the lathe stand are now sized to final dimension and the joinery notches cut.

Out comes the smoothing plane to clean up the edges and faces of the rough boards. Even though it's shop furniture, I still wish to make it look as attractive as possible. What if the Shwarz, or St. Roy, or Norm himself ever happened to drop in on my shop? What would these stalwarts - these woodworking giants - have to say if they saw a lathe stand that looked as if it was pounded together by a gorilla?

Snap out of it, geek, and get back to planing !!!!

Image


As I move the plane - a 1960s era 'Westline by Stanley', along the edge of a board, listening to the sshhhk of the blade shaving off a…..shaving…..my mind wanders, again.

I recall years ago when my recently-late step-dad once showed me one of his hand planes, referring to it as an "Armstrong" tool. In those days, I was very naive about hand tools, so I looked all over the plane, expecting to find the name "Armstrong" stamped somewhere on it. All I could see was a couple of guys' names- "Stanley", "Bailey" and #5.

I got it when I saw his sly grin…

Alright, that's enough filler material to make this blog post look more substantial than it really is.
Once all is cleaned up, the pieces will be ready for the application of assembly hardware holes.
Next blog post is bound to be pretty boring…

Meanwhile, as the shavings pile up underneath one end of the workbench, ike is goofing off at the other…..

Image


More to come…..Please hang around!
 

Attachments

#13 ·
"Armstrong" Tools

All of the boards that make up the primary frame of the lathe stand are now sized to final dimension and the joinery notches cut.

Out comes the smoothing plane to clean up the edges and faces of the rough boards. Even though it's shop furniture, I still wish to make it look as attractive as possible. What if the Shwarz, or St. Roy, or Norm himself ever happened to drop in on my shop? What would these stalwarts - these woodworking giants - have to say if they saw a lathe stand that looked as if it was pounded together by a gorilla?

Snap out of it, geek, and get back to planing !!!!

Image


As I move the plane - a 1960s era 'Westline by Stanley', along the edge of a board, listening to the sshhhk of the blade shaving off a…..shaving…..my mind wanders, again.

I recall years ago when my recently-late step-dad once showed me one of his hand planes, referring to it as an "Armstrong" tool. In those days, I was very naive about hand tools, so I looked all over the plane, expecting to find the name "Armstrong" stamped somewhere on it. All I could see was a couple of guys' names- "Stanley", "Bailey" and #5.

I got it when I saw his sly grin…

Alright, that's enough filler material to make this blog post look more substantial than it really is.
Once all is cleaned up, the pieces will be ready for the application of assembly hardware holes.
Next blog post is bound to be pretty boring…

Meanwhile, as the shavings pile up underneath one end of the workbench, ike is goofing off at the other…..

Image


More to come…..Please hang around!
I can relate to the fun you are having with your 'Armstrong' tools, a great brand.
 

Attachments

#14 ·
"With This Ring, I Thee Bore..."

All of the components of the main frame structure are now cut and smoothed. Time to bore the holes for the 5/16" x 3" lag screws that will hold it all together. The holes will be counter sunk with large enough diameter to accommodate the screw hex heads as well as clearance for the socket that will drive them home.

Since this is a simple, common operation, I will refrain from 'boring' you with further details.

Except to say that the work will all be done using the trusty brace and auger bits that I just so happen to have sitting around the vicinity.

Now, we get to the reference of the 'ring' mentioned in the title of this blog entry.

(Cue the 'Ring Theme' music from the The Lord of the Rings movie).

I ran across this tip from an old-timer craftsman.

This gentleman would slip his plain wedding band onto the shaft of his auger bits whenever he bored a hole with the brace held horizontally. By maintaining the position of the ring in the same spot on the shaft as it turned, he knew that his tool was square to the work in the vertical direction. Then all he had to do was maintain the tool square in the horizontal by eye. Ingenious.

Image


Of course, some of our spouses may object to such use of our wedding bands. In that case a metal key ring would serve just as well.

Now that the rail holes are done, it's just a simple matter of drilling pilot holes in the frame sides:

Image


And assembling the pieces:

Image


Incidently, I haven't seen sawdustike for a few days.
Maybe he stepped out for a cold one with tinkertoydude….

More to come….
 

Attachments

#15 ·
"With This Ring, I Thee Bore..."

All of the components of the main frame structure are now cut and smoothed. Time to bore the holes for the 5/16" x 3" lag screws that will hold it all together. The holes will be counter sunk with large enough diameter to accommodate the screw hex heads as well as clearance for the socket that will drive them home.

Since this is a simple, common operation, I will refrain from 'boring' you with further details.

Except to say that the work will all be done using the trusty brace and auger bits that I just so happen to have sitting around the vicinity.

Now, we get to the reference of the 'ring' mentioned in the title of this blog entry.

(Cue the 'Ring Theme' music from the The Lord of the Rings movie).

I ran across this tip from an old-timer craftsman.

This gentleman would slip his plain wedding band onto the shaft of his auger bits whenever he bored a hole with the brace held horizontally. By maintaining the position of the ring in the same spot on the shaft as it turned, he knew that his tool was square to the work in the vertical direction. Then all he had to do was maintain the tool square in the horizontal by eye. Ingenious.

Image


Of course, some of our spouses may object to such use of our wedding bands. In that case a metal key ring would serve just as well.

Now that the rail holes are done, it's just a simple matter of drilling pilot holes in the frame sides:

Image


And assembling the pieces:

Image


Incidently, I haven't seen sawdustike for a few days.
Maybe he stepped out for a cold one with tinkertoydude….

More to come….
Well done. It'll be fun to see how this comes out. It looks well made so far.

And here I thought everybody used their wedding ring to drill perfect vertical holes. Ok, just kidding. I love all of these old simple tricks to insure accuracy. If everybody knew them Woodpecker would be out of business in just a few days. They keep sending me adds for expense solutions to problems that can be solved with things like wedding rings, (Although after 48 years I think mine has grown into my finger).

another trick you might not know is that a wedding ring also can be used as an egg cup in a pinch, or to get married with.
 

Attachments

#16 ·
A Brief Interlude

I generally try not to have more than one project in progress at any given time in the handsawgeek shop.

The real job and other activities require enough multi-tasking as it is, so staying linear with woodworking is good for the geek's brain!

This week an exception had to be made. The lathe stand has been moved aside briefly to make room for a small project of necessity for some pressing musical endeavors.

A recent trip to Guitar Center resulted in the purchase of a Line6 HDX500 Digital Effects Processor unit for use with my electric violin and guitar.

This means that the home-made effects pedal board built (cobbled) for these instruments a few years back is now obsolete and can be dismantled.

Still in frequent use, however, is a Boss RC2 Loop Station and its accompanying foot switch unit. It is fairly inconvenient to have to do a loose 'cable -up' of these pedals every time I wish to use them.

So here is a small wood pedal board built just for this dedicated application:

Image


The connector jack on the side is for the separate 9 volt supply to power the devices.

In case any of you might have the slightest curiosity (or even care) about what a loop station does, here is the scoop:

The device allows one to record a passage of music, then continuously play it back over and over (looping). During each playback, the musician can then add successive layers of recordings. For example, I can first lay down a rhythm guitar line, then add a bass line, then add a drum pattern, then layer on a lead riff, then maybe a harmony part or two. The end result is that the unit allows one to virtually become a one-man band in real time. A very cool tool, especially for practicing.

Not too long ago, I was playing around with this device to build up a loop in which I layered all four parts of Pachelbel's 'Canon In D' on violin. The cello part was simulated by running through an octaver pedal.
My wife walked in on this session and commented, "It sounds like a wedding in here!"

Next time on 'The handsawgeek Blog', we return to the lathe stand.

Found ike while tidying up between projects….

Image

Thanks for 'plugging in'.
 

Attachments

#17 ·
A Brief Interlude

I generally try not to have more than one project in progress at any given time in the handsawgeek shop.

The real job and other activities require enough multi-tasking as it is, so staying linear with woodworking is good for the geek's brain!

This week an exception had to be made. The lathe stand has been moved aside briefly to make room for a small project of necessity for some pressing musical endeavors.

A recent trip to Guitar Center resulted in the purchase of a Line6 HDX500 Digital Effects Processor unit for use with my electric violin and guitar.

This means that the home-made effects pedal board built (cobbled) for these instruments a few years back is now obsolete and can be dismantled.

Still in frequent use, however, is a Boss RC2 Loop Station and its accompanying foot switch unit. It is fairly inconvenient to have to do a loose 'cable -up' of these pedals every time I wish to use them.

So here is a small wood pedal board built just for this dedicated application:

Image


The connector jack on the side is for the separate 9 volt supply to power the devices.

In case any of you might have the slightest curiosity (or even care) about what a loop station does, here is the scoop:

The device allows one to record a passage of music, then continuously play it back over and over (looping). During each playback, the musician can then add successive layers of recordings. For example, I can first lay down a rhythm guitar line, then add a bass line, then add a drum pattern, then layer on a lead riff, then maybe a harmony part or two. The end result is that the unit allows one to virtually become a one-man band in real time. A very cool tool, especially for practicing.

Not too long ago, I was playing around with this device to build up a loop in which I layered all four parts of Pachelbel's 'Canon In D' on violin. The cello part was simulated by running through an octaver pedal.
My wife walked in on this session and commented, "It sounds like a wedding in here!"

Next time on 'The handsawgeek Blog', we return to the lathe stand.

Found ike while tidying up between projects….

Image

Thanks for 'plugging in'.
That is cool, I love me some loop pedals! I don't do music myself, but I listen to it alot. Been listening to a whole lot of Dub FX lately - who is an artist who only uses the loop pedal and sound manipulation and his own voice to do all of his songs, including the base, harmonies etc. That is a real thing of beauty in the hands (or at the feet I should say) of a pro.
 

Attachments

#18 ·
Speedily Creeping Forward

I trust that everyone had a great Labor Day Weekend!

Having just enjoyed three whole days off from work, I had thought that some substantial progress would have been made on the lathe stand build.

This was not to be.

A garage sale on Saturday, and loads of geek-family activities kept shop time to a minimum.
Between all the revelries, small segments of time were found to add a few minor additions to the project, notwithstanding.

Holes were bored in the top and mounting bolts for the machine were installed:

Image


Frame cross pieces were cut and installed. These are for attaching the work top onto the frame:

Image


At this point in construction, the frame was carried up the fourteen-step stairway from the basement annex, maneuvered through the tricky door configuration at the top of the stairs, and placed in the garage, where the lathe would ultimately be used.

It was deemed that, had any more pieces been added to the frame at this point, it would have become too unwieldy for the handsawgeek to move upstairs without assistance from a kind-hearted neighbor.

As Popeye once said, "I knows me limic-a-tay-shkins!"

Words to live by.

Something is very odd about sawdustike today……

Image


Until next time, and thanks for reading……
 

Attachments

#19 ·
Good Rust Hunt

Instead of working on the lathe stand this past weekend, the handsaw geek went a-rust huntin'.

Several yard sales did not net very much of interest, as the 'watch' list for items is very narrow.

Paydirt was found at one sale, however, as the peddler-of-the wares had a table with some vintage tools displayed on it.

A veritable geek magnet.

Among a pile of old wood handle screwdrivers, files, and hammers, these items were found:

Image


The plane is a Stanley #220 block, and the push driver is a Goodell-Pratt. 10 bucks for the pair.

Also scored were a couple of Disston D-8 rip saws that carried the 'Warranted Superior' medallion.

Not that the handsawgeek needs any more hand saws, but at a buck apiece, how can they be passed up?

Actually, a little work was accomplished on the lathe stand over the weekend: layout of the pedestal legs on the stock boards. More sawing and shaping to come….
 

Attachments

#20 ·
Thanksgiving Holiday Progress

Last week, I took some much needed vacation days from work, so I was able to enjoy a substantial amount of shop time.

In a previous post, I mentioned that I don't usually like to have more than one project going at one time, but an exception was made this week, given the fact that a lot of time was made available.

First, the lathe stand:
The four pedestal supports were sawn to rough size, and two of them were shaped to final dimension, squared up, and finish planed.

Image


Much of the future work remaining on this project will be done sporadically, as it requires fitting and assembling parts to the main frame, which now resides in the very cold garage.

The 'geek' will be spending most of his time this winter in the warm basement annex HTOZ, thank you!

A couple of other projects worked on over the week include:

Tool Cabinet

The side pieces were actually fashioned about a year ago, including the hand-cut box joints, but this project was put on hold due to wholesale shop re-organization, and other projects taking the fore.

Image


This last week, I was able to trim and fit the joints, and get the whole thing glued up.

Image


It was a nice break from hacking away at the lathe stand 2-by material.

Next step is to make the front swinging door section.

Drafting Table.

I've had this old drafting board banging about the shop for several years, so I finally had an opportunity to build the adjustable support for it and put the darn thing in use.

Image


The handsawgeek does not use a PC to draw up woodworking plans.
It's old school all the way, baby!

Image


Disclaimer: This is a rare occasion where plastic items were allowed into the HTOZ. Just long enough to set up for the photo on the workbench.

Tool Tote

Finished up the removable tool tray for the tote I described a couple of blog entries back.

Image


Christmas Gifts

Made some substantial progress on some toys for the grand-kiddos for Christmas. This will be covered in a future post when all is completed.

In addition, I did the usual 'just hanging around in the shop' kind of stuff; cleaning up, re-arranging, sorting through stock, etc.

One evening I ventured into the basement on an errand for Mrs. handsawgeek, and found that I had left the task lights on over the workbenches after that day's work session.

This is the sight that met my eyes in the darkened basement. Just had to take a pic.

Image


Thanks for looking!
 

Attachments

#21 ·
Thanksgiving Holiday Progress

Last week, I took some much needed vacation days from work, so I was able to enjoy a substantial amount of shop time.

In a previous post, I mentioned that I don't usually like to have more than one project going at one time, but an exception was made this week, given the fact that a lot of time was made available.

First, the lathe stand:
The four pedestal supports were sawn to rough size, and two of them were shaped to final dimension, squared up, and finish planed.

Image


Much of the future work remaining on this project will be done sporadically, as it requires fitting and assembling parts to the main frame, which now resides in the very cold garage.

The 'geek' will be spending most of his time this winter in the warm basement annex HTOZ, thank you!

A couple of other projects worked on over the week include:

Tool Cabinet

The side pieces were actually fashioned about a year ago, including the hand-cut box joints, but this project was put on hold due to wholesale shop re-organization, and other projects taking the fore.

Image


This last week, I was able to trim and fit the joints, and get the whole thing glued up.

Image


It was a nice break from hacking away at the lathe stand 2-by material.

Next step is to make the front swinging door section.

Drafting Table.

I've had this old drafting board banging about the shop for several years, so I finally had an opportunity to build the adjustable support for it and put the darn thing in use.

Image


The handsawgeek does not use a PC to draw up woodworking plans.
It's old school all the way, baby!

Image


Disclaimer: This is a rare occasion where plastic items were allowed into the HTOZ. Just long enough to set up for the photo on the workbench.

Tool Tote

Finished up the removable tool tray for the tote I described a couple of blog entries back.

Image


Christmas Gifts

Made some substantial progress on some toys for the grand-kiddos for Christmas. This will be covered in a future post when all is completed.

In addition, I did the usual 'just hanging around in the shop' kind of stuff; cleaning up, re-arranging, sorting through stock, etc.

One evening I ventured into the basement on an errand for Mrs. handsawgeek, and found that I had left the task lights on over the workbenches after that day's work session.

This is the sight that met my eyes in the darkened basement. Just had to take a pic.

Image


Thanks for looking!
It's a good feeling whittling away at the numerous projects started, isn't it? Everything looks good. I'm glad you have the basement to work in. Better than trying to heat the garage.
 

Attachments

#24 ·
Over the Hump

Image


This past weekend, I was able to make a little bit of progress on the lathe stand project involving the four pedestal support legs. A couple of hours spent with some saws, files, rasps, and smoothing plane turned those previously ugly pieces of North American Scroungewood into serviceable lathe stand parts.

Happily, these are the last of those brutal 2-by parts to be hand-tooled.

That newly built planing stop mentioned in last week's post turned out to be worth its weight in gold for this part of the project.

I also lugged the main frame back down the stairs to the basement annex, so I could more easily finish the project without turning into a 'geeksickle' in the freezing garage.

The ultimate plan is to have this piece completed and operational by the end of January. The finishing may have to wait until Spring, when the completed project can be hauled back to the not-quite-so freezing garage.

As far as construction goes, all that remains is fashioning the bottom of the sand enclosure, the tool shelf, attaching the pedestal supports, affixing the castors, and mounting the lathe table and machine.

I am looking forward to getting the lathe back into operation as there are several items on the official "handsawgeek 2015 Project List" that require turned parts.

Now, where did I put that tube of BenGay?......
 

Attachments

#25 ·
Over the Hump

Image


This past weekend, I was able to make a little bit of progress on the lathe stand project involving the four pedestal support legs. A couple of hours spent with some saws, files, rasps, and smoothing plane turned those previously ugly pieces of North American Scroungewood into serviceable lathe stand parts.

Happily, these are the last of those brutal 2-by parts to be hand-tooled.

That newly built planing stop mentioned in last week's post turned out to be worth its weight in gold for this part of the project.

I also lugged the main frame back down the stairs to the basement annex, so I could more easily finish the project without turning into a 'geeksickle' in the freezing garage.

The ultimate plan is to have this piece completed and operational by the end of January. The finishing may have to wait until Spring, when the completed project can be hauled back to the not-quite-so freezing garage.

As far as construction goes, all that remains is fashioning the bottom of the sand enclosure, the tool shelf, attaching the pedestal supports, affixing the castors, and mounting the lathe table and machine.

I am looking forward to getting the lathe back into operation as there are several items on the official "handsawgeek 2015 Project List" that require turned parts.

Now, where did I put that tube of BenGay?......
I've been away…catching up with what's happening. Obviously, you are well beyond this point now, but still worth some late praise. Well done.

BenGay: no shop should be without it. :)
 

Attachments

#28 ·
Done!!..But Not Finished

'Git 'er done!" -Larry The Cable Guy's Over-Used Tag Line.

The 2015 Official handsawgeek Workshop Project List tells me that I had to get this lathe stand finished by the end of January.

And, I made it!!

Here's the synopsis of the past two weeks….

To start things off, a trip to the BORG was necessary to buy a few more items of hardware to complete the project. Usually when I'm there, I make it a point to visit the "70% off sticker" cull lumber cart, just to see what's there. Most of the time, the cart is stacked with specimens of very unsavory pieces of wood, but occasionally I find something of use. This day, I hit the jackpot. Among the various warped, bowed, twisted, cupped, waned, checked, and damaged boards I found several full eight foot sticks of 1Ă—2 craft pine. Even though all of them were somewhat bowed along their length, they were perfect for the application I had in mind: Support cleats for the sand enclosure bottom and edge rails for the tool shelf. The inherent bows would not be an issue since these boards would be attached lengthwise to other, sturdier pieces. This find would save me from having to rip similar parts from wider stock.

Armed with these and a handful of needed wood screws and carriage bolts, I went 'galumphing' back to the shop…

The Sand Box,

Image


This is a very straight forward, nuthin' fancy part of the build: a pair of 1Ă—2 cleats cut to length and screwed to the inside bottom of the frame, and a bottom shelf made of pieces cross-cut from a crusty old 1Ă—10. A finish nail on the ends of each piece will suffice to keep them in place. Since this assembly will be entirely hidden from view, there is no attempt here to make it pretty.

Leg Support and Rail Assemblies,

Image


The rails are nothing more than two by fours hand planed down enough to get rid of the milled corner radii. They are now actually around 3 1/8" wide. Everything gets glued and screwed together.

Sand Box Top/Tool Shelf,

Image


Cut to length from a piece of 1Ă—12 pine board and outfitted with 1Ă—2 rails to keep turning tools and accessories from rattling off the shelf during lathe use. This assembly will be screwed into place atop the lower frame once the sand box is filled.

Transport the Whole Kit and Kaboodle back up the stairs and into the garage,

Image


GRUNT…GROAN…..Thank the Lord for two-wheel dollies!

Caster Installation,

Image


Flip the whole assembly over on its top to install the heavy duty casters. Never mind that the swiveling, locking pair is bright orange. They were on sale at Woodcraft…. The plain fixed pair were freebies kindly donated to the geek.
I'm not certain whether I want to have casters on this machine or not. The original intent was to render the lathe mobile for moving out to the driveway on nice days. If the casters don't work out, I have the option of replacing them with solid wood feet.

Attach the top,

Image


Nothing special here. Bore holes and affix with big carriage bolts.

Throw in a bag of tube sand and screw on the tool shelf, mount the Lathe,

Now all that remains is to cobble up a small wheel chock assembly for the non-locking set of casters that will also incorporate leveling compensation for the sloping garage floor.

And start turnin' !!

Image


The final blog post in this series will have to wait until this coming Spring, when the garage will become warm enough to safely apply the finish to the project. I intend to brush on a couple coats of polyurethane varnish since it will provide a little extra surface protection against all the inevitable scratches and dings this shop furniture is bound to suffer.

Perhaps there will be a couple of decorative accents in store as well.
 

Attachments

#29 ·
Done!!..But Not Finished

'Git 'er done!" -Larry The Cable Guy's Over-Used Tag Line.

The 2015 Official handsawgeek Workshop Project List tells me that I had to get this lathe stand finished by the end of January.

And, I made it!!

Here's the synopsis of the past two weeks….

To start things off, a trip to the BORG was necessary to buy a few more items of hardware to complete the project. Usually when I'm there, I make it a point to visit the "70% off sticker" cull lumber cart, just to see what's there. Most of the time, the cart is stacked with specimens of very unsavory pieces of wood, but occasionally I find something of use. This day, I hit the jackpot. Among the various warped, bowed, twisted, cupped, waned, checked, and damaged boards I found several full eight foot sticks of 1Ă—2 craft pine. Even though all of them were somewhat bowed along their length, they were perfect for the application I had in mind: Support cleats for the sand enclosure bottom and edge rails for the tool shelf. The inherent bows would not be an issue since these boards would be attached lengthwise to other, sturdier pieces. This find would save me from having to rip similar parts from wider stock.

Armed with these and a handful of needed wood screws and carriage bolts, I went 'galumphing' back to the shop…

The Sand Box,

Image


This is a very straight forward, nuthin' fancy part of the build: a pair of 1Ă—2 cleats cut to length and screwed to the inside bottom of the frame, and a bottom shelf made of pieces cross-cut from a crusty old 1Ă—10. A finish nail on the ends of each piece will suffice to keep them in place. Since this assembly will be entirely hidden from view, there is no attempt here to make it pretty.

Leg Support and Rail Assemblies,

Image


The rails are nothing more than two by fours hand planed down enough to get rid of the milled corner radii. They are now actually around 3 1/8" wide. Everything gets glued and screwed together.

Sand Box Top/Tool Shelf,

Image


Cut to length from a piece of 1Ă—12 pine board and outfitted with 1Ă—2 rails to keep turning tools and accessories from rattling off the shelf during lathe use. This assembly will be screwed into place atop the lower frame once the sand box is filled.

Transport the Whole Kit and Kaboodle back up the stairs and into the garage,

Image


GRUNT…GROAN…..Thank the Lord for two-wheel dollies!

Caster Installation,

Image


Flip the whole assembly over on its top to install the heavy duty casters. Never mind that the swiveling, locking pair is bright orange. They were on sale at Woodcraft…. The plain fixed pair were freebies kindly donated to the geek.
I'm not certain whether I want to have casters on this machine or not. The original intent was to render the lathe mobile for moving out to the driveway on nice days. If the casters don't work out, I have the option of replacing them with solid wood feet.

Attach the top,

Image


Nothing special here. Bore holes and affix with big carriage bolts.

Throw in a bag of tube sand and screw on the tool shelf, mount the Lathe,

Now all that remains is to cobble up a small wheel chock assembly for the non-locking set of casters that will also incorporate leveling compensation for the sloping garage floor.

And start turnin' !!

Image


The final blog post in this series will have to wait until this coming Spring, when the garage will become warm enough to safely apply the finish to the project. I intend to brush on a couple coats of polyurethane varnish since it will provide a little extra surface protection against all the inevitable scratches and dings this shop furniture is bound to suffer.

Perhaps there will be a couple of decorative accents in store as well.
Looks like it'll be plenty functional. Dont have to be pretty! :)
I have what looks like a clone to that lathe. It's suiting my needs for now while I'm learning, but I sure hope to get a better one some day.
Maybe Santa will bring me one in a year or two.
 

Attachments

#32 ·
Done At Last!

Image


This weekend, the handsawgeek finally enjoyed the combination of a substantial block of free time and some pretty darn good weather.

The lathe stand was rolled out onto the driveway to receive its long-awaited application of a finish.

A couple coats of clear satin polyurethane were brushed on, and I now had me a finished shop fixture!

I even had time between coats to duck into the garage, fire up the bench grinder, and put a primary bevel on several of those old chisels I've acquired recently.

On another subject, that fancy-pants display table project I blogged about a couple of months back is on hold until Mrs. handsawgeek decides if she even wants it at all. I still have all the dimensional and joinery drawings made up, as well as some drawings of the proposed apron carvings, so I am ready to go if and when the green light comes on.

Man…gotta open up some more garage doors…that polyurethane stinks!!!
 

Attachments

#33 ·
Done At Last!

Image


This weekend, the handsawgeek finally enjoyed the combination of a substantial block of free time and some pretty darn good weather.

The lathe stand was rolled out onto the driveway to receive its long-awaited application of a finish.

A couple coats of clear satin polyurethane were brushed on, and I now had me a finished shop fixture!

I even had time between coats to duck into the garage, fire up the bench grinder, and put a primary bevel on several of those old chisels I've acquired recently.

On another subject, that fancy-pants display table project I blogged about a couple of months back is on hold until Mrs. handsawgeek decides if she even wants it at all. I still have all the dimensional and joinery drawings made up, as well as some drawings of the proposed apron carvings, so I am ready to go if and when the green light comes on.

Man…gotta open up some more garage doors…that polyurethane stinks!!!
Good to see this again!

Heh. I have been avoiding poly because of the smell. Ventilation in the dungeon still isn't fully implemented, but maybe the weather this summer will cooperate and I can work with it on projects I can take outside.

I've got some catching up to do with your past posts. Spending as much time on outdoor projects and dungeon overhauling as time and stamina allow for. Enjoy your summer, Ed.
 

Attachments