CeramiCircuit - 945CL-240-2W (Rating: 5)
Problem. Prior to 2013, I heated the attached 2 car garage 450 square foot workshop with open flame heat. I started out with propane, but it was loud and consumed a lot fuel. I switched to tall style kerosene heater and stuck with it for about 5 years.
The kerosene heater did a great job keeping the shop warm, but the fumes would enter the house even with weather stripping on the tight closing door. And then there was purchasing fuel; it seemed that every two to three weeks I had to make a trip to the gas station in the cold to purchase 10 gallons of fuel. Additionally, I did not like cleaning up the occasional inevitable spills and the heater took up floor space. In January and February in the mid-west, I probably spent about $40 - $60 per month, depending of kerosene prices, weather, and my time in the shop.
One problem that I did not notice was excess moisture in the shop. Open flames produce a lot of water from the burning of fuel. However, I occasionally opened the garage door to get rid of fumes, so that probably saved me problems with my projects.
Solution. In 2013, I was watching "Hometime" where they installed Electric Radiant Heaters in a storage/work area. I looked up the company, "Radiant Electric Heat" on the internet, spoke with the company, and placed my order.
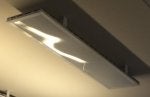
Materials. I purchased three 240 volt Electric Radiant Heaters for ceiling mounting, model 945CL-240-2W. These heaters produce 3414 BTUs and consumed 1000 watts at 4.23 Amps and measure 46 (length) x 10 (width) x 1.125 (thickness). While I call these units heaters, I believe they are actually lamps that produce light in the infrared region of the spectrum rather than in the visible light spectrum.
Each unit arrived with stand-off brackets for mounting to the ceiling. I also purchased their Mechanical Double Pole line voltage thermostat. The heaters can be found at
http://electricheat.com/products/ceiling-heater-surface-mounted/
I also purchase 10-2 electric cable, a 240 switch rated at 30 amps, and a 20 amp/240 circuit breaker from the home center.
Installation. I planned the layout and cut ¾" plywood onto which I mounted the heaters. I installed the plywood on the ceiling at each heater location. I entered the attic and ran 10-2 electric cable to each heater location. I brought the cable from the heaters into the box for the thermostat, from there to the box for the switch, and from there to the load center. The heaters were daisy chained.
I installed the stand-off heater mounting brackets. Then the fun began. The junction box is mounted on the ceiling side of the heater. I made electrical connections at each heater with the heater hanging close to the ceiling while leaving just enough room to make the connections. This was a real challenge given the stiffness of 10 gauge wires. I managed to make the connection and then replace the junction box cover. The heater was secured to the stand-off brackets.
The thermostat and switch were wired and the circuit breaker installed. I powered up the circuit and held my breath, as I do whenever I to do electric work. Everything worked and I passed the county's electrical inspection.
Performance. I really like the heaters. The radiant heaters use infrared light to heat objects in the workshop, which then radiate heat into the workshop. As I write this review, the outdoor temperature is 10 degrees, and the workshop is warm. It does take a little time to warm the shop when I first begin work, but no longer than it did with the kerosene heater. The units are quiet and I can use the thermostat to increase or decrease the shop temperature. Even though the thermostat has an off position, I prefer the separate switch to shut the heaters off when I am done for the day. That way, I know they are off.
When I purchased the heaters, I was uncertain whether three heaters would be adequate. The company did a heat load calculation using shop parameters I provided, including my desire to keep the shop at around 60-65 degrees. However, I planned the circuit to handle 4 heaters. That way I could add another heater to the existing circuit by simply replacing breaker.
Best of all, no more trips on a cold day to buy kerosene, no more spills, no more fumes, and I found winter time floor space.
Cost. The cost of the heaters and thermostat with shipping was about $1200. Electric supplies from the home center probably added another $100.
The 3 heaters consume 3 kilowatt hours for every hour they are on. For me, that is less than $0.25 per hour. Therefore, the heaters can operate 120 hours before I spend what I was spending on kerosene.
A hidden cost was the insulation I installed in the garage attic back when I was heating with kerosene. Insulation in the attic and exterior walls and the insulated garage door are a critical to the performance of the heaters.
Maintenance. Dust can accumulate in the heater, on top of the lamp and under the top of the lamp frame. The company recommended that any dust be blown off the lamps by directing compressed air through the vent slots as needed. The lamps get hot to the touch and probably would cause a burn with prolonged contact. I am not sure they get hot enough to combust wood dust. Nonetheless, I blast them with air from time to time.
Problems. The only issue I had was making the electric connections to the heaters. The designer obviously did not think about how one could re-attach the heater's junction box when working just inches from the ceiling. The junction box is held in place by a single philips screw that is driven from the top, right where the ceiling happens to be. I used patience, a wrench, and a philips bit to secure the junction box in place. My stubby screw driver was too long. Although the problem would have been easier with 12 gauge wire, it still would have been a challenge.
I sent an email to the company recommending a design change, but suspect it went into their bit bucket.
Recommendation. I recommend these heaters. I doubt that these heaters are saving any money, but the convenience and performance of the units made it a worthwhile upgrade for me.
Problem. Prior to 2013, I heated the attached 2 car garage 450 square foot workshop with open flame heat. I started out with propane, but it was loud and consumed a lot fuel. I switched to tall style kerosene heater and stuck with it for about 5 years.
The kerosene heater did a great job keeping the shop warm, but the fumes would enter the house even with weather stripping on the tight closing door. And then there was purchasing fuel; it seemed that every two to three weeks I had to make a trip to the gas station in the cold to purchase 10 gallons of fuel. Additionally, I did not like cleaning up the occasional inevitable spills and the heater took up floor space. In January and February in the mid-west, I probably spent about $40 - $60 per month, depending of kerosene prices, weather, and my time in the shop.
One problem that I did not notice was excess moisture in the shop. Open flames produce a lot of water from the burning of fuel. However, I occasionally opened the garage door to get rid of fumes, so that probably saved me problems with my projects.
Solution. In 2013, I was watching "Hometime" where they installed Electric Radiant Heaters in a storage/work area. I looked up the company, "Radiant Electric Heat" on the internet, spoke with the company, and placed my order.
Materials. I purchased three 240 volt Electric Radiant Heaters for ceiling mounting, model 945CL-240-2W. These heaters produce 3414 BTUs and consumed 1000 watts at 4.23 Amps and measure 46 (length) x 10 (width) x 1.125 (thickness). While I call these units heaters, I believe they are actually lamps that produce light in the infrared region of the spectrum rather than in the visible light spectrum.
Each unit arrived with stand-off brackets for mounting to the ceiling. I also purchased their Mechanical Double Pole line voltage thermostat. The heaters can be found at
http://electricheat.com/products/ceiling-heater-surface-mounted/
I also purchase 10-2 electric cable, a 240 switch rated at 30 amps, and a 20 amp/240 circuit breaker from the home center.
Installation. I planned the layout and cut ¾" plywood onto which I mounted the heaters. I installed the plywood on the ceiling at each heater location. I entered the attic and ran 10-2 electric cable to each heater location. I brought the cable from the heaters into the box for the thermostat, from there to the box for the switch, and from there to the load center. The heaters were daisy chained.
I installed the stand-off heater mounting brackets. Then the fun began. The junction box is mounted on the ceiling side of the heater. I made electrical connections at each heater with the heater hanging close to the ceiling while leaving just enough room to make the connections. This was a real challenge given the stiffness of 10 gauge wires. I managed to make the connection and then replace the junction box cover. The heater was secured to the stand-off brackets.
The thermostat and switch were wired and the circuit breaker installed. I powered up the circuit and held my breath, as I do whenever I to do electric work. Everything worked and I passed the county's electrical inspection.
Performance. I really like the heaters. The radiant heaters use infrared light to heat objects in the workshop, which then radiate heat into the workshop. As I write this review, the outdoor temperature is 10 degrees, and the workshop is warm. It does take a little time to warm the shop when I first begin work, but no longer than it did with the kerosene heater. The units are quiet and I can use the thermostat to increase or decrease the shop temperature. Even though the thermostat has an off position, I prefer the separate switch to shut the heaters off when I am done for the day. That way, I know they are off.
When I purchased the heaters, I was uncertain whether three heaters would be adequate. The company did a heat load calculation using shop parameters I provided, including my desire to keep the shop at around 60-65 degrees. However, I planned the circuit to handle 4 heaters. That way I could add another heater to the existing circuit by simply replacing breaker.
Best of all, no more trips on a cold day to buy kerosene, no more spills, no more fumes, and I found winter time floor space.
Cost. The cost of the heaters and thermostat with shipping was about $1200. Electric supplies from the home center probably added another $100.
The 3 heaters consume 3 kilowatt hours for every hour they are on. For me, that is less than $0.25 per hour. Therefore, the heaters can operate 120 hours before I spend what I was spending on kerosene.
A hidden cost was the insulation I installed in the garage attic back when I was heating with kerosene. Insulation in the attic and exterior walls and the insulated garage door are a critical to the performance of the heaters.
Maintenance. Dust can accumulate in the heater, on top of the lamp and under the top of the lamp frame. The company recommended that any dust be blown off the lamps by directing compressed air through the vent slots as needed. The lamps get hot to the touch and probably would cause a burn with prolonged contact. I am not sure they get hot enough to combust wood dust. Nonetheless, I blast them with air from time to time.
Problems. The only issue I had was making the electric connections to the heaters. The designer obviously did not think about how one could re-attach the heater's junction box when working just inches from the ceiling. The junction box is held in place by a single philips screw that is driven from the top, right where the ceiling happens to be. I used patience, a wrench, and a philips bit to secure the junction box in place. My stubby screw driver was too long. Although the problem would have been easier with 12 gauge wire, it still would have been a challenge.
I sent an email to the company recommending a design change, but suspect it went into their bit bucket.
Recommendation. I recommend these heaters. I doubt that these heaters are saving any money, but the convenience and performance of the units made it a worthwhile upgrade for me.