LumberJocks Woodworking Forum banner

Dovetail layout for drawer back

3.4K views 24 replies 10 participants last post by  controlfreak  
#1 · (Edited by Moderator)
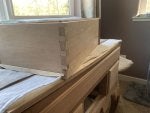
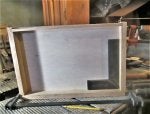
I'm building drawers and decided to try the approach where the bottom slides in from the back. The back is therefore less wide than the other parts so that the bottom can slide under it. The bottom is then nailed to the underside of the back.

This implies a different layout for the dovetails as the back has to join with the sides higher up than it would
Otherwise.

Anyone with experience doing this have layout tips for me?
 
#2 ·
Yes. The simplest way is lay out the pins on the back first and cut straight done at the top of the groove on the tail board.

If you cut tails first, mark a vertical parallel to groove first.

Also, when you scribe the sides, don't put an edge mark at the bottom back , or write an X there - that can prevent an oops.
 
#3 ·
It really doesn't have to be joined higher, just cut short at the bottom. You'll probably want to account for that when you do the tails for the side pieces so you don't have a stray tail left over.

No one would see it, but you'd know it was there, likely leading to many sleepless nights.
 
#5 ·
Functionally no need for DTs at back of drawer, most dado the back, short wall with bottom slid under and nailed or screwed. DTs are functional at front where they help oppose forces of pulling the front.

Even after you show them how to release a drawer, most users never do, so they don't see DT's at back anyhow.
 
#8 ·
Another good way to build drawers with Dovetails is to use drawer slips. It might be called English or British drawer slips. I can't remember
Drawer slips give you the advantage of thinner sides. The bottom can fitted nicely after the drawer is built.
Here's a pic to get the idea
Image


Good Luck

- Aj2
Yeah I'm following Tage Fried's article on drawer making and he recommends slips as well. Indeed this lets me use 3/8" sides, so I'm re-sawing 4/4 and accumulating 1/4" stock for another day.

Still he has the slips on the sides only, with a groove in the front and a short wall in back. Do you see a way to do the whole thing in slips? Do you just helicopter it in and glue it from all sides?
 

Attachments

#9 ·
Functionally no need for DTs at back of drawer, most dado the back, short wall with bottom slid under and nailed or screwed. DTs are functional at front where they help oppose forces of pulling the front.

Even after you show them how to release a drawer, most users never do, so they don t see DT s at back anyhow.

- therealSteveN
Dado the back… you mean a lock rabbet? I'm trying to grasp how I could dado a corner. You're right that it will never be seen. Could do box joints or something with a spline even.
 
#10 ·
Yes. The simplest way is lay out the pins on the back first and cut straight done at the top of the groove on the tail board.

If you cut tails first, mark a vertical parallel to groove first.

Also, when you scribe the sides, don't put an edge mark at the bottom back , or write an X there - that can prevent an oops.

- Robert
This is helpful, thank you.
 
#12 ·
leftcoaster…

How are you cutting your dovetails? I ask because if you're using a jig, dovetails are a no brainer for the back joints since you're already set up and it's faster to just cut those joints than it is to set up for another type of joint. Not that a lock rabbet or similar joint is hard to set up, it's just going to take longer than cutting dovetails on a jig that's all ready to go.

If you're cutting them by hand, it might make some sense. Unless, that is, you're a dovetailing wiz.

Be careful nailing from underneath to secure the drawer bottom. Since there's no groove there to support it, excess weight can cause it to sag if the nails fail. If you let the drawer bottom extend the full length, then you'll have a ledge to add glue blocks in the back.

Image
 
#13 ·
leftcoaster…

How are you cutting your dovetails? I ask because if you re using a jig, dovetails are a no brainer for the back joints since you re already set up and it s faster to just cut those joints than it is to set up for another type of joint. Not that a lock rabbet or similar joint is hard to set up, it s just going to take longer than cutting dovetails on a jig that s all ready to go.

If you re cutting them by hand, it might make some sense. Unless, that is, you re a dovetailing wiz.

Be careful nailing from underneath to secure the drawer bottom. Since there s no groove there to support it, excess weight can cause it to sag if the nails fail. If you let the drawer bottom extend the full length, then you ll have a ledge to add glue blocks in the back.

Image


- Rich
Wow, that's brilliant. I wondered about those nails too.

I am cutting them by hand. In the front they are half blind, which takes rather longer than through ones. I will probably do through ones because it's skill development and I'm pretty quick, since I use my palm router to clean out the pins. I would like to have fewer gaps, hence the desire for practice.
 
#14 ·
I am cutting them by hand. [...] since I use my palm router to clean out the pins.

- leftcoaster
Oh No!! You can't say that on here without this turning into a mega-thread on what constitutes hand cut. Some even argue that using guide blocks with your hand saw is cheating.

Not me though. Actually, I cut my dovetails by hand as well. I carefully guide my router along the dovetail template on my jig-by hand.
 
#15 ·
I am cutting them by hand. [...] since I use my palm router to clean out the pins.

- leftcoaster

Oh No!! You can t say that on here without this turning into a mega-thread on what constitutes hand cut. Some even argue that using guide blocks with your hand saw is cheating.

Not me though. Actually, I cut my dovetails by hand as well. I carefully guide my router along the dovetail template on my jig-by hand.

- Rich
LOL. I use Mike Pekovich's approach but no table saw for the tails.

Hand saw tails with a dozuki, clear the waste with a fret saw. Pare with a chisel. Transfer the marks to the pin board and saw. Remove enough to get a clean pin wall to use as a template and clean out the bottom with the palm router.

If you ever watch I********************ani Furniture on YouTube he does the same as Pekovich. I like when the tails aren't always spaced with engineered precision, so I haven't used power tools that would enforce the layout.
 
#16 ·
Yeah I'm following Tage Fried's article on drawer making and he recommends slips as well. Indeed this lets me use 3/8" sides, so I'm re-sawing 4/4 and accumulating 1/4" stock for another day.

Still he has the slips on the sides only, with a groove in the front and a short wall in back. Do you see a way to do the whole thing in slips? Do you just helicopter it in and glue it from all sides?

- leftcoaster
Not sure what a short wall in the back is. But a groove in the front is a must. Thats made between the sockets of the drawer front.
What i do is glue the slips on the sides after all the careful fitting is done. Then slide the drawer bottom in last
Good Luck
 
#17 ·
Dado the back…
Image


Screws are optional to hold the back into the dado…larger drawers I do….the last 5 I just completed, relied just on glue…
Image


Half blinds up front, for "show"..
Image


Dados to hold the back..
Image


Bottom slides in under the back, and into grooves in the sides and front…
Image


YMMV…
Image


Carefully look..those be slips showing…..with a 1/4" plywood panel glued to it….mitered in the corners, they go on all four sides…3/8" sides, at that..
Image


Except this has hand cut box joints…aka Finger Joints in all four corners…
 

Attachments

#18 ·
Functionally no need for DTs at back of drawer, most dado the back, short wall with bottom slid under and nailed or screwed. DTs are functional at front where they help oppose forces of pulling the front.

Even after you show them how to release a drawer, most users never do, so they don t see DT s at back anyhow.

- therealSteveN

Dado the back… you mean a lock rabbet? I'm trying to grasp how I could dado a corner. You're right that it will never be seen. Could do box joints or something with a spline even.

- leftcoaster
Bandit did an excellent job of showing exactly what I was talking about Dadoing the back meant, at least to me. Plenty strong enough, easy to do, and not the "fit" required like with the DTs in order to be functional. You are already pulling the drawer box along, with the load inside by the opposition of the DTs in front. All you need is solid entrapment and something to tag the bottom to in the back.

Even if I had a DT jig already set up, it takes a bit of careful work to keep putting parts into play to also DT the backs, sure it is a strong joint, just unnecessary. At a router table, using a sled to move longer pieces smoothly I can run both rear sides through a 3/4" bit of 10, 20, 50 or 100 drawers a LOT quicker than I could ever crank them out with the DT jig. Doing it with the TS IMHO is taking longer than a pre set router jig.
 
#19 ·
My first, and only drawer, I just lay it out with an oversized tail so to speak at the bottom. I did dovetails for the back mostly because I wanted the practice. I have also seen some where the back has to large tails with a exaggerated pin on the bottom. Ya know, I can't remember how I did it now. I was just happy that my first half blind drawer worked out. Fun to see all of the different options here.
 
#23 ·
I mentioned it above but here is a link to the FWW (1984!) article by Tage Frid on drawermaking.

- leftcoaster
Sure, that's how it was done in 1984, but everything's changed now with the new technologies.

Nah, just kidding. You'll never go wrong following Tage Frid's advice.

I do have to say that in the world of drawer construction, the joinery for the back of the drawer is probably the least critical choice to make.