Creating the Top
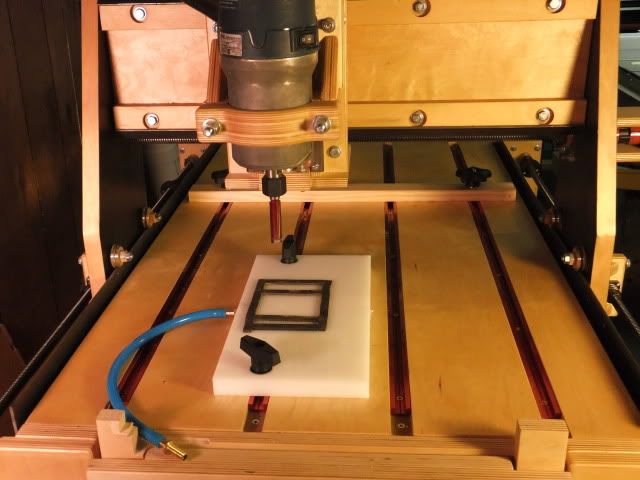
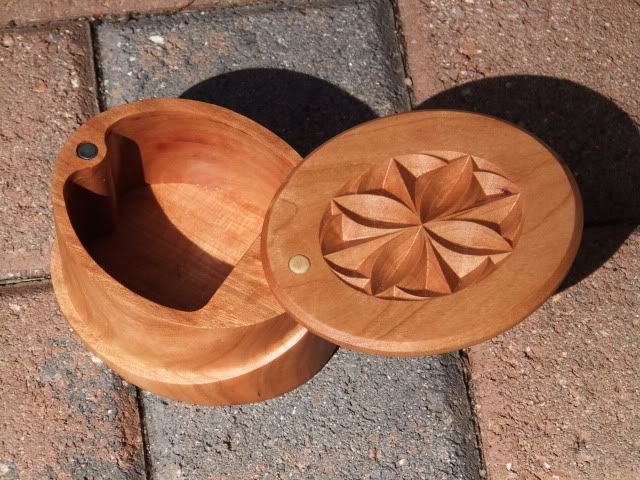
I will try to describe how I created the design for the Salt Box, and how I told my homemade CNC to cut it out. Here is a picture of the box, and the top. Let's start with the top.
![Image]()
Remember this is just a router. Almost all the things that the CNC can do may be done by hand routing, maybe with a template or a fancy router table. But for this project, I picked a couple of things that would be quite difficult without the machine control.
Background: In my mind, there are four types of routing that you can have the machine do.
Profile: Cutting on a line. You have it cut on a line, outside of the line, or inside of the line. Different bits can be used to get different effects. These would include a straight bit, a V-bit, and a rounded core box bit. You can also tell the machine how deep to go and whether to go flat horizontal or gradually change the height as it routes.
Pocket: Cutting out a pocket (or mortise). Typically here you select a closed drawing and tell the machine how deep to route it out. The two main bits here are the straight bit and the bowl cutting bit with its slightly curved sides. Typically the bit is plunged to a certain depth in the center of the pocket, and then moved about to complete that depth. Lower the depth and repeat.
Raster: Cutting out a "3D" design. Typically here the router is started at the upper left hand corner and then move straight to the right using a very small bit. The bit depth is constantly changed as it moves. This is repeated hundreds if not thousands of times until the design appears. It takes a long time, and you need a really nice machine to pull off a nice result.
V-Carve: Cutting with a V-bit while gracefully changing the height. This produces basically the same thing as Chip Carving by hand. The design must be carefully chosen to never allow the bit to route too deep. The way it works is the software sees a drawing object (called a closed vector) and will tell the machine to lower the V-bit into the center of it until the depth is such that the sides of the V touch the sides of the closed vector. Then it will instruct the machine to move and raise the bit to keep the V always touching the sides of the vector. A lot of signs are made this way as font characters are closed vectors.
I will cover Profile and Pocketing in another blog. I don't do Raster. And that leaves me with V-Carve for now.
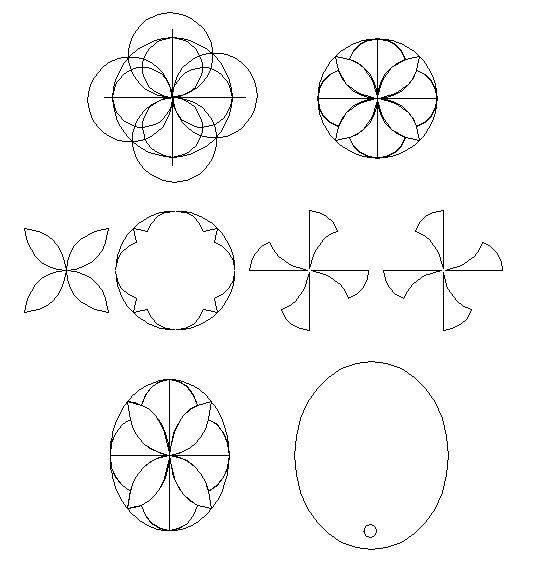
Here is a picture of the objects presented to the software which creates the design. This should be recognizable to someone who has done Chip Carving. I started with a bunch of overlapping circles. I then trimmed the lines (called vectors) until I had what is shown. Next I used layers in the drawing editor to copy certain elements of the design to end up with 4 sets of closed vectors. I then selected all the little parts and stretched them into an oval. Also pictured is the profile of the design and where the drill hole goes.
![Image]()
And here is a video of it being cut. I edited it down to two minutes. It is worth a look, as I think this is the most magical part of a design. Maybe you should hit the mute button, as you probably are not wearing ear protection right now.
Take care,
Steve
I will try to describe how I created the design for the Salt Box, and how I told my homemade CNC to cut it out. Here is a picture of the box, and the top. Let's start with the top.
Remember this is just a router. Almost all the things that the CNC can do may be done by hand routing, maybe with a template or a fancy router table. But for this project, I picked a couple of things that would be quite difficult without the machine control.
Background: In my mind, there are four types of routing that you can have the machine do.
Profile: Cutting on a line. You have it cut on a line, outside of the line, or inside of the line. Different bits can be used to get different effects. These would include a straight bit, a V-bit, and a rounded core box bit. You can also tell the machine how deep to go and whether to go flat horizontal or gradually change the height as it routes.
Pocket: Cutting out a pocket (or mortise). Typically here you select a closed drawing and tell the machine how deep to route it out. The two main bits here are the straight bit and the bowl cutting bit with its slightly curved sides. Typically the bit is plunged to a certain depth in the center of the pocket, and then moved about to complete that depth. Lower the depth and repeat.
Raster: Cutting out a "3D" design. Typically here the router is started at the upper left hand corner and then move straight to the right using a very small bit. The bit depth is constantly changed as it moves. This is repeated hundreds if not thousands of times until the design appears. It takes a long time, and you need a really nice machine to pull off a nice result.
V-Carve: Cutting with a V-bit while gracefully changing the height. This produces basically the same thing as Chip Carving by hand. The design must be carefully chosen to never allow the bit to route too deep. The way it works is the software sees a drawing object (called a closed vector) and will tell the machine to lower the V-bit into the center of it until the depth is such that the sides of the V touch the sides of the closed vector. Then it will instruct the machine to move and raise the bit to keep the V always touching the sides of the vector. A lot of signs are made this way as font characters are closed vectors.
I will cover Profile and Pocketing in another blog. I don't do Raster. And that leaves me with V-Carve for now.
Here is a picture of the objects presented to the software which creates the design. This should be recognizable to someone who has done Chip Carving. I started with a bunch of overlapping circles. I then trimmed the lines (called vectors) until I had what is shown. Next I used layers in the drawing editor to copy certain elements of the design to end up with 4 sets of closed vectors. I then selected all the little parts and stretched them into an oval. Also pictured is the profile of the design and where the drill hole goes.
And here is a video of it being cut. I edited it down to two minutes. It is worth a look, as I think this is the most magical part of a design. Maybe you should hit the mute button, as you probably are not wearing ear protection right now.
Take care,
Steve