LumberJocks Woodworking Forum banner

Advice for padding on ring compartment for boxes

3K views 29 replies 7 participants last post by  wildwoodbybrianjohns  
#1 · (Edited by Moderator)
Im having some difficulty sourcing the right padding to underlay fabric for jewelry box ring compartments. I am aiming for the high-end market and so, need a quality material.

So far, Ive bought cheap, crappy chinese boxes and canibalized the foam padding, but this isnt a long-term solution. I also tried cutting up a foam yoga mat, but this material is too stiff.

Anyone have a suggestion???
 
#3 · (Edited by Moderator)
Brian - can you show a photo of the boxes you have made
plus the cheap ones you buy to cannibalize the parts you need ?
I think that would put everyone on the same page.
I am not far from a big fabric and craft store that has all kinds of speciality foams.
I think I know what you are looking for and have some here at home.
but will wait to hear more about exactly what you need.
but, with you being in Spain, that may throw a kink in the mix for availability.
[you have an awesome website, BTW - and you are a true craftsman !!]

I was in a Tiffany's jewelry store in Orlando, FL a few weeks ago so my wife could
get a bracelet she just HAD to have . . . . as she was being fitted, I walked around
and looked at all the "stuff" in the display cases. I didn't pay any attention to the
supports or anything to actually display the pieces, I was too distracted by the PRICE TAGS!!

.

.
 
#4 · (Edited by Moderator)
To Cowboyup:

Well, ya, I guess. Thanks for pointing in "A" direction. Problem with Rockler is allot of their stock they wont import to Europe(Spain), I always get a: "sorry, this item is not eligible for shipping to spain," notification. And if they do, its gonna cost me more in import tax than the item itself, plus shipping.

But now I can google around and maybe find what Im looking for, shipped from europe somewhere.

I was thinking more like some type of foam I could cut to custom sizes.

Anyway, thanks again, cheers.
 
#5 · (Edited by Moderator)
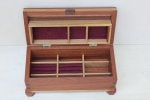
The first photo is felt overlaid on some foam cannibalized, and Im happy with this.

Image


This second photo shows a result I was not happy with, and have since redone it to resemble the first.

Image


These examples are just thick felt wrapped over 1/4" foam. And I dont hotglue or anything in case the buyer wants to remove it.

Sorry, dont have a photo of crappy chinese stuff atm. I will do some googling, and try to find a sewing/fabric shop local that might have a solution.

I am upping my game though and moving to higher quality fabrics, felt isnt quite good enough.
 

Attachments

#6 · (Edited by Moderator)
Hey John, thanks for that compliment, truly.

When I was young I worked in various production cabinet shops, learned the ropes, and particle board and laminates were not my thing; plus there was what I call the "sawdust shuffle," similar to the gait a sailor developes, that just wears you out, at the end of the day you are just done! and I bailed on the kitchens and bath vanities and went into the painting business, which I did for many years in various parts of the world; to the point where I was applying to the program in Denmark that certifies you to work in the "royal" buildings.
Then I moved to Spain and didnt enter that program. Last job I was on here in Spain was a nightmare, which I wont detail, suffice to say, I said to myself- I aint doing this anymore, and went back to my roots.

So, Im only about a year into this thing I am doing now.
 
#7 ·
Brian - if you want to set the bar high for your caliber of craftsmanship,
look at some of the lady's scarfs to cut up to go over the foam
and get away from the felt. in my personal opinion, a nice silk would far
outweigh any felt lining in just about anything. (even a gun display box).
I will photo the foam I have later today to show you what I have.
it is not as stiff as a yoga mat but more so than poly or styro foam.

(I have been to Spain several times in my Naval career and almost got
married twice in Palma and 3 times in Torremolinos). whew, what a cruise !

.
 
#9 ·
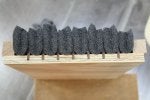
With respect to the ring inserts, I've been happy with these as starting pieces. I size the compartment for an integer number of "rolls" of the ring insert material. For my box I used five of the seven rolls and made the interior width 5-7/8 inches.
The extra rolls were cut off on the table saw by raising the blade just high enough to cut through the cardboard foundation of the insert. The extra rolls were then easy to detach. For cutting to width I cut the insert by first squaring up the end with the TS blade (48 tooth) raised to full height so the cuts are basically down strokes to eliminate any fraying damage (cut very cleanly this way). The inserts have small stir-stick type slats glued into the loops about 1/3 the thickness down. When cutting to length, my first pass on the TS had the blade raised just high enough to sever these sticks with the tooth tips. The saw blade had the tendency to pull the foam down slightly when the blade contacted these sticks and the top edges of the black cover material would get nicked. By cutting the sticks first, then making the final full blade height pass, everything came out perfect. For sizing, my required length was 4 inches. I cut the insert to 4-1/16" so there would be some slight compression for a clean, snug fit without any visible buckling. The sticks needed to be trimmed back about 1/8" on each end and a pair of wire cutters did the trick easily. The cardboard base was then trimmed back from each end by about 1/16" with the blade raised to just cut the cardboard as before.

Image
 

Attachments

#11 · (Edited by Moderator)
So, after some checking, definitely cant get the rockler item shipped here, nor can I get JewelrySupply inserts shipped here, U.S. only.

Sucks, cause either of those would be perfect.

All I found so far googling is like this, which is still cannibalizing chinese crap, arghh.

Image
 

Attachments

#14 · (Edited by Moderator)
Thanks john for all your help. Im still hopeful I can google up something from the U.K. I did find the right type of thing, only drawback is its leatherette, whatever that means, i.e., plastic.

Last resort, my dad lives in Fla, I can get him to order from rockler and send it here.

But ya know, Ima DIY kinda guy, might just end up making these inserts myself….
 
#15 ·
You could make your own?

Long story short: Had the pleasure of touring various wood working shops in Philippines during my travels. One had building dedicated to making inlay decorated jewelry boxes from local mahogany. They made the ring inserts in the finishing shop. Don't have any pictures, wasn't allowed to take any of the operation.

Here's best I can type to describe the gluing fixture and process used:

It was simple a 1" thick plate of aluminum roughly 12×18 inches:
with grooves deep enough to hold slightly compressed round strips of foam,
with narrow ~3/16" wide fingers between each foam strip.
The grooves captured the foam as they were round with exposed opening smaller than width of round foam bar. Sort of like this train track router bit creates:
http://www.carbideprocessors.com/model-train-track-bit-female-connector-whiteside-3900/
The circles were almost touching each other at center line, and they showed me old fixtures made from MDF that had broken during use.

The assembly process was key. The would lay felt across the plate, push foam into each groove using a narrow board to ensure it is compressed and fully seated in circle, when plate was full, they sprayed contact cement on entire surface and let it dry slightly. They took a piece of card board covered one side with same felt, edges folded over onto the back, and sprayed back with contact cement. They dropped the plate with foam strips into a box with sides deeper than plate, and dropped the felt covered cardboard on top to properly align and bond it together. Used a J-Roller to firmly bond the 2 surfaces. The result was a panel of ring holders that could be slide out the side of the fixture.

The ring supports where cut to size using a cute desk top version of table saw, with a rotating 6" paper slitting knife. They don't use teeth to avoid dust contamination. In case you are not familiar, the blades look like this:
https://www.baucor.com/collections/paper-cutting-knives-paper-slitter-blades

Round foam 'bar' stock is pretty easy to find in USA. It's called Foam Welt Cord when used for upholstery work. Most common in shops that do Marine upholstery, but also found in some vehicle upholstery.
Worst case, McMaster sells Santoprene rounds: https://www.mcmaster.com/6322K14

-
#IAMAKLUTZ, sharing an idea, not an expert.

Best Luck.
 
#19 ·
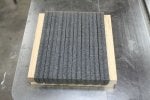
A few years back when the Rockler inserts were all I could easily find, I decided to make my own. These are felt covered:

Image


Basically I made a jig for gluing and used common pipe insulation for the foam.

It worked quite well after I figured out all the bugs, but I'll settle for commercial units now for the instant gratification 8^)
 
#20 ·
Some more details:

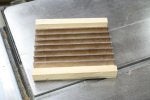
I created a jig with a plywood base and "slats" to separate each row of the ring insert foam

Image


I then installed a loop of foam (pipe insulation) into each section, cut to approximate size

Image


The foam strips were then sized to fit the jig nicely

Image


I then removed the foam strips and laid in a section of the cloth I wanted to use. I begin with the cloth flat across the top of the jig, then insert the center strip of foam pushing in the fabric until it sits flush. This is repeated center-outward until everything is in place and taught.

It then is a simple matter to use spray adhesive (3M super 77) over the jig and place a hardboard "cap" that forms the bottom of the ring insert. Pressure is applied with a heavy weight to keep all the fabric folds in contact with the hardboard cap while the adhesive dries.
Image
 

Attachments

#21 ·
Hey man, thats perfect. Thanks so much for this. I think I will make several jigs of different sizes, that can be "standard" in all my boxes.

Have you ever had a problem cutting fabric on the tablesaw, I mean, Im imagining fabric getting caught up in a spinning blade and= disaster!
 
#22 ·
Have you ever had a problem cutting fabric on the tablesaw, I mean, Im imagining fabric getting caught up in a spinning blade and= disaster!

- wildwoodbybrianjohns
I would never try to trim off the fabric on a TS unless it was fully glued to the foam. To may things to go wrong =8^0

For trimming the foam, I had added small piece of DS tape in each slot to temporarily hold them securely.
I then placed them in and pushed them into the tape with a wide/thin board along the fold in the foam. The flat surface was leveled out with a thin/sharp Japanese trim saw riding along the slats in the jig. I did the edge trimming the same way.

I found that I could get a better shape at the "heads" of the strips by pushing a length of dowel rod (3/16" or so) into the bottom of the foam folds (secured in place with a few spots of glue to keep from sliding down).

Trimming the fabric on the ends is still a design work in process 8^)

Since the fabric is not attached to the foam (just at the line where the folds contact the backing material), it needs to be wrapped over the ends and secured. Currently I have just scissored a cut along the fabric fold, then folded over the flap and attached it to the end of the foam, repeating for each foam strip. It takes some fiddling to get it looking consistent. This is probably the biggest reason I like the commercial products. With the fabric attached to the foam, cutting on the TS produces a clean edge.

The problem with fully gluing the foam to the fabric is finding the right glue. It has to be able to deform/flex and not bleed through the fabric. I've considered trying the 3M spray and producing the insert one row at a time.
What I'd try first is to wrap the fabric around the top and sides of a single piece of the trimmed-to-size foam. Apply the spray glue, set the fabric over the foam, then place it in a jig slot to dry. Do this for each strip then attach them all together with the backing. The jig would be useful for alignment, but the ribs would need waxing to keep them from being glued to the backing.

Anyway, just rambling here. I'd say give it a try and see what works for your needs. The best thing about the home made inserts is you get to choose the fabric and color.
 
#25 ·
Thanks again, invaluable info.

Re: cutting fabric on the TS, I meant when cutting the whole piece, backer, foam and fabric, after glue-up.

Obviously, cutting the fabric alone is just the dumbest thing ever:))

- wildwoodbybrianjohns
I grok!

I would only cut the foam/fabric if the entire surface of the fabric was glued to the foam, as is with the commercial inserts. My original creations only have the fabric secured to the foam where the two meet at the junction of the backer board.
 
#26 ·
The problem with fully gluing the foam to the fabric is finding the right glue.
- splintergroup
Adhesive are tricky things to find, well sometimes, unless you happen to know someone who worked in the adhesives industry? wink, wink…..

If you want a PERMANENT, non-bleed, flexible, spray fabric adhesive;
3M #24 Foam & Fabric adhesive is a common professional choice for general purpose upholstery applications. Henkel/Loctite/Peramtex makes similar product, but only the more rigid headliner adhesive is sold via retail outlets.

If you want a TEMPORARY, non-bleed, flexible, spray fabric adhesive;
Odif 505 is common choice for upholstery shops, or costume making. There are many many private label temporary spray fabric adhesives sold in fabric shops. Some are even water soluble, and are washed away after assembly. They are very popular as replacement for pins in high volume fabric sewing operations. Often used in 5 gal pail fed pressure pots and special swirl pattern spray guns borrowed from hot melt gun applications. The swirl pattern gun ensures even coverage with thick adhesive that doesn't atomize well.

If you want a PERMANENT, non-bleed, spray adhesive for fabric/foam bonded to solid metal/plastic surfaces; 3M offers headliner adhesive. There is also the Permatex version.

TBH, the headliner adhesives are very close formulations to classic 3M 77 or 3M 90 spray contact cement(s), but are designed to endure higher temperature before degradation, while maintaining better flexibility. As many people eventually find out, Classic contact cement turns hard and brittle after a few months.

The above are easy to find retail suggestions.
Hot melt adhesives are very popular in fabric/foam bonding in high volume production environments. They have zero solvents, low odor, and outside of higher cost application equipment are usually cheapest option when assembling thousands of yards of fabric and/or foam per day. Hot melt adhesives are somewhat selective to type of bonded substrate, but the automotive and sports equipment industries solve this though use of 2-part polyurethane hot melt adhesives. They are too complex for most home shops, so will stop here.
Adhesives are fun stuff to work on, earned half dozen patents while doing it.
Glad you asked. Maybe you aren't? Oh well.

As always with product suggestions, YMMV.