How to do it
Basket Weave Pattern Technique
Adapted from the book "High Relief Wood Carving" by William J Schnute.
Layout a grid of squares.
Each side of the grid equal to the width of the carving gouge you'll use. In this instance, the gouge is 5/16mm. Each side is therefore 16mm, or about 5/8". Since I'm more imperial than metric, I used 5/8. Close enough.
Each side of each grid square will get a stop cut with the 5/16 gouge.
![Image]()
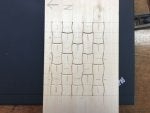
Mark orientation lines.
It's real easy to make mistakes. So make some marks to help orient your gouge for the upcoming stop cuts. Mark every other square, as in a checker board pattern.
![Image]()
Make stop cuts
The key to avoid mistakes is to always place the cutting edge of the gouge parallel and below the orientation line. The outer edges of the gouge will meet the corners of the 5/8" square.
![Image]()
Now make stop cuts on one side of the marked squares.
![Image]()
Flip the work piece 180 deg and stop cut opposite side of square.
![Image]()
Complete the top and bottom "waves".
![Image]()
Mark orientation lines for remaining squares.
These lines are perpendicular to first set of orientation lines.
![Image]()
Make 3rd set of stop cuts. Remember gouge is parallel and below the new orientation lines.
![Image]()
Flip work piece 180 degrees and make last group of stop cuts, opposite side of each square.
![Image]()
Begin roughing in the weave.
In this operation carve in the direction of the orientation lines. I used this gouge because it's what I had, but I think a 1F or 2F/8 would do a better job.
![Image]()
![Image]()
![Image]()
Carve "against the grain" squares.
![Image]()
![Image]()
![Image]()
![Image]()
The rest is just cleaning up stop cuts and corners, and rounding the tops of the weaves.
Basket Weave Pattern Technique
Adapted from the book "High Relief Wood Carving" by William J Schnute.
Layout a grid of squares.
Each side of the grid equal to the width of the carving gouge you'll use. In this instance, the gouge is 5/16mm. Each side is therefore 16mm, or about 5/8". Since I'm more imperial than metric, I used 5/8. Close enough.
Each side of each grid square will get a stop cut with the 5/16 gouge.
Mark orientation lines.
It's real easy to make mistakes. So make some marks to help orient your gouge for the upcoming stop cuts. Mark every other square, as in a checker board pattern.
Make stop cuts
The key to avoid mistakes is to always place the cutting edge of the gouge parallel and below the orientation line. The outer edges of the gouge will meet the corners of the 5/8" square.
Now make stop cuts on one side of the marked squares.
Flip the work piece 180 deg and stop cut opposite side of square.
Complete the top and bottom "waves".
Mark orientation lines for remaining squares.
These lines are perpendicular to first set of orientation lines.
Make 3rd set of stop cuts. Remember gouge is parallel and below the new orientation lines.
Flip work piece 180 degrees and make last group of stop cuts, opposite side of each square.
Begin roughing in the weave.
In this operation carve in the direction of the orientation lines. I used this gouge because it's what I had, but I think a 1F or 2F/8 would do a better job.
Carve "against the grain" squares.
The rest is just cleaning up stop cuts and corners, and rounding the tops of the weaves.