LumberJocks Woodworking Forum banner

Work Bench Build

80K views 127 replies 32 participants last post by  helluvawreck  
#1 ·
The Beginnings, where I come from, and where I'm going.

A Workbench… I figured it was about time I make one. I've been working with hand tools primarily for almost a year now, and my "workbenches" has had many forms. My primary work horse was the work mate. Now, this works, but is far from ideal.

Image


Image


Image


And so it goes on. I've also used a few other arrangements as well.
Parallel jaw clamps, clamped to a folding table, clamped to a porch support beam. This actually worked surprisingly well, until there was any sort of side pressure… then the end would start to dance around

Image


Image


Image


I've also used a sitting bench with a single clamp as a planning stop.

Image


Image


Ok, I think you've got the point. I've made do for some time now, in various different ways. I feel it's now time to get a real bench to work on. Thus begins the journey.

Here's the basic design. I will also add a leg vise, and an end vise
Image


That is all I've got for this one. I will have an update for some more progress in the coming days.
Thanks for checking it out!
 
#104 ·
Tool Well and Leg Vise

I've made some progress since the last blog entry, so I suppose I should probably update things here…

I've cut some pine up to make the bottom of my tool well. I may rabbet the ends in the future so they sit just a hair lower, but for now they do the job fine. Didn't take many pictures of progress here, as it was just cutting up a couple pine boards and laying them in the groove and on the shelf.

Image


Image


Image


The main part of of this blog post is the leg vise. I guess I might as well just jump right in with pictures

Some how I managed to not take any pictures of the work in progress with my camera… so all I've got are some phone pictures, unfortunately. And not very many.

Basically, I ripped it to width, cut it to length, and roughly cut it to shape with my circular saw. Then I planed it flat, and planed the shape to be what I wanted.
Image


Image


Yup, horrible at taking pictures sometimes.

Oh well, we continue.

I'm starting to realize how poorly documented this part of the build is…

I made another 1.5" wooden screw, and fellow LJ Mauricio was kind enough to send me an excess 3.5" hub, and also drilled a 1.5" hole in the end. I used it for my leg vise. I think he was right, 3.5" looks much better on the leg vise than 2" would have.

Anywho, I do have good picture coverage of this part. Here I'm working on making the garter plate for the leg vise out of a piece of 3/4" walnut
Image


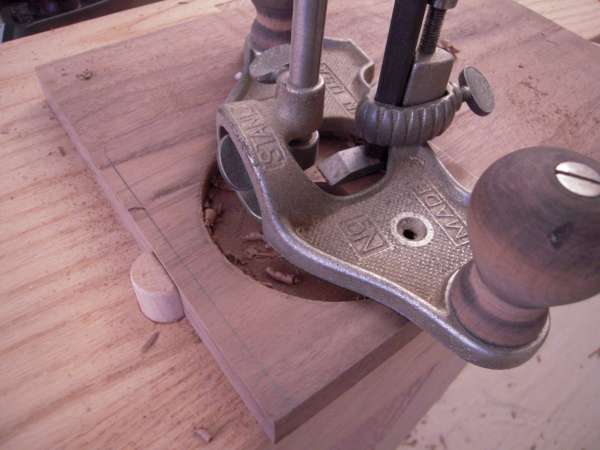
I drilled a 1" hole with a forstner bit about 3/8" deep. Enough so I could easily get the forstner bit started again with out having to use the spur in the middle. Because I then used a 3.5" hole saw, centering the pilot bit on the cone that the forstner bit spur left. I drilled down about 1/4" (I think it ended up being 3/16, or even 3/8" deep in the end, but oh well)

That established the outside edge, and then I drilled the rest of the way through the 1" hole.

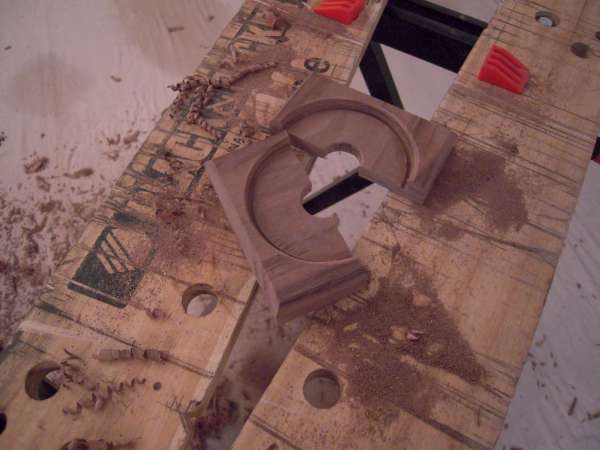
Then it was time to chisel out some of the excess waste

A quick test fit with the hub
Image


A #71 to level out the bottom
Image


And there we have it
Image


Now it's time to cut it off of the rest of the piece of walnut
Image


Image


Image


And cut it in half so I can get it around the screw
Image


And there she is (And yes, the screw placement was intentional based on the grain patterns of the chop. I also cut the chop to size with that as the intended result)
Image


Image


Then, it was time to drill out the back leg, so the leg vise screw could pass through it, so as to not limit my leg vise to a capacity of 5"
Image


Image


Then drilled a hole at the bottom of the leg for the parallel guide
Image


And made another screw (threaded dowel, I suppose) for the parallel guide. I drilled a 1.5" deep hole in the 2" thick vise chop, and then tapped it so I could thread the parallel guide screw in place, and still remove it if I have to.

And here's the parallel guide screw, and the walnut nut
Image


And with that, it was time to give it a test
Image


Image


Also made a 1" oak handle for it. Continuing the theme of "alternating" oak and maple (wagon vise was maple end cap, oak garter plate, maple hub, oak handle. Leg vise is oak chop, maple hub, oak handle)
Image


It does actually close all the way even with the 3/4" thick nut still on it. So that makes me happy, in that I shouldn't have to ever remove it in use, I don't think.
Image


Out of curiosity, this is about as wide open as it'll go with the current parallel guide screw
Image


That'll probably be plenty :)
Image


Image


Thanks for checkin' it out :) This will probably be the last blog of the main bench build. I will hopefully be able to find a time to get some finish on it, but that will have to wait until a time I can do it somewhere other than in my apartment.
 

Attachments

#105 ·
Tool Well and Leg Vise

I've made some progress since the last blog entry, so I suppose I should probably update things here…

I've cut some pine up to make the bottom of my tool well. I may rabbet the ends in the future so they sit just a hair lower, but for now they do the job fine. Didn't take many pictures of progress here, as it was just cutting up a couple pine boards and laying them in the groove and on the shelf.

Image


Image


Image


The main part of of this blog post is the leg vise. I guess I might as well just jump right in with pictures

Some how I managed to not take any pictures of the work in progress with my camera… so all I've got are some phone pictures, unfortunately. And not very many.

Basically, I ripped it to width, cut it to length, and roughly cut it to shape with my circular saw. Then I planed it flat, and planed the shape to be what I wanted.
Image


Image


Yup, horrible at taking pictures sometimes.

Oh well, we continue.

I'm starting to realize how poorly documented this part of the build is…

I made another 1.5" wooden screw, and fellow LJ Mauricio was kind enough to send me an excess 3.5" hub, and also drilled a 1.5" hole in the end. I used it for my leg vise. I think he was right, 3.5" looks much better on the leg vise than 2" would have.

Anywho, I do have good picture coverage of this part. Here I'm working on making the garter plate for the leg vise out of a piece of 3/4" walnut
Image


I drilled a 1" hole with a forstner bit about 3/8" deep. Enough so I could easily get the forstner bit started again with out having to use the spur in the middle. Because I then used a 3.5" hole saw, centering the pilot bit on the cone that the forstner bit spur left. I drilled down about 1/4" (I think it ended up being 3/16, or even 3/8" deep in the end, but oh well)

That established the outside edge, and then I drilled the rest of the way through the 1" hole.

Then it was time to chisel out some of the excess waste

A quick test fit with the hub
Image


A #71 to level out the bottom
Image


And there we have it
Image


Now it's time to cut it off of the rest of the piece of walnut
Image


Image


Image


And cut it in half so I can get it around the screw
Image


And there she is (And yes, the screw placement was intentional based on the grain patterns of the chop. I also cut the chop to size with that as the intended result)
Image


Image


Then, it was time to drill out the back leg, so the leg vise screw could pass through it, so as to not limit my leg vise to a capacity of 5"
Image


Image


Then drilled a hole at the bottom of the leg for the parallel guide
Image


And made another screw (threaded dowel, I suppose) for the parallel guide. I drilled a 1.5" deep hole in the 2" thick vise chop, and then tapped it so I could thread the parallel guide screw in place, and still remove it if I have to.

And here's the parallel guide screw, and the walnut nut
Image


And with that, it was time to give it a test
Image


Image


Also made a 1" oak handle for it. Continuing the theme of "alternating" oak and maple (wagon vise was maple end cap, oak garter plate, maple hub, oak handle. Leg vise is oak chop, maple hub, oak handle)
Image


It does actually close all the way even with the 3/4" thick nut still on it. So that makes me happy, in that I shouldn't have to ever remove it in use, I don't think.
Image


Out of curiosity, this is about as wide open as it'll go with the current parallel guide screw
Image


That'll probably be plenty :)
Image


Image


Thanks for checkin' it out :) This will probably be the last blog of the main bench build. I will hopefully be able to find a time to get some finish on it, but that will have to wait until a time I can do it somewhere other than in my apartment.
Top shelf workmanship Mos, a definite favorite.

Thanks for posting the process of your fine bench.
 

Attachments

#113 ·
Tool Well and Leg Vise

I've made some progress since the last blog entry, so I suppose I should probably update things here…

I've cut some pine up to make the bottom of my tool well. I may rabbet the ends in the future so they sit just a hair lower, but for now they do the job fine. Didn't take many pictures of progress here, as it was just cutting up a couple pine boards and laying them in the groove and on the shelf.

Image


Image


Image


The main part of of this blog post is the leg vise. I guess I might as well just jump right in with pictures

Some how I managed to not take any pictures of the work in progress with my camera… so all I've got are some phone pictures, unfortunately. And not very many.

Basically, I ripped it to width, cut it to length, and roughly cut it to shape with my circular saw. Then I planed it flat, and planed the shape to be what I wanted.
Image


Image


Yup, horrible at taking pictures sometimes.

Oh well, we continue.

I'm starting to realize how poorly documented this part of the build is…

I made another 1.5" wooden screw, and fellow LJ Mauricio was kind enough to send me an excess 3.5" hub, and also drilled a 1.5" hole in the end. I used it for my leg vise. I think he was right, 3.5" looks much better on the leg vise than 2" would have.

Anywho, I do have good picture coverage of this part. Here I'm working on making the garter plate for the leg vise out of a piece of 3/4" walnut
Image


I drilled a 1" hole with a forstner bit about 3/8" deep. Enough so I could easily get the forstner bit started again with out having to use the spur in the middle. Because I then used a 3.5" hole saw, centering the pilot bit on the cone that the forstner bit spur left. I drilled down about 1/4" (I think it ended up being 3/16, or even 3/8" deep in the end, but oh well)

That established the outside edge, and then I drilled the rest of the way through the 1" hole.

Then it was time to chisel out some of the excess waste

A quick test fit with the hub
Image


A #71 to level out the bottom
Image


And there we have it
Image


Now it's time to cut it off of the rest of the piece of walnut
Image


Image


Image


And cut it in half so I can get it around the screw
Image


And there she is (And yes, the screw placement was intentional based on the grain patterns of the chop. I also cut the chop to size with that as the intended result)
Image


Image


Then, it was time to drill out the back leg, so the leg vise screw could pass through it, so as to not limit my leg vise to a capacity of 5"
Image


Image


Then drilled a hole at the bottom of the leg for the parallel guide
Image


And made another screw (threaded dowel, I suppose) for the parallel guide. I drilled a 1.5" deep hole in the 2" thick vise chop, and then tapped it so I could thread the parallel guide screw in place, and still remove it if I have to.

And here's the parallel guide screw, and the walnut nut
Image


And with that, it was time to give it a test
Image


Image


Also made a 1" oak handle for it. Continuing the theme of "alternating" oak and maple (wagon vise was maple end cap, oak garter plate, maple hub, oak handle. Leg vise is oak chop, maple hub, oak handle)
Image


It does actually close all the way even with the 3/4" thick nut still on it. So that makes me happy, in that I shouldn't have to ever remove it in use, I don't think.
Image


Out of curiosity, this is about as wide open as it'll go with the current parallel guide screw
Image


That'll probably be plenty :)
Image


Image


Thanks for checkin' it out :) This will probably be the last blog of the main bench build. I will hopefully be able to find a time to get some finish on it, but that will have to wait until a time I can do it somewhere other than in my apartment.
Sweet bench there, outstanding work. I know it is very satisfying to get one of these finished, it is a major process. Your work will really improve once you start using it.
 

Attachments