Precisely setting up the Freud 99-034 Lock Miter Bit regardless of thickness
Introduction
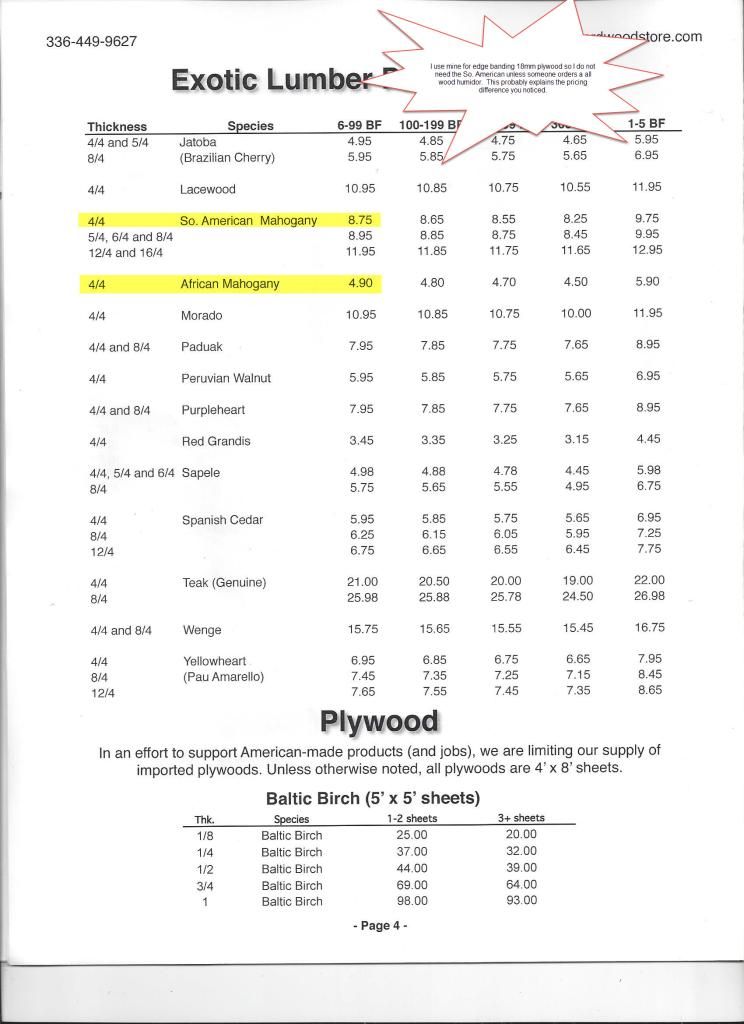
Just to let you know, three months ago I was a woodworking novice … seriously novice. So green in fact that I did not realize it is completely impossible to setup one of these bits with a Lowe's Bosch Adjustable Router Table. So, I purchased some JessEm products and a Wixey Digital Height Gauge with Fractions. I then began the process of working with a lock miter bit. I started with a Katana Lock Miter Router Bit (#17850) and their setup block (#9755). The problem being that the block is setup for only ½" and 11/16" stock. I work with varying stock thicknesses. So, this was no solution for me. Next I purchased the Freud 99-034 lock miter bit and the Sommerfeld 's Easy Set Up Jig for Freud Bits. This is one quality tool as it works with 8 Freud bits and accommodates stock thicknesses from 23/32" to 1-3/16" in increments of 1/128th of an inch. I thought I had it made. However, I did not. It was very, very close … but not precise enough to risk 5 board feet of Mahogany ($4.90/bf * 5 bf = $24.50 plus a drive to Gibsonville, NC to replenish my inventory). There has to be a way to do this precisely, for any given material thickness.
The Way
I researched dimension information about the 99-034 and could find nothing, so I borrowed my son's (a mechanical engineer) caliper (1/1000" accuracy) and got to work.
Step 1: Obtain accurate dimensions of the bit itself
I ran the bit through the router table with the fence set so that the entire profile of the bit registered on the plywood. I also referenced the 99-034 instructions and found the exact center point of the bit. Then found the following:
A. Total Bit Height: 1.160"
B. Bit Height above center point: .650"
C. Bit Height below center point: .50:
D. Thickness of 11/16" stock: .6875"
E. Center point of 11/16" stock: .34375"
(http://drive.google.com/file/d/0BzuGM0X0_h52dVN6MkpDbWdDdXM/view?usp=sharing)
Step 2: Calculating bit height
Just by trial and error I determined that the approximate bit height for 11/16" stock was .975". However, that was not close enough. When performing the test (see below) the height difference was still noticeable.
Notice that when you raise and lower the bit height, the distance that remains constant is the bit height above the center point of the board. What varies is the distance below the center point of the board to the top of the router table. So, the bit height has to be:
.650" + (.50" - ½ of the material thickness)
Or, for my situation
.650 + (.50-.34375) = .80624"
I knew I had it when the result was very close to .975 but just a little bit higher.
Step 3: The Test
1. Go to Lowe's and ask for four of their thick paint sticks
2. Rip two of them to the exact thickness of your material
3. Set the fence close to the point where the fence face meets with the top of the material thickness.
4. Run a stick through the bit and adjust the fence so that the bit just barely kisses the upper edge of the stick.
5. Do the same with the second stick.
6. Flip one stick over and fit the two together.
7. For me, I achieved a perfect alignment for the very first time.
(http://drive.google.com/file/d/0BzuGM0X0_h52WEd3UWlBR3piZEU/view?usp=sharing)
Conclusion
A perfect setting and not one expensive piece of wood harmed in the process. Comments welcome …
Introduction
Just to let you know, three months ago I was a woodworking novice … seriously novice. So green in fact that I did not realize it is completely impossible to setup one of these bits with a Lowe's Bosch Adjustable Router Table. So, I purchased some JessEm products and a Wixey Digital Height Gauge with Fractions. I then began the process of working with a lock miter bit. I started with a Katana Lock Miter Router Bit (#17850) and their setup block (#9755). The problem being that the block is setup for only ½" and 11/16" stock. I work with varying stock thicknesses. So, this was no solution for me. Next I purchased the Freud 99-034 lock miter bit and the Sommerfeld 's Easy Set Up Jig for Freud Bits. This is one quality tool as it works with 8 Freud bits and accommodates stock thicknesses from 23/32" to 1-3/16" in increments of 1/128th of an inch. I thought I had it made. However, I did not. It was very, very close … but not precise enough to risk 5 board feet of Mahogany ($4.90/bf * 5 bf = $24.50 plus a drive to Gibsonville, NC to replenish my inventory). There has to be a way to do this precisely, for any given material thickness.
The Way
I researched dimension information about the 99-034 and could find nothing, so I borrowed my son's (a mechanical engineer) caliper (1/1000" accuracy) and got to work.
Step 1: Obtain accurate dimensions of the bit itself
I ran the bit through the router table with the fence set so that the entire profile of the bit registered on the plywood. I also referenced the 99-034 instructions and found the exact center point of the bit. Then found the following:
A. Total Bit Height: 1.160"
B. Bit Height above center point: .650"
C. Bit Height below center point: .50:
D. Thickness of 11/16" stock: .6875"
E. Center point of 11/16" stock: .34375"
(http://drive.google.com/file/d/0BzuGM0X0_h52dVN6MkpDbWdDdXM/view?usp=sharing)
Step 2: Calculating bit height
Just by trial and error I determined that the approximate bit height for 11/16" stock was .975". However, that was not close enough. When performing the test (see below) the height difference was still noticeable.
Notice that when you raise and lower the bit height, the distance that remains constant is the bit height above the center point of the board. What varies is the distance below the center point of the board to the top of the router table. So, the bit height has to be:
.650" + (.50" - ½ of the material thickness)
Or, for my situation
.650 + (.50-.34375) = .80624"
I knew I had it when the result was very close to .975 but just a little bit higher.
Step 3: The Test
1. Go to Lowe's and ask for four of their thick paint sticks
2. Rip two of them to the exact thickness of your material
3. Set the fence close to the point where the fence face meets with the top of the material thickness.
4. Run a stick through the bit and adjust the fence so that the bit just barely kisses the upper edge of the stick.
5. Do the same with the second stick.
6. Flip one stick over and fit the two together.
7. For me, I achieved a perfect alignment for the very first time.
(http://drive.google.com/file/d/0BzuGM0X0_h52WEd3UWlBR3piZEU/view?usp=sharing)
Conclusion
A perfect setting and not one expensive piece of wood harmed in the process. Comments welcome …