Grain direction
A lot of tutorials seem to start with the mechanical parts of the project, rather than some of the planning or layout stages. Stefang asked about information for gluing up blocks for carving so I thought I would do a few blogs about this stage of carving, the preparation of materials before you carve.
Wood is a moving, changing material, and certain aspects such as density, moisture content, grain, and size can affect the design of a project. I am no expert, so feel free to disagree with anything that you feel you have a different slant on; I am not too old to learn new tricks! This entry will be primarily about smaller 3-dimensional carvings, "in-the-round" carvings and I'll talk about larger carvings and glue-ups in other etries..
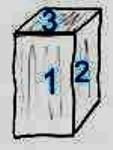
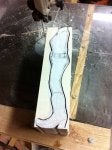
For smaller carvings like this, you want to take advantage of how the grain runs in a particular piece of wood. If you look a small blocks of kiln dried wood you will be able to see the growth rings. For most carvings, you want to have the end grain (3) at the top and bottom of the blanks. The end grain is more difficult to carve into, it doesn't hold details as well, and it absorbs stains, paints, and finishes like a sponge. It can absorb so much and turn so dark that you can no longer see the details you so laboriously carved. You want the grain to run up and down (1). You are working with a section of a tree, so the growth rings may show up as almost a straight line, a slight arc, or shallow C shaped lines when viewed from the end.
![Image]()
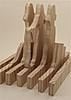
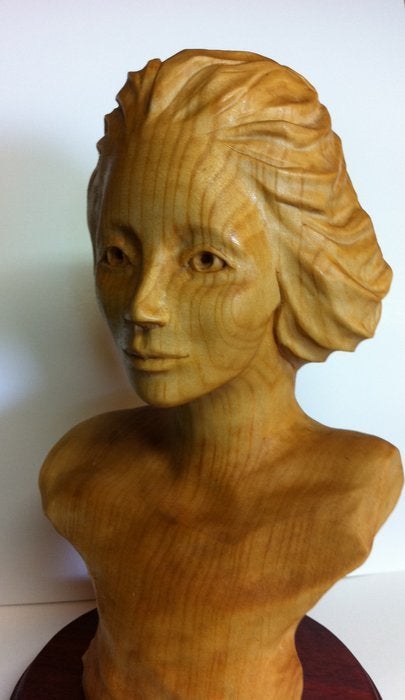
The color number and size all depends on the size of the tree and the type of wood it was cut from. If you are carving a face, you can orient those lines to run from the front of the piece to the back, which is essentially placing the outside (where the bark grew) to one side (2) and the inner heartwood side to the other. This puts the "shorter" grain on the sides of the face, where sturdier, thicker elements like ears and hair are carved. If you put the short grain on the front of the face, it makes it easier to accidently split off the end of a nose or an eye lid or other delicate features, because of how the grain runs. This doesn't mean you can't do it another way and have it turn out great! It is just something to be aware of with an organic material like wood. The growth rings are very pronounced in the basswood below and you can easily see the lines running verically from the front. But you can see in a slight profile view how you have sections like the ends of the hair and edge of the cheek and eye socket where the grain is very short
![Image]()
![Image]()
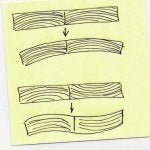
…it is quite easy to remove large chunks of wood when carving up and down in those areas. Imagine the grain turned 90 degrees and you can see how easy it would be to slice the end of the nose off! Think of it like the layers of a sheet of plywood, and keep the edge going in the direction where you need the strength most. More tomorrow!
A lot of tutorials seem to start with the mechanical parts of the project, rather than some of the planning or layout stages. Stefang asked about information for gluing up blocks for carving so I thought I would do a few blogs about this stage of carving, the preparation of materials before you carve.
Wood is a moving, changing material, and certain aspects such as density, moisture content, grain, and size can affect the design of a project. I am no expert, so feel free to disagree with anything that you feel you have a different slant on; I am not too old to learn new tricks! This entry will be primarily about smaller 3-dimensional carvings, "in-the-round" carvings and I'll talk about larger carvings and glue-ups in other etries..
For smaller carvings like this, you want to take advantage of how the grain runs in a particular piece of wood. If you look a small blocks of kiln dried wood you will be able to see the growth rings. For most carvings, you want to have the end grain (3) at the top and bottom of the blanks. The end grain is more difficult to carve into, it doesn't hold details as well, and it absorbs stains, paints, and finishes like a sponge. It can absorb so much and turn so dark that you can no longer see the details you so laboriously carved. You want the grain to run up and down (1). You are working with a section of a tree, so the growth rings may show up as almost a straight line, a slight arc, or shallow C shaped lines when viewed from the end.
The color number and size all depends on the size of the tree and the type of wood it was cut from. If you are carving a face, you can orient those lines to run from the front of the piece to the back, which is essentially placing the outside (where the bark grew) to one side (2) and the inner heartwood side to the other. This puts the "shorter" grain on the sides of the face, where sturdier, thicker elements like ears and hair are carved. If you put the short grain on the front of the face, it makes it easier to accidently split off the end of a nose or an eye lid or other delicate features, because of how the grain runs. This doesn't mean you can't do it another way and have it turn out great! It is just something to be aware of with an organic material like wood. The growth rings are very pronounced in the basswood below and you can easily see the lines running verically from the front. But you can see in a slight profile view how you have sections like the ends of the hair and edge of the cheek and eye socket where the grain is very short

…it is quite easy to remove large chunks of wood when carving up and down in those areas. Imagine the grain turned 90 degrees and you can see how easy it would be to slice the end of the nose off! Think of it like the layers of a sheet of plywood, and keep the edge going in the direction where you need the strength most. More tomorrow!


")