LumberJocks Woodworking Forum banner

Delta 40-601 SS rehab help

1 reading
40K views 151 replies 38 participants last post by  MrUnix  
#1 · (Edited by Moderator)
A couple of weekends ago at a yard sale, I ran across a Delta 40-601 18" scroll saw that I couldn't resist taking home with me. It worked, but it couldn't keep a constant speed and varied from dead slow to super fast. The PO told me that it had a bad speed sensor and had already yanked it out (it was sitting on top of the machine). Other than that, it was in great shape, had it's original metal stand, a quick change kit (new - still in the box) along with about a hundred various blades (most still new in unopened packages). For $35 I figured the blades and quick change kit alone were worth it.

So, I got it home and started looking for some place to get a new sensor. Doing the research, I noticed that the majority of speed problems with these saws was not the sensor, but the 'speed control rotor' that the sensor works with to determine rotational speed. Seems they were made of some kind of bakelite material and had a habit of breaking apart. I got around to opening up the machine and sure enough, the rotor was gone, but the metal hub was still there. Grrrr.. Ok, yet another one of those parts that is no longer available. However, I did garner from my digging around the net that the sensor picked up a magnetic pulse from the rotor, so I got a wild idea to try and make one to replace it with.

The rotor is about 2" in diameter, so I got out my 2 1/4" hole saw and threw it in a drill press. I had some scrap hardwood (cherry I believe) and made the circle, then used a forstner bit to make a hole for the metal hub. I dug up a small rare earth magnet in my box-o-junk and embeded it on the edge, glued in the hub and gave it a try.

Image


To my surprise, it worked! But I'm pretty sure it's running much faster than what the speed indicator tells me, and maxed out, the thing feels like it wants to explode (way, way too fast!). However, the slowest speed it runs at is just about as slow as I would ever want to go, and I can ramp it up for larger stuff if needed.. so all in all, I'm pretty happy with it.

Image


(You can see the speed sensor installed just above the rotor)

Now.. my question for those of you in the know.. I am pretty sure that those original rotors had more than one magnet in them, but not sure how many or how big. I would love to have an original to examine, but if someone who has one of these saws could just tell me what theirs has, that would be fantastic. It's pretty easy to get to.. you just remove the four screws holding the gear box cover on the bottom and it's right there. By rotating the gears and using a piece of metal, it should be pretty easy to figure out how many embedded magnets are in the rotor.

Any help would be GREATLY appreciated!!

Cheers,
Brad
 

Attachments

#2 ·
Go to eReplacementParts.com and put in Delta Scroll Saw 40-601. They probably have the part and the4y also have a schemematic of the machine that might help. Great people and if they don't have a part, they will find one. Try'em.

Download Diagram
Fig # Part # Img Part Name Availability Price Qty
1 430031020002
Yoke
Ships in 15 - 21 business days
$229.62
2 901041500202
Set Screw Obsolete - Not Available
Discontinued
$0.00 N/A
3 430031060001
Pivot Shaft
Ships in 15 - 21 business days
$35.35
5 430034120001

Screw Assy
Ships in 15 - 21 business days
$9.06
6 430031050001

Sleeve
Ships in 15 - 21 business days
$1.28
7 905010131507

Roll Pin
Ships in 15 - 21 business days
$1.18
8 904152231506
Retaining Ring
Ships in 15 - 21 business days
$1.18
9 961030102859

Grommet
Ships in 15 - 21 business days
$3.65
10 430030890001

Blade Support Obsolete - Not Available
Discontinued
$0.00 N/A
11 901030103318S

Screw
In stock
3 available
$1.44
12 430030270002

Top Blade Clamp
Ships in 15 - 21 business days
$21.07
13 430030790002

Blade Clamp Nut
In stock
3 available
$11.57
14 905010120303
Roll Pin Obsolete - Not Available
Discontinued
$0.00 N/A
15 905010102708

Roll Pin
Ships in 15 - 21 business days
$1.51
16 908250131439

O-Ring
In stock
2 available
$2.39
Fig # Part # Img Part Name Availability Price
17 430030270003

Bottom Blade Clamp
Ships in 15 - 21 business days
$10.32
18 430030890003
Support Arm
Ships in 15 - 21 business days
$144.13
19 422250680001
Lock Knob Obsolete - Not Available
Discontinued
$0.00 N/A
21 901030100760

Cap Screw
In stock
1 available
$2.70
22 491957-00

Lock Washer Obsolete - Not Available
Discontinued
$0.00 N/A
23 901030103318S

Screw
In stock
3 available
$1.44
24 438010040080
Cable Clamp 3/8
Ships in 15 - 21 business days
$1.18
25 430030610001
Chip Blower Tube
Ships in 15 - 21 business days
$6.12
27 928060231012
Washer Obsolete - Not Available
Discontinued
$0.00 N/A
29 901030103318S

Screw
In stock
3 available
$1.44
30 430030050002
Base
Ships in 15 - 21 business days
$937.69
31 430020790001
Retainer
Ships in 15 - 21 business days
$157.67
32 908250131439

O-Ring
In stock
2 available
$2.39
33 430030380001

Bellows
Ships in 15 - 21 business days
$19.79
34 430030380002
Flapper Valve
Ships in 15 - 21 business days
$12.30
Fig # Part # Img Part Name Availability Price
35 430030790004
Bellows Retainer Obsolete - Not Available
Discontinued
$0.00 N/A
36 901030103318S

Screw
In stock
3 available
$1.44
37 430030310001
Gear Cover
Ships in 15 - 21 business days
$12.25
38 901030103318S

Screw
In stock
3 available
$1.44
39 400061310022

Speed Sensor
Ships in 15 - 21 business days
$416.74
40 901041509428S

Set Screw
Ships in 15 - 21 business days
$1.65
43 901030103318S

Screw
In stock
3 available
$1.44
45 901030408015S

Cap Screw
In stock
5 available
$2.54
46 904010101614S

Steel Washer
In stock
5 available
$1.51
47 430030550001

Blade Back Up Guide Obsolete - Not Available
Discontinued
$0.00 N/A
48 901030408015S

Cap Screw
In stock
5 available
$2.54
49 904010101614S

Steel Washer
In stock
5 available
$1.51
50 430020270005S

Hold Down Spring
In stock
2 available
$15.53
51 901041900207S

Set Screw
Ships in 15 - 21 business days
$2.54
52 902020401306

Square Nut
In stock
1 available
$1.28
Fig # Part # Img Part Name Availability Price
54 902020401303S

Square Nut
In stock
1 available
$1.51
55 430031080002

Hold Down Rod
Ships in 15 - 21 business days
$17.90
56 901030100224

Cap Screw
In stock
1 available
$1.51
57 904010101610S

Steel Washer
Ships in 15 - 21 business days
$0.36
58 430030140001

Hold Down Bracket
Ships in 15 - 21 business days
$7.68
59 430030540001

Blade Guard
Ships in 15 - 21 business days
$11.41
61 426020630001S

Table Insert Obsolete - Not Available
Discontinued
$0.00 N/A
64 430030910001
Table
Ships in 15 - 21 business days
$434.95
65 430020270003

Trunnion Clamp
Ships in 15 - 21 business days
$96.95
66 426020950001

Trunnion Half
In stock
8 available
$65.15
67 491957-00

Lock Washer Obsolete - Not Available
Discontinued
$0.00 N/A
68 901030100763

Cap Screw Obsolete - Not Available
Discontinued
$0.00 N/A
69 430033900001
Swivel Assy
Ships in 15 - 21 business days
$140.93
70 901010605770
Cap Screw
Ships in 15 - 21 business days
$0.36
71 1087640

Lock Nut
Ships in 15 - 21 business days
$1.34
Fig # Part # Img Part Name Availability Price
76 904010312925

Spec Washer
In stock
5 available
$11.50
77 951010107802S

Pointer
Ships in 15 - 21 business days
$1.26
78 904010101610S

Steel Washer
Ships in 15 - 21 business days
$0.36
79 901030103318S

Screw
In stock
3 available
$1.44
80 420011110003

Stud
Ships in 15 - 21 business days
$4.45
81 904010312925

Spec Washer
In stock
5 available
$11.50
83 438010040075

Strain Relief
Ships in 15 - 21 business days
$2.14
101 438020110017

Brush Cap
Ships in 15 - 21 business days
$7.96
101 438020070027
Brush Obsolete - Not Available
Discontinued
$0.00 N/A
 
#3 ·
"Go to eReplacementParts.com and put in Delta Scroll Saw 40-601. They probably have the part and the4y also have a schemematic of the machine that might help. Great people and if they don t have a part, they will find one. Try em."

Been there, done that :)

DeltaMachineryParts, eReplacementPartrs, toolpartsdirect, mikestools, acetool, etc.. all have them either listed as obsolete/not available or "special order".. I contacted Delta and they told me they are no longer available. I also contacted any supplier that had them listed as available but 'special order', and they all told me that they couldn't get it either. E-bay has been a bust as well. Hence my fabrication above!

Cheers,
Brad
 
#4 ·
I think that there are a couple of things that you might try. You could put a meter on the output of the sensor and see what happens when the magnet goes by. It maybe a hall effect transistor. You could then tell if the current magnet is working. If it is, I would just try adding a second magnet and see if the speed is in the proper range.

I did some searching online also and you are correct that it does not seem to be available but there are some good pictures of the sensor and the magnet with the wheel.
 
#5 ·
Brad I just pulled the bottom off my 40-601 and looked at it. There are no magnets showing but I can tell you it is magnetic all the way around it. They are not very strong though. I held a scroll saw blade lightly while rotating it looking for a non magNetic point on the wheel. Might want to try picking up some of those flexible strip magnet from like Michaels and glue it to the edge and see if that may work better. Hope this helps.
 
#6 ·
"Brad I just pulled the bottom off my 40-601 and looked at it. There are no magnets showing but I can tell you it is magnetic all the way around it. [...] Hope this helps."

Thanks a bunch for looking at your machine, however, now I'm totally confused !!!

The sensor obviously picks up some kind of magnetic signal from the rotor, as otherwise my 'fix' wouldn't be working at all.. a continuous magnetic field doesn't seem like it would offer any input at all to the sensor! Maybe they are just spaced so close to each other that it appears to be continuous.. I dunno. I think my next move is to try and find a way to measure the speed it currently runs at (at the slowest setting) and compare that to what it 'thinks' it's running at via the front indicator (40 SPM). If I can get a ratio (actual vs indicated) then I might be able to figure out how many more magnets it needs. I was hoping this would be a bit easier to figure out!

Cheers,
Brad
 
#7 · (Edited by Moderator)
If it's a hall effect sensor, I think all you need is a chunk of metal. You need to know how many lobes the original had on it. If the original had 4 lobes, and you are trying to use 1, it will run 4 times as fast. Look up how a ignition coil pickup on an 1970's vehicle works, or even the crank and camshaft sensors on modern vehicles. It's just a chunk of metal with teeth which induces a very small voltage into the winding.
 
#9 ·
sounds like I might help. I had two 601's sold 1 to a guy from work , 3 weeks later his rotor shattered
Took mine off,thinking I could turn one out on lathe .
To count magnets I used one of those hard to reach expandable magnet tools , stuck it on vise held the rotor close ,
Counted 28 pauses . Not very strong mags but easy to count
Thinking I will try hole punching some those flat icebox mags ,not sure how to apply to new rotor
 
#10 ·
Counted 28 pauses . Not very strong mags but easy to count
Thinking I will try hole punching some those flat icebox mags ,not sure how to apply to new rotor
Wow..

I know mine is running fast with just 1 magnet.. but I can't imagine that it's running 28x fiaster! Even so, it is functional as is and I've been giving it a pretty good workout lately. First scroll saw I've ever owned and I am having a lot of fun with the thing.

Thanks a zillion for taking the time to check it out. We all finally know the answer to 'how many magnets' :) I also like your idea of the fridge magnets and may give that a try to see how it goes. I'm thinking that they could be attached (glued) to the outside edge of the rotor then the whole thing covered with a couple layers of polyurethane or even painted over to help keep them in place. Maybe get fancy and fill in the gaps between magnets with some epoxy or something. Sure would be easier if I had a lathe!

Cheers,
Brad
 
#11 ·
Just an update on this..

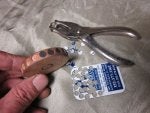
A few months ago I picked up a nice little Delta lathe (~1948 model 46-110) that I finished restoring a couple weeks ago. Came out really nice and works great, so I decided to try fabricating a better speed rotor for the scroll saw with it.. I wanted to try the refrigerator magnet idea to see if they were strong enough for the sensor to detect. I grabbed the strongest magnet I had on the fridge, which still is pretty weak as far as magnets are concerned. Then I punched them out using a standard hole punch. The punch produces a circle just a gnats hair smaller than 1/4 inch, and a 1/4 inch forstner bit was used to drill the slightly recessed holes for them to sit in. I glued them in and then coated the whole outside edge with a couple coats of polyurethane to keep everything in place.

Image


Unfortunately, it didn't work. It acted just like it did when I first got it (without a speed rotor), with the speed all over the place varying from fast to slow and back. It seems those magnets just don't have enough strength apparently. Next step is to try and find some stronger magnets. Updates to follow when I do.

Cheers,
Brad
 

Attachments

#12 ·
You might try adjusting air gap to .010. This info I found on vintagemachinery.org website under the publications reprint section scroll saws dated insert 03-10-2005. The rotor p/n 125 would have had metal spaced around it "teeth" that the sensor would "count" and send pulses generated by the "hall effect" pick-up sensor p/n/39 to the controller. Also found that this rotor was used on lathes 46-400 type1 & 2. The metal teeth are just that- metal and not magnets.
Hope that this helps.
 
#13 ·
Thanks Bob.. I have that service buliten and did set the sensor gap to 0.010" or better. Also, there appears to be some disagreement about what is actually in the rotor. You can't really tell by looking at an original one as they just look like a plain plastic disc with a metal hub. Some (like you) say it's just metal, others say it's magnets. My original attempt at making a replacement rotor used a single magnet, and it did actually work to regulate the speed.

If it is a Hall effect sensor, like I and most others believe it is, then the rotor should have magnets in it. Hall effect sensors vary the output voltage in response to a magnetic field, which kind of supports the magnet theory. However, I made a custom faceplate for the lathe to make it easier to make the rotors, so I can fab up a small batch of them and test various configurations.. magnets, different types of metal, number of them around the rotor, etc..

Cheers,
Brad
 
#15 · (Edited by Moderator)
Not to get off topic, but there are two major system types of non-contact speed detection of a rotating shaft (well, three if you include optical); inductive and active. For inductive, the magnetic field is inside the sensor and it measures the field change as a frerromagnetic rotors teeth are passed by it. Active sensors use a Hall effect transistor to vary it's output voltage as an external magnetic field passes by it. What type is used on these scroll saws is currently unknown, but I do know that it worked when I used a magnet, which leads me to believe that it's a hall effect sensor, not an inductinve one.. but I will test both to be sure.

Cheers,
Brad
 
#17 · (Edited by Moderator)
Update.. SUCCESS!

I ordered a batch of 100 1/4" rare earth magnets from Amazon to try out in the rotor (really cheap.. just under $7 and free shipping). Apparently though, these things literally came over on a slow boat from China.. I ordered them online on October 20th and just got them yesterday (November 17th).. and the labels on the envelope (in both english and chinese) were marked "China Post"! Heck, I don't care.. they were cheap and I wasn't in any real hurry.

So I made up a rotor to test, installed the magnets and threw it in.. and it worked great. It's a completely different machine now and runs like new. So for anyone with one of these saws with a busted rotor, there is hope! Even though the stock rotors are no longer available, one can be made fairly easily for a couple of bucks. Thanks to everyone who helped me solve this problem! It would have been a big green paper weight without the assistance.

Cheers,
Brad

PS: As an added bonus, using the much stronger rare earth magnets makes the air gap setting between the sensor and rotor completely non-critical. I forgot to adjust the sensor when I tested the new rotor, and there was about a 1/8" or larger gap.. still worked great and moving the sensor closer had absolutely no effect on how it ran. Kind of makes sense, as rare earth magnets were very, very expensive back when these machines were made, so they most likely used much weaker ceramic magnets which required closer placement.
 
#18 ·
Mr. Unix, I purchased this scroll saw in 1988 and enjoyed it until a few years ago when the speed started varying uncontrollably. I left it alone until last week, when I disassembled it and discovered the Speed Sensor Rotor in pieces. I then started the web search for replacement parts and discovered your post. I am going to try your repair as the rest of the saw is in excellent condition. I am going to order the "slow boat from China" magnets but I am unsure what glue to use. What did you use to glue the magnets and how did you attach the the replacement rotor to the existing shaft? I would appreciate any info. and suggestions.

Image
 
#19 ·
You can probably use any glue you like.. I just used regular wood glue (titebond). I drilled 1/4" holes about 1/16" deep with a forstner bit just like shown in my post up towards the top of this thread. Once they were glued in, I made sure they would not come out by coating the outer edge with a couple coats of polyurethane which sort of sealed everything in place. Initially when testing, I just wrapped the outer edge with some electrical tape and that worked just fine as well. One tip that might be useful: I found that the interaction between magnets made them want to flip and pop out occasionally when trying to put another one next to it.. so I cut down some stick pins from my wifes sewing box and stuck them in each hole with the head slightly sunk into the wood.. this gave the magnets something to stick to while I was installing them.

As for securing to the shaft, you can re-use the metal hub from the original rotor like I did with my first prototype (with one magnet). What I eventually wound up doing was to make a wooden faceplate for my lathe with a 3/8" bolt centered on it. I drilled a 3/8" hole in a wood blank, mounted it on the faceplate and then turned it on that.. which ensured that the rotor was perfectly centered around the shaft. I started out with about a 1" thick piece of stock and made an extended hub that I could then drill and tap for a set screw (#8-32) that I made from a spare screw (just cut the head off and use dremel to make a screwdriver slot):

Image


After drilling and taping, I sanded the hub down so the whole thing was just a bit shy of 3/4" thick, which is about as wide as you can go without running into clearance problems. It fits pretty snug on the shaft anyway, and with the set screw lightly tightened against the flat spot on the shaft, it ain't going anywhere.

Cheers,
Brad
 

Attachments

#22 ·
Thanks Jeb (and Jeff!),

The rotor really needs 28 magnets, but because I bought 1/4" ones, there is no way to fit that many on a 2" diameter rotor (you can maybe get 24 or thereabouts if you place them really, really close to each other). Since my lathe has 60 indexing holes, I just went with 20 to make things easier. It still works just fine, although it does run slightly faster than what the front indicator says it is.. which I haven't found to be a problem at all so far. The slowest speed it can be set to is 40 spm which is way, way to slow for anything I can think of doing, and with the 20 magnet rotor, it is still way too slow for any useful work (probably closer 60 spm with the replacement rotor). And the upper end of the speed range is well beyond anything I would want to use, so even with the replacement rotor, there is a nice wide speed range available.

I've thought about ordering some 1/8" magnets and trying to make some with 28, but since the one I have works so well, I'm not all that motivated and would rather just cut wood :) As for making extras and selling them, I'm not sure there is much of a demand.. but if enough people express an interest, it wouldn't be too much trouble to crank out a few extras.

Cheers,
Brad
 
#23 ·
Image


This thread gave me a little inspiration to tackle the broken rotor on my scroll saw. I used the original hub from the rotor and 1/2" plywood. I used 24 magnets because that's what came in the package I bought. I'm not really concerned with the accuracy of the readout, so long as the speed is stable. I put the magnets on edge to allow more magnets. I coated the assembly with epoxy to secure it all together.
 

Attachments

#24 · (Edited by Moderator)
I like the idea of placing them on edge like that.. did it work? Just curious because the magnetic field radiates off the faces of the magnets, not the edges (which is why I placed mine flat). Orienting them like that would solve my space problem, and I could make up a rotor with the correct number of magnets (if and when I get the motivation to mess with it more)!

Cheers,
Brad