Charles Neil - CHARLES NEILS BLOTCH CONTROL at last (Rating: 5)
Hey friends and neighbors
I received my can of Charles Neils Blotch control almost a week ago and I have been waiting to give it a try due to my work schedule
I decided to give it a go on some poplar knowing it's one of the worst woods to blotch when stain is applied.
I sanded this six quarter piece of poplar as I would preparing for staining for all woods I'm about to finish going through the grits up to 220 grit as the instructions suggest. I then applied a first coat of blotch control by just wiping it on and let dry for an hour (again as the instructions say to do) sanded with 320 grit and then cleaned it off and applied the second coat and let dry overnight. Since I have another project made of poplar that I wanted to use my General finishes vintage cherry water base dye stain on I decided to use it on the test.
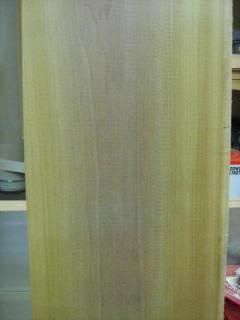
Here's the back side of the poplar board the front had very large areas of sap wood

I then started to apply a liberal amount of the stain to both of the treated and non treated wood. and wiped off the excess as is normal
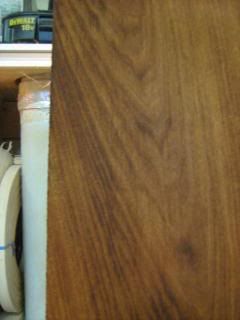
here's the top of the board that was not treated with Charles blotch control

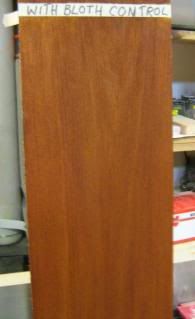
here's the bottom of the board that was treated with Charles blotch control.

WOW I could not believe my eyes I saw it on line but now in person it looks like a cherry board joined to a blotchy horrible piece of wood. But wait there's more WERE DID THE SAP WOOD GO it all colored as if there was no sap wood. I could'nt believe my eyes.
What this means is for the cost of Charles blotch control I can use poplar or pine and make it look like anything I want. This will save a bundle in wood cost.
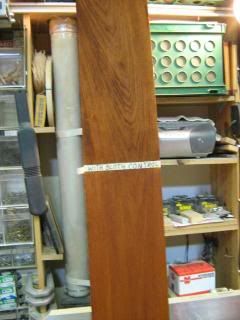
Here's a photo of top and bottom in a long shot. The top is without blotch control and the bottom was treated with blotch control.

Charles rides again not only is he a great builder of furniture plus the master of finishing but now a great inventor of a product that makes our projects look like high priced woods when there not.
Everyone familiar with me knows I'm a big fan of Charles and even though we have never met I consider him a good friend. But that in no way had anything to do with rating this great blotch control a five star product.
It's great and I plan getting much more . Give it a try you'll be glad you did.
Thanks Charles for solving this problem for us all
Here's Charles video about it.
Here's were you can get it.
http://shop.charlesneilwoodworking.com/Finishing-Products_c_11.html
Hey friends and neighbors
I received my can of Charles Neils Blotch control almost a week ago and I have been waiting to give it a try due to my work schedule
I decided to give it a go on some poplar knowing it's one of the worst woods to blotch when stain is applied.
I sanded this six quarter piece of poplar as I would preparing for staining for all woods I'm about to finish going through the grits up to 220 grit as the instructions suggest. I then applied a first coat of blotch control by just wiping it on and let dry for an hour (again as the instructions say to do) sanded with 320 grit and then cleaned it off and applied the second coat and let dry overnight. Since I have another project made of poplar that I wanted to use my General finishes vintage cherry water base dye stain on I decided to use it on the test.
Here's the back side of the poplar board the front had very large areas of sap wood

I then started to apply a liberal amount of the stain to both of the treated and non treated wood. and wiped off the excess as is normal
here's the top of the board that was not treated with Charles blotch control

here's the bottom of the board that was treated with Charles blotch control.

WOW I could not believe my eyes I saw it on line but now in person it looks like a cherry board joined to a blotchy horrible piece of wood. But wait there's more WERE DID THE SAP WOOD GO it all colored as if there was no sap wood. I could'nt believe my eyes.
What this means is for the cost of Charles blotch control I can use poplar or pine and make it look like anything I want. This will save a bundle in wood cost.
Here's a photo of top and bottom in a long shot. The top is without blotch control and the bottom was treated with blotch control.

Charles rides again not only is he a great builder of furniture plus the master of finishing but now a great inventor of a product that makes our projects look like high priced woods when there not.
Everyone familiar with me knows I'm a big fan of Charles and even though we have never met I consider him a good friend. But that in no way had anything to do with rating this great blotch control a five star product.
It's great and I plan getting much more . Give it a try you'll be glad you did.
Thanks Charles for solving this problem for us all
Here's Charles video about it.
Here's were you can get it.
http://shop.charlesneilwoodworking.com/Finishing-Products_c_11.html


