$5 Incremental Stop Block
I think this is pretty cool. It is more than an incremental positioner. It is a removable stop block that can be replaced exactly where it was, or any distance from that original spot. The increment is every 1/32 inch, with micro adjust. I am still playing with the idea, and would appreciate any comments.
.
![Image]()
.
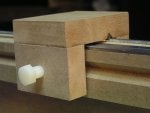
OK, the threaded rods on top of the fence and inside the stop block do not move. The threads on them just lock into each other, and then the plastic bolt is tightened. The threads just really need to engage, and do not need to be tightly pressed against each other. The rod size is 10-32: size 10, 32 teeth per inch. This is also called Fine Pitch, and can be hard to find in rod form. Do not use 10-24, but 8-32 maybe easier to find (but it is a little thinner). Rod size 10-32 is easy to buy online.
.
![Image]()
.
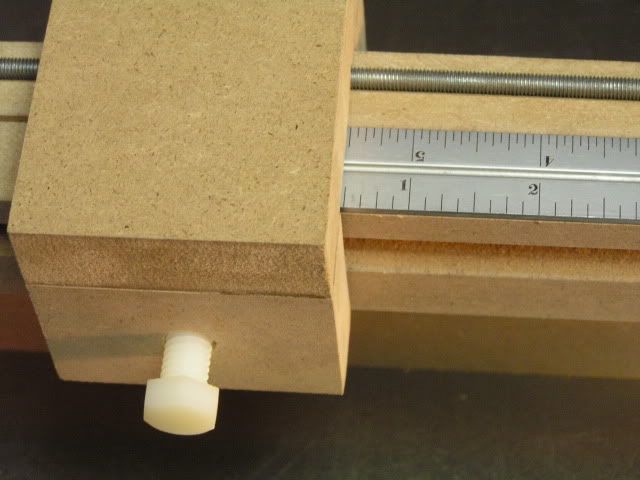
I ran a groove down the top of the fence for the rod to sit in. The rod is just proud of the groove when it is laying in it. I added maple plates on the ends. The hole through the plate furthest from the blade is tapped (threaded) and the one closest to the blade is just barely large enough for the rod to pass through. I installed these plates on the rod, and then glued the plates to the fence.
.
![Image]()
.
I added a stiffener to the back of the fence with magnets to hold a ruler. This allows the scale to be moved depending on the situation, the fence angle, etc.
.
I added a double wing nut contraption to be able to micro-adjust the rod. The rod is fairly hard to turn (which is good, and planned), and this allowed me to turn it both directions, as the nuts lock into each other.
.
![Image]()
.
The short rod that is in the groove on the stop block is glued into place. I tapped a hole for the plastic locking bolt. I tried a knob here, but it bumped into my miter gauge knob. And I added a hinge to allow it to be flipped up for cutoffs. But I guess you really don't need this on a removable stop, I just happen to have a bunch of wooden hinges")
.
![Image]()
.
![Image]()
.
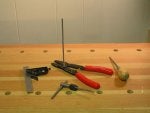
To be able to cut threaded rod like this, you need a screw cutter. I use a tool like the one shown. I thread the rod into it and squeeze like hell to cut it. A little bit of fine sandpaper eases the edges.
.
![Image]()
.
Here is a photo of my first test cuts. I set the stop block to 1 inch, and ran the blade through. I then repeatedly removed the stop block, turned myself in a circle to make sure I was not cheating, repositioned the bock 1/4 inch away, and did another cut. Pudding = Proof.
.
![Image]()
.
I believe this has potential for various other positioners. My brain is also working on a router fence with this concept.
Steve
Note: at the redo of the pictures, I found two more of the slidy thing.
.
![Image]()
.
![Image]()
I think this is pretty cool. It is more than an incremental positioner. It is a removable stop block that can be replaced exactly where it was, or any distance from that original spot. The increment is every 1/32 inch, with micro adjust. I am still playing with the idea, and would appreciate any comments.
.
.
OK, the threaded rods on top of the fence and inside the stop block do not move. The threads on them just lock into each other, and then the plastic bolt is tightened. The threads just really need to engage, and do not need to be tightly pressed against each other. The rod size is 10-32: size 10, 32 teeth per inch. This is also called Fine Pitch, and can be hard to find in rod form. Do not use 10-24, but 8-32 maybe easier to find (but it is a little thinner). Rod size 10-32 is easy to buy online.
.
.
I ran a groove down the top of the fence for the rod to sit in. The rod is just proud of the groove when it is laying in it. I added maple plates on the ends. The hole through the plate furthest from the blade is tapped (threaded) and the one closest to the blade is just barely large enough for the rod to pass through. I installed these plates on the rod, and then glued the plates to the fence.
.
.
I added a stiffener to the back of the fence with magnets to hold a ruler. This allows the scale to be moved depending on the situation, the fence angle, etc.
.
I added a double wing nut contraption to be able to micro-adjust the rod. The rod is fairly hard to turn (which is good, and planned), and this allowed me to turn it both directions, as the nuts lock into each other.
.
.
The short rod that is in the groove on the stop block is glued into place. I tapped a hole for the plastic locking bolt. I tried a knob here, but it bumped into my miter gauge knob. And I added a hinge to allow it to be flipped up for cutoffs. But I guess you really don't need this on a removable stop, I just happen to have a bunch of wooden hinges
.
.
.
To be able to cut threaded rod like this, you need a screw cutter. I use a tool like the one shown. I thread the rod into it and squeeze like hell to cut it. A little bit of fine sandpaper eases the edges.
.
.
Here is a photo of my first test cuts. I set the stop block to 1 inch, and ran the blade through. I then repeatedly removed the stop block, turned myself in a circle to make sure I was not cheating, repositioned the bock 1/4 inch away, and did another cut. Pudding = Proof.
.
.
I believe this has potential for various other positioners. My brain is also working on a router fence with this concept.
Steve
Note: at the redo of the pictures, I found two more of the slidy thing.
.
.